Pages

Wednesday, 29 November 2017

Revamp your bag by DT Khushboo

Good morning all you lovely crafters out there!

I'm Khushboo and I'm here with a new Inspiration Post today.


Often times, we love certain possessions of ours, and when they start showing signs of wear and tear, we are left with no option but to throw them out! That really breaks my heart. Recently, I was again faced with the same dilemma - when my favourite bag (which I haven't even used all that much :(!) started to lose its resin material from the sides. If I wasn't a crafter, with a very heavy heart I would have had to throw the bag away. But now that that's not the case, I know exactly how to give my bag a new life :D - all thanks to the Decoupage technique! Yep, today, I'll share with you how you can use decoupage on your bag and make it look as good as new!


Let's take a look at the pictures of my finished project first and I'll then explain how I managed to do that!


(My bag originally look like this. And all the brown piping and stitched boundaries that you see started to rip away.)


Pic credit: Pinterest


These are some of the pictures of my transformed bag. Notice how I decoupaged with designer paper napkins on the boundaries.


Materials used:

  1. Designed tissue paper
  2. Mod-Podge (or any other decoupage glue)
  3. Gesso
  4. White paint
  5. Paint brushes
  6. Tweezers
  7. Clean rag
  8. Water

Brief steps for transforming your old bag into new:

  • Wipe your bag with a clean cloth to get rid of the dust, dirt and grease.
  • Pluck out the ripped and lose hanging resin pieces on your bag (this is to enable that the part where you will stick the tissue is even and flat, no uneven texture).
  • Apply two coats of gesso and let it dry after every coat.
  • Paint the surface with white paint once the gesso is dry.
  • Rip small pieces of decoupage tissue according to the size of the surface you want to cover.
  • Start laying it down on the surface with the help of your paintbrush and decoupage glue.
  • Apply two coats of decoupage glue and let every coat dry thoroughly.
  • Finish it off with a nice clear varnish or spray.


Signing out,

Hope you guys enjoyed my creations and the tutorial. Can't wait to see how you add your own twist to this!


Above mentioned products are available at Rainbow Craftykari Store OR you can pre-order the products by sending an email at rainbowcraftykari@gmail.comThat's it from me, folks!


Khushboo R. Gandhi

Friday, 24 November 2017

DIY Pattern Paper and Gifting ideas Tutorial by DT Ishani

Hello everyone,


Haven't we all sometimes wished that our gifts be unique and custom made? Today I'll share with you how you could make a gift extra special with these handmade gift wrapping pattern paper ideas. 


Below is the list of material required before be begin the process.


Materials Required

  • Paper Sheets (120 gsm)
  • Stamps (of your choice)
  • Acrylic Block
  • Versamark ink
  • Embossing powder (EP)
  • Anti Static powder tool
  • Brush (to brush off stray EP)
  • Various colour Ink pads 
  • Heat Gun

1.   I started with the sheet of paper (120 gsm). I used a cake slice stamp and also the sentiment for this Pattern paper as I wanted to later turn it into a small box (with Origami) on a Birthday theme. I used few different colours to stamp the cake. Then, I used the eraser end of a pencil and put similar colour polka dots around, along with few gold embossed polka dots.


2.   I took a contrasting paper (120 gsm) and used the same eraser end of a pencil to heat emboss golden polka dots. I made sure to brush off extra powder as finger prints on the paper may attract embossing powder. I suggest, that as you work your way across the sheet keep using anti-static powder to keep static away.


3. Similarly, I used different stamps to create a pattern. For the snowflakes, I used white embossing powder and for paisley, I used champagne embossing powder. Pretty simple, right!


Favour box

With my pretty papers, I thought of making a favour box. The darker paper shall be the bottom part so the size of the two sheet varies by 0.5 cm. You can change dimensions, just remember that both the sheets are square with half a centimetre difference.

1. I took a sheet that measured 22x22 cms.


2. Folded it in half.

3. Folded again to make it a quarter fold.


4. Then I opened and brought the four edges together at the middle.


5. Then I bought the outer edges and folded at a 1/4th distance at all the sides.


6. Then I opened my folds, brought two opposite sides together and tucked in the two open opposite sides.


7. Tucked in both the sides and made edges of the box.


8. Similarly, I did with the bottom part, just that the size was 21.5 x 21.5 cms.


9. I assembled them together and my paper savour box was ready.


Gift bags

Materials used

  • A4 Sized Pattern paper
  • Glue
  • Punch
  • Ribbon


1. Firstly, I folded the sheet at two places at a distance of 2 cms, that is - on only one side length and breadth.


2. Then I folded the sheet at the middle, in half.


3. I stuck the folded end with Glue at the breadth side of the sheet.


4. Then, I folded up from the bottom at a distance of 4 cms.


5.  I opened the folded part and tucked-in the sides as shown in the picture.


6. Then, I folded the upper and the lower flaps and made them overlap at the middle. Later, I stuck the flaps together with the glue.


7.  At the length, I folded the bag at about 3 cms and made a good crease.


8.  Now,  I punched the holes and put the ribbon through it for the handles.


I did a similar bag with the snowflakes pattern paper too.


Hope you will try to do something similar, and put to use your stamps in this creative way. All the  material mentioned above are available at Rainbow Craftykari Store and you can also pre-order by sending an e-mail to rainbowcraftykari@gmail.com

Happy Crafting

Ishani

Wednesday, 22 November 2017

Altered Bottles by DT Anila

Hello friends!

Don't we all like to hoard things? We not only like to buy and hoard new items but also like to collect things which can be reused/upcycled in some form or the other, with the hope of giving these junk/scrap items new life sometime. 


I have a huge collection of glass bottles, cardboard/paper boxes, invitation/greeting card, tissue paper rolls and what not.


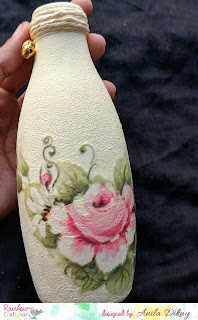
Today I am showcasing an upcycled glass bottle. This is just an inspiration for you to start using/revamping those things you have been hoarding endlessly. 


Here, I have decoupaged the (2) glass bottles to convert them into beauties to adorn your homes. They can also be given out as gifts.

Here's a look at the project -


Materials used

  • Chalk paints
  • Decoupage tissue papers
  • Sponge
  • Paper string
  • Thread and bells.


Method -
  • Firstly, remove any sticker on the bottle. Wash the bottle clean and dry it completely. 
  • Cover the bottle completely by dabbing the sponge with chalk paint over it. Let it air-dry.
  • Repeat the process to get a more uniform finish. 
  • Pick the tissue to be used and trim the design as desired. 
  • Carefully remove the backing/second ply of the tissue.
  • Apply a coat of Mod-Podge and stick the tissue over it carefully avoiding any creases. Let dry.
  • Apply a coat of Mod-Podge over the tissue paper to seal it. 
  • Tie a paper string to the neck of the bottle, covering it fully.
  • Tie a set of bells/Ghungroos with the help of a thin thread.


More pictures follow -


Hope, I could inspire you to finally start working on those things and give them a new life.

Do check out our ongoing challenge on the blog here
And do not forget to participate. 

Love,
Anila