
Showing posts with label Challenge. Show all posts
Showing posts with label Challenge. Show all posts
Wednesday 5 April 2017
RCS - March Challenge Winners
This is Aditi Here, Today we're here to announce the winners of the March Challenge Revamp your scraps.


Saturday 1 April 2017
RCS Challenge # 2 - Exploding Surprise
Hello Crafty peeps
This is NIkkita Sethi back again at Rainbow Craftykari blog with an exciting challenge for the month of April.
This month you have to create an explosion box with a twist and the Guidelines are:
Create any kind of explosion box and on any theme.
The explosion box must have minimum 2 layers and you can goes upto as many layers
The Explosion box must have an 3D object in the center. It could be cake, small jewelry box, silhouette or anything.
Your Project must be NEW.
The explosion must have an flower either inside or at the top cover, It could be handmade flower, fabric flower or mulberry flower. You can include as many
You must use minimum 2 colors from the color palette given below and Maximum 5 colors from the palette, Other shades can be used but very minimally

Please go through General Guidelines and Rules HERE. Any entry which won't be following the guidelines, will be disqualified and will be removed by the participation entries.
Rainbow Craftykari will be giving TWO Prizes for this month -
One Winner will be be selected by the DT and He/She stand a chance to win Gift Voucher worth Rs 400/- from Rainbow Craftykari Store.
Second Winner will stand a chance to win a Papericious 6"x6" paper pack
Top 3 entries will win Rainbow Craftykari badges.
*Above given guidelines are mandatory to qualify in the challenge. If any participant fails to follow the guidelines, they will be disqualify from the challenge.
It's an easy least challenge.
And for the inspiration I have created my version of explosion box. I have used "blush" collection papers from Papericious for my explosion box and made it on love theme. Love is a beautiful expression it makes one feel emotionally connected to ones who are special to us. The blush collection papers goes perfect with he challenge theme and it's specially designed for romantic theme as well. It has some vibrant, dreamy designs which goes well with the two layers and a garden of love as a center piece element in the middle of the box. I have used two main shades from the color palette and have given the slight touch of dull light yellow.
Open the box and be pleasantly surprised by layers of beauty, full of mystery and surprises.


Here is the Inspirations by our DT's and GDT's
Floral Explosion Box by GDT Karthikha
I wanted to do an explosion box that will suit any occasion, be it birthday, anniversary, love, etc. So the best option was floral! I've used all the colors from the color palette for the challenge. The different shades are seen in the patterned papers and flowers used. For more details check here https://tinyurl.com/lsmwq95

Birthday Double Surprise Explosion Box by DT Aditi Mahajan

Shaker Blooming Explosion Box by GDT Richa Maurya

Link up your projects through Inlinkz before 30th Apr'17
Excited to see your projects
All the Best !!
Wednesday 1 March 2017
RCS Challenge # 1 - Revamp your Scraps
Hello Crafters,
This is Aditi today and I'm so very thrilled to Bring First Challenge at the Rainbow Craftykari Blog, hosting the March Challenge.
The challenge of this month "Revamp your Scraps" is to alter any found object and create a piece of altered art.
This is Aditi today and I'm so very thrilled to Bring First Challenge at the Rainbow Craftykari Blog, hosting the March Challenge.
The challenge of this month "Revamp your Scraps" is to alter any found object and create a piece of altered art.

Challenge Guidelines:
- Create any altered art project.
- Use only found objects to alter and not new resources like MDF bases.
- Use any technique.
- Your Project must be New.
- Use any form of butterfly in your project. (stamped, die cut, fussy cut, 3 D sticker, anything, we want to see at least one butterfly)
- This challenge is open till 31st March, 2017.
General Guidelines:
- Be a follower of our Blog
- Like our Facebook page
- Create a new project for the challenge and link it to our blog for the current challenge. No back links allowed. You could also link it up from your social media account in case you don't have a blog.
- Link directly to the project you are submitting and not to your blog.
- Each participant is allowed upto 2 entries.
- You can use the same project to enter at a maximum of 3 challenges.
- This Challenge is currently valid for Indian participant only.
To Inspire you all, Here is my project to kick your creativity. Looking forward to your projects and good luck!

Here is the Inspirations by our GDT's
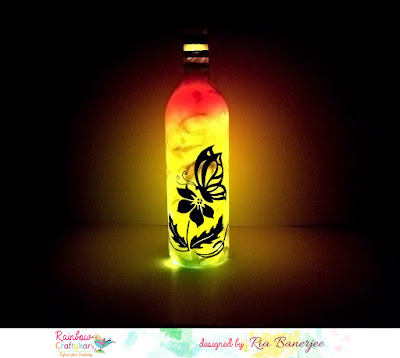
Revamp your Scrap Bottles by GDT Ria Banerjee
Revamp your Scrap Bottles by GDT Ria Banerjee
I started with Acrylic Spray Paints viz. Orange and Yellow. Make sure that the wine bottle is cleaned before applying spray on it. I sprayed yellow first, then applied orange from the top. Let it dry for an hour. Do not apply too much color as it will increase the opacity. Take black acrylic paint and draw whatever comes to your mind. I prefer silhouette image will provide the opacity and the image will come to life.Insert LED lights from the top and you are done! For more details check here https://tinyurl.com/rybgdtrb
In Second Project,
I started with white Acrylic spray paint and painted on the bottle.
I took a decoupage napkin and glued to the bottle.
I took some peacock feathers that I had in my home and some leaves to embellish.
I took mulberry flowers and glittered pollens (I made with glue and glitter) and adhered on the bottle.
I finished it with some aluminum foil, wrapping it on the neck.
For more details check here https://tinyurl.com/rybgdtrb

Altered Household Items by Guest DT Richa
To alter the pen stand, follow the same steps. Cover it with mod podge, layers of tissue paper and black gesso/acrylic paint. Leave it to dry. To embellish punch out some flowers and emboss the petals with embossing tool. I have added the button in the shape of a butterfly and have also added plastic embellishment spelling 'Dear Friend' To Make this/For More Details Click here
Revamp Old Chocolate Tray Into Home Décor by DT Pavitra
For this altered piece I used prima’s newly launched waxes and patina effect paste and I really enjoyed working with them. They are super easy to work with and instantly glam up any project. For more details click here

Subscribe to:
Posts (Atom)