
Friday 5 May 2017


Wednesday 3 May 2017
Accordion Mini Album with Vellum Hinge by GDT Mounika K
Hello Everyone
Mounika Here Again, So much excited for my inspirational post on Rainbow Craftykari blog. Today I'm going to pump up your creativity. Have made Accordion mini album which would be great way to give as a gift to your loved ones and beautiful way to store your memories. It's simple and cute to make. So I've made one for my husband with me and my son's pictures.
Let's get started!!
To start with i cut down 4*4 size Papericous sigma cardstock, I must say it's an amazing cardstock for colors and stamping and randomly colored it with different distress inks and some photo transperent inks.


While assembling i used vellum as hinge between two pages ,took hinge of 2"×1.5" vellum before sticking panels together placed velum and stuck. Finally for embellishment i stamped Mudra butterfly stamp with different colors distress inks and cut down some frame from Papericous often paper collection and assembled my mini album

Some close ups of mini album


Hope my project inspires you....
Materials used
Papericous sigma cardstock
Papericous often paper collection
Vellum sheets
Ribbon
Mudra Butterfly stamp
Distress inks
Phototransperent inks
Foam tape
All the materials listed above are available at Rainbow Craftykari Store or you can pre order them by sending an email at rainbowcraftykari@gmail.com.
Hope you got inspired to create one yourself. Do join us in the Current challenge "The Blooms Magic". Looking forward to see your entries. Happy Crafting!!
Warm Regards
Mounika K
My blog link - http://craftdrama19.blogspot.in/
My fb page - https://www.facebook.com/McCrafts/
Tuesday 2 May 2017
Quick Card Tutorial by GDT Anila & GDT Khushboo
Often times than not, we're so busy with life, that we rarely get time to create those special looking cards for the ones we love. Hence, Rainbow Craftykari and Maninder, came up with this super idea of showcasing a tutorial that encompasses some techniques that you can use for making cards in just a few minutes.
There will be a couple of cards with different techniques by me, Khushboo Gandhi, and another very talented GDT, Anila DK. Hope you guys enjoy this post as much as we enjoyed creating it for you. Can't wait to see how you put these techniques to use with your own twist on your projects!"
The following is the introduction for my cards:
"Let's begin with our first segment on quick cards in this series. As some of you must be aware, I LOVE colours! I love vibrancy and magical stuff. And I try to bring some of that spunk in my projects too. Quick cards don't always have to mean CAS style or a minimalistic style. I've come up with a couple of techniques that don't take very long to implement, ans the end result is really distinct and lively. So let's get on with our super pretty tutorial.
Colour Burst Mixed Media Card Tutorial #1


You will need:
White/off-white cardstock
Crackle paste
Ranger's alcohol inks
Vellum
Versafine Black ink pad
Sentiment stamp
Rhinestones
Directions:
White/off-white cardstock
Crackle paste
Ranger's alcohol inks
Vellum
Versafine Black ink pad
Sentiment stamp
Rhinestones
Directions:
- Dimensions of the card: 5x4 inches
- Take a white or an off-white cardstock, folded into the above dimensions.
- Add crackle paste in the background, in whatever way you wish. It should look random and not in a set square or rectangle shape. That way, your card looks edgy and different.
- Take alcohol inks in the colours of your choice and start squeezing a drop here and there (in-between spraying with water/alcohol).
- Repeat step no. 4 till you are satisfied with the colour combinations and have covered almost the whole of your crackle base.
- Take a piece of vellum for the sentiment. Stamp it with your sentiment stamp, and stick the vellum on top of the colourful crackle base. You can use any colour cardstock if you don't want to work with vellum. I've used it because I did not want that beautiful, colourful background to be hidden by the cardstock.
- Embellish with rhinestones to add an elegant touch, and voila! your card is ready in just a few minutes
Make your own background and font (card #2)


You will need:
White/off-white cardstock
Colour sprays
Glitter
Butterfly stamp
Black ink pad
Quick Directions:
- Fold the cardstock in the same way as for the above card.
- Take a few color sprays and spray them on the cardstock. The spray should be concentrated on one point on the cardstock (so that you get the splotchy effect).
- Take your card and let it drip out at one end to get rid of the extra spray color on your card. In doing so, you are allowing the colors to mix and get dragged to another end of your card (hence creating a random pattern as seen above).
- Stamp a butterfly and add glitter on it. Curve it and stick it on the card.
- I was a little bored of the pre-set sentiment stamps and fonts, and so I took my glitter bottle and stylized the sentiments myself for the words 'fly high'.
Hope you liked what I created and I can't wait for you to give these techniques a try.
Here by I'm signing Off, But this Tutorial post hasn't been finished yet, Our GDT Anila is now going to teach you some cas cards.
Warm Regards
Khuhboo Gandhi
Hello, Dear Crafters.
This is Anila Here, I am back again at the Rainbow Craftykari blog.
We come across various occasions for wishing our friends and family. One click on the smartphone and your wishes reach the person.
In this age of Whatsapp and Facebook, we often forget the joy of sending greeting cards. The emotions you attach to a digital card is not felt as much as when you send out an actual card. This way the recipient feels and knows the love and efforts you have put in making the card and thus your wishes to them also become memorable. I think we all love receiving cards.
Let us make few cards today and send them out to our family/friends.
Today in this post I am showing you three easy and quick cards, which you can make for your loved ones. The most important part here is that these cards are made with minimal supplies.
White cardstock
Black cardstock
Colourful cardstocks
Sentiment stamps
Foam adhesives
White Embossing powder (Optional)
Embossing folder (Optional)
Colorful sequins
Card 1

Directions:
- I took a plain white cardstock of size 2.5" x 5.75".
- Dry embossed this card panel through my bigshot using a cupcake embossing folder.
- On a textured card base of 4"x6", I stuck a glitter washi tape such that when the embossed panel is mounted over the card base a part of this washi tape is seen from under.
- On a white CS strip, I stamped the "Happy Birthday" sentiment. Mounted this on the card base with a little larger black strip underneath.
(Note: - The embossed panel can easily be replaced by a pattern paper if you do not own an embossing machine or folder)


Card 2

Directions:
- I took a white card panel of size 2.75" x 6".
- I mounted few colourful heart die-cuts as balloons on the panel.
- With a black marker traced the strings for the heart balloons.
- Adhered this panel on a white card base.
- Stamped the sentiment on a white strip and mounted it with foam adhesive.
(Note - The hearts can be easily hand-cut)


Card 3

Directions:
- For this card, I cut colorful strips and arranged them on the 4"x6" card base.
- I tried to maintain the color wheel concept. So first placed the primary colored strips and then overlapped them with the secondary colors. Stuck them in place. Trimmed off the extras.
- Next, I took a white card panel of size 4" x 5.5". Die-cut a heart shape on this panel.
- I mounted the negative panel with foam adhesive on the card base such that the heart cut-out overlooks the colorful strips.
- I heat embossed the sentiment with white embossing powder on a black strip. Adhered it with foam adhesive with a part of it overlapping the heart.
- Lastly, added few colored sequins to add some element to the card.
(Note - The heart can be traced and cut with a carving knife.)


Wasn't it easy to make these cards?
We all have these basic supplies lying in our house. And like I mentioned, the embossed panel can be replaced by pattern paper, the die-cuts can be replaced by hand cuts and the stamped sentiments too can be replaced by handwritten sentiments.
Just imagine the joy of making such cards and sending them to your loved ones.
Hope to see you start soon.
Thank you.
Do leave your valuable feedback in the comments below.
Regards,
Anila Dikay
Monday 1 May 2017
RCS Challenge # 3 - The Blooms Magic
Hello my Dear Friends
Pavitra here and it’s time for another challenge at our blog Rainbow Craftykari.
Who doesn’t love flowers, every feeling of ours are well defined by flowers, personally I myself love to see blooms on my projects, cards frames and so on, so for this month The Blooms Magic challenge is to create projects with handmade paper flowers. Isn't it really exciting!!

Here are the Challenge Guidelines:

- Create any project using any technique with handmade paper flowers.
- It can be made of any type of paper like filter paper, Iris cardstock, quilling paper or any Cardstock/Paper But not of ribbon, fabric or foam.
- Flowers made with the Stamped images WON'T be counted. Your Project will be counted as Invalid.
- It can be die-cut, Punch cutouts, or Hand-cut.
- The use of flowers SHOULD be CLEARLY VISIBLE.
- Your project should be absolutely NEW. Any Old Projects won't be acceptable.
- Your Project Must be in Rhythm with Handmade Flowers
Please go through General Guidelines and Rules HERE. Any entry which won't be following the guidelines, will be disqualified and will be removed by the participation entries.
Rainbow Craftykari will be giving Following Prize for this month -
One Winner will be be selected by the DT and He/She stand a chance to win Gift Voucher worth Rs 500/- from Rainbow Craftykari Store.
Top 3 entries will win Rainbow Craftykari badges to put on their blog.
Every Participant will get Participation Badge to Flaunt on their blog.
*Above given guidelines are mandatory to qualify in the challenge. If any participant fails to follow the guidelines, they will be disqualify from the challenge.
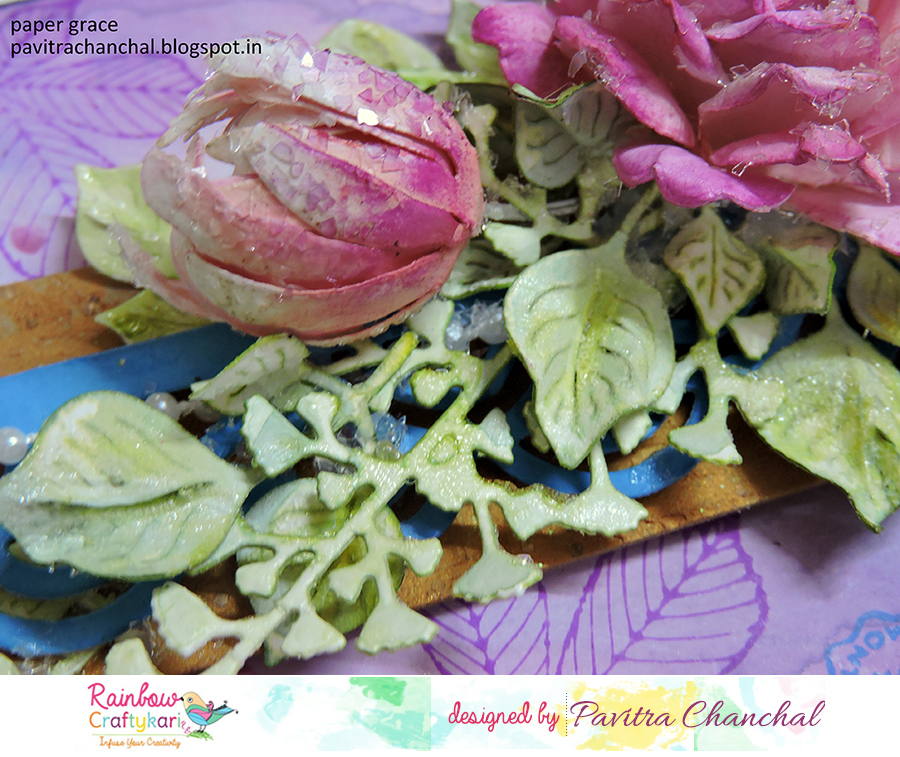
Here is my project to inspire you all. It’s a money envelope adored with beautiful flowers.

The envelope is made of colored cardstock. The base is made of iris sheet 270 GSM , I first colored it with distress inks and then stamped with various shades of archival and colorbox chalk inks.
The flowers are first die cut with iris sheet 150gsm, inked and then shaped accordingly. Finally I placed all the other elements together and finish off the flowers with glass glitter for the sparkling effect.


Material List:
Colored Cardstock - 250 - 300gsm
Iris paper 270
Iris paper 150
Archival Ink - Dark peony and Berrilicious
Distress ink - Milled lavender, Seedless preserves, Dusty concord and Chipped sapphire
Distress Re-inker - Peeled paint
Link up your projects through Inlinkz before 30th May'17
Excited to see your projects
All the Best !!
Regards
Pavitra
Paper Grace
pavitrachanchal.blogspot.in


Inspiration Projects by our DT's and GDT's
Altered Tin Can with Thank You Tag by GDT Anila Dikay
As an inspiration post, I have made two projects here today where I have used the flowers made by me. Check here for detailed Post


Beauty Inside The Blooms MM Canvas by GDT Mounika K. For more details visit here


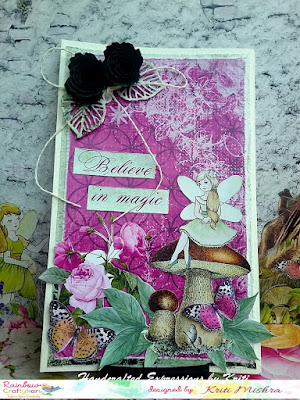
Shabby Chic Card with Handmade Flowers By GDT Kriti. For details visit here


Summer Breeze 3D Pop-up Box Album by DT Aditi Mahajan
I've created a 3D Pop-up Box Album on the theme of Summer. Relax and rejuvenate in the gardens and enjoy your vacation. For Details Click Here


Subscribe to:
Posts (Atom)