Hello Crafty friends,
A very lovely warm Good Morning to you all.
Again we are back with a new tutorial and this time we have Anushree as our Guest DT in Teaching and Learning Program. Sit back with a coffee and enjoy the tutorial.
Over to you Anushree,


A very lovely warm Good Morning to you all.
Again we are back with a new tutorial and this time we have Anushree as our Guest DT in Teaching and Learning Program. Sit back with a coffee and enjoy the tutorial.
Over to you Anushree,
Hello everyone,
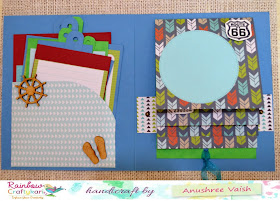
I am really happy to be on the blog once more with Teaching and learning program. This time I have experimented with something out of my comfort zone. I have tried making a travel journal .With this journal I will be showcasing different techniques like making pockets and waterfall card which can also be used in making explosion box and different styles of albums or scrapbooks. In the waterfall card I have given provision to put pictures of the trip in tags of the pocket, one can jot down his memories of the journey. So let’s begin this beautiful project.
I am really happy to be on the blog once more with Teaching and learning program. This time I have experimented with something out of my comfort zone. I have tried making a travel journal .With this journal I will be showcasing different techniques like making pockets and waterfall card which can also be used in making explosion box and different styles of albums or scrapbooks. In the waterfall card I have given provision to put pictures of the trip in tags of the pocket, one can jot down his memories of the journey. So let’s begin this beautiful project.
Here is the front cover of the journal for which I have used
some pattern paper and metal embellishments with ribbons along.
So I started with green & blue cardstock and some
pattern paper, along with some die-cuts. Sizes are mentioned in the pictures.
The blue cardstock will form my base for journal with four sides,front,back and
inside left and right.The green one is single sheet.

I started making water-fall card first. I took the green
card stock and marked it according to the sizes mentioned (In Inches) in the
pictures. I used my Martha Stewart scoreboard to do all this scoring. After
that I did mountain folding to it. Put a little glue below the first marking
and stick the pattern paper to it. The pattern paper only needs to be glued
from the top section to the card stock.

After that one by one rest three sheets of pattern paper
needs to be glued to card stock in the same way.

This is how it will look after stacking all four sheets of
pattern paper on the marked portions.

After that i folded the green cardstock keeping all patterned
paper on one side and remaining on the other. On the other side to the end make
a hole to put ribbon through it. Now I took another pattern paper with some
brads. This pattern paper is of similar size as the blue card stock and
attached to blue cardstock from one side of it.

This
is how the back cover will look after attaching both.

Meanwhile I made some tags again with pattern paper for the
pocket on the inside left hand side cover. I also made a pocket separately for
the left hand side cover. The pocket is glued to the base card stock which will
hold all the tags.

Now I took that sheet of pattern paper for the waterfall card
and glued to the green card stock.This is the only place where waterfall card
is getting stuck to the journal, else nowhere we need to glue it up.

This
is how my inside covers on both sides look like without any embellishments.

Now if we try pulling the green cardstock piece, the one
which has hole in it, rest pattern paper will start showing a water fall
effect. I am not sure if photos can justify the effect but honestly it’s a
lovely effect which one should definitely try.

After
that I started putting some mdf embellishments on the left hand side and some
hand stamped travel related images along with the die-cuts on the right hand side.That completes my
journal.

This
is how it looks finally.

I really enjoyed making this
one.Hope you will enjoy it too. For any queries please feel free to ask.
Here is the list of supplies
I have used for this project:
1.Cardstock
2.Pattern Paper from
Imaginisce
3.Some metal embellishments
and MDF cutouts.
Above listed Materials are available at Rainbow Craftykari Store or you can pre-order.
Thanks a lot Team Rainbow Craftykari for giving me this
opportunity
Regards,
Anushree


Beautiful journal with a nice tutorial Anu 😊
ReplyDeletebeautiful
ReplyDeleteWonderful, just love it Anu! Every instruction is so clear and informative!
ReplyDeleteLoved this journal Anushree, and the tutorial is fab. Sure going to make one😊👍🏼
ReplyDeleteThank u,Reading lovely comments from u all just made my day!!Hugs
ReplyDelete