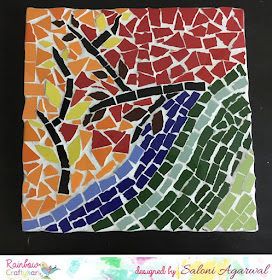
I am back on the Rainbow Craftykari blog with another fun project.This is the first time I have explored Mosiac art and I am happy with the result I have achieved.
A mosaic is a piece of art or image made from the assemblage of small pieces of coloured glass, stone, tiles or other materials. It is often used in decorative art or as interior decoration. Most mosaics are made of small, flat, roughly square, pieces of stone or glass of different colours, known as Tesserae.
In this tutorial, I will be showing you how to create mosaic art with tiles. I have made a wall hanging, but the technique can also be used for different projects.
Here's a look at creation:
1. Select the material you wish to use. Pieces of material used in a mosaic art are called tesserae. They can be glass, stones tiles, pebbles, or anything else you can find. You will also want to gather together any objects you might want to include.
2. Pick the base to adhere the mosaic tiles on. Tables, planters, wooden, or glass are just a few ideas to use.
3. Draw the pattern you wish to make into a mosaic.
4. Transfer the design to your base. Lay it on a flat surface and roughly lay the tesserae. Use glass or tile cutting tools to cut pieces to the desired size. You can also use a hammer to break pieces as well. Make sure the pieces are clean of any dirt before laying them out. Paste all the pieces and let it dry.
7. Let the grout set for some time. Wipe the mosaic with a clean sponge and warm water. Rinse out the sponge regularly as you wipe away grout from the surface of the tiles. This is to remove the grout from the surface of the tesserae so that it remains smooth and levels with the edges of the tesserae.
1. Select the material you wish to use. Pieces of material used in a mosaic art are called tesserae. They can be glass, stones tiles, pebbles, or anything else you can find. You will also want to gather together any objects you might want to include.
2. Pick the base to adhere the mosaic tiles on. Tables, planters, wooden, or glass are just a few ideas to use.
3. Draw the pattern you wish to make into a mosaic.
4. Transfer the design to your base. Lay it on a flat surface and roughly lay the tesserae. Use glass or tile cutting tools to cut pieces to the desired size. You can also use a hammer to break pieces as well. Make sure the pieces are clean of any dirt before laying them out. Paste all the pieces and let it dry.
5. Prepare the grout mixture. You can procure this from any hardware store. Grout comes in many colours and there are colours you can add to the grout to change the colouring. Choose a colour that accents your mosaic.
6.Mix the grout with water in a disposable container. Mix to a consistency of peanut butter And then spread with a popsicle stick, or with your gloved hand. Make sure the grout fills in every nook and cranny.
7. Let the grout set for some time. Wipe the mosaic with a clean sponge and warm water. Rinse out the sponge regularly as you wipe away grout from the surface of the tiles. This is to remove the grout from the surface of the tesserae so that it remains smooth and levels with the edges of the tesserae.
8. Seal the mosaic with varnish. This will coat the tiles and safeguard against damage, especially for outdoor mosaics subjected to fluctuating temperatures and adverse weather conditions. It will also give it a high gloss finish that will make the colours stand out.
Material used:
MDF Base
Broken Tiles
Tiles Nipper
Grout
Sponge
If you have any queries, feel free to drop a comment below in comments section, will reply asap :)
Most of the above-listed materials are available on the Rainbow Craftykari Store and can also be pre-ordered by sending an e-mail at rainbowcraftykari@gmail.com.
Do visit the Rainbow Craftykari store HERE
Hope you're inspired to create yours! Do participate in our ongoing challenge.
Happy Crafting
Saloni


Immensely Beautiful Project Saloni!! Loved the Tutorial ~ Aditi & Maninder
ReplyDeleteHi, Informative Tutorial!!
ReplyDeleteHave a query.. How can we paste tiles.. by fevicol or something else??
Unique and lovely project
ReplyDeletebeautiful project !!!
ReplyDelete