Friday 20 January 2017

Shabby Chic Layout By Guest DT Sunila and Aditi

Bonjour Crafters

We’re back with an inspirational post and our third project for Rainbow Craftykari! What a delight :)

Today we’re here to inspire you with a shabby chic layout and with Valentine’s day nearing, we though love would be a fabulous theme to work with!

What is shabby chic? Shabby chic (/ˈʃæb.iˈʃiːk/) is a form of interior design where furniture and furnishings are either chosen for their appearance of age and signs of wear and tear or where new items are distressed to achieve the appearance of an antique. When incorporated in art and craft its as simple as creating something that appears worn off, old, faded and distressed. Pastel colours (pinks, blues, white) are the go to colours in this style.

Here is the Layout we have created for this one


For this layout we chose one 12x12 sheet with a pastel pink and floral elements as our base. We picked various sizes of pattern papers for our layering. If you notice this layout is a three picture layout- one big and two small. We assembled our papers and photos and made rough marks once happy with the arrangement. We then made cut marks on the top right and bottom left of the page, tore it and folded it like draping it. We distressed all our edges with distress inks. In the peep through places, we added another piece of paper underneath. We mounted our base piece onto white cardstock. We distressed the edges of all our paper pieces and photos for the vintage look. We then chose our chipboard pieces, painted them gold and added them onto our layout, some above and some peeking from beneath a picture. We added some texture using modelling paste and a stencil around our arrangement. Once content we adhered everything down in place. We then adhered a few flowers going with our layout.

Its Pastel, Its Subtle and Its Romantic


Products used:
Papericious Paper Stacks- Infinity and Ephemera
Papericious Chippies- The Wedding Theme, and Hearts
Photos off the internet
Flowers
Mont Marte Modelling Paste
Finnabair Dots and Lines Stencils
Distress Ink- Vintage Photo and blending tool
Gold acrylic paint
Fevicol
Two sided tape
Scissors

Above listed Materials are available at Rainbow Craftykari Store or you can pre-order.
Regards,
Sunila & Aditi

Wednesday 18 January 2017

Trishutter Card by Our DT Nikkita Sethi


Hello Crafty people,

Wish you all a very happy and prosperous New Year 2017.

I am back with another inspirational post for Rainbow Craftykari blog.This is my first post for 2017 and I have created a multi fold Trishutter mini. So are you looking for an attractive and unique style of multifold mini?
Search no more, because this handcrafted card will be exciting gift to your loved ones this Valentines.
I have made this card keeping Valentine season in mind. A boring wish on Whatsapp is now what most of us do, so this Valentine’s go back to old- fashioned way of handmade cards, just with brand new style.
Take a look at this Trishutter mini with multiple folds to hold pictures and messages so that you can send loads of love and best wishes in a beautiful way.

Carefully handmade, using Papericious If Only collection papers, handmade embellishments and mulberry flowers its great to have this multifold card this Valentine’s .


Materials used;

Papericious If only collection
Black cardstock,
Tacky tape, Ribbon
Glossy accents,
Handmade embellishments, 
Mulberry flowers

Above listed Materials are available at Rainbow Craftykari Store or you can pre-order.

Do leave some love.
Happy Craftying
Love
Nikkita Sethi


Monday 16 January 2017

Swing Easel Card Tutorial By Karthikha

Hello crafty friends,

A very lovely Welcome and a warm Good Morning in this cold winter. Hope you all are doing fine and enjoying our tutorial and inspiration posts.

Today in our Teaching and Learning Program, we have Guest DT Karthikha with a beautiful Swing Easel card tutorial, so enjoy the tutorial.

Over to you Karthikha

Hello Crafty Folks,

Today I am here with a tutorial on how to make a swing easel card. It is a very simple and beautiful interactive card once you get the hang of it! Be ready for the picture heavy post and enjoy.


Step 1
Start with a black cardstock measuring 11 ⅝ x 6 inches and score it at 2, 2 ½, 3 and 5 ¾ inches along the width.


Step 2
PS: For steps 2 and 3, if you have a trimmer, follow the measurements as trimming. I do not own one so I’m scoring them first.

Now turn it along the height of the card and score from 1 inch to 2 ½ inches, leaving a gap of 1 inch from the top. Similarly, score from 3 inches to 4 ¾ inches. Repeat this on the right side of the cs also by flipping the cardstock. I guess this pic explains the scoring/trimming part clearly.


Step 3 
Now score joining the end points.


This is how the scoring looks.


Step 4
I’ve cut along the scored lines (only those from step 2 and 3) using a craft knife and cutting mat. If you have used a trimmer for step 2 and 3, you would have already achieved this.


Step 5
Ignore the first wide scoring line and make mountain fold as shown in the picture.


Step 6
After folding along the middle of the card, it should look like this.


Step 7
Make a valley fold as in the pic. This makes the center panel swing and the easel is ready to be set.


Step 8
Now for decorating the frame, take a patterned paper of your choice by size 5 ¾ x 5 ½ inches. Make a frame ¾ inches wide on the sides like this. I’ve used Papericious Happy Birthday pack sheets.


Step 9 
Paste it on the easel frame and score along the old lines. For the inner frame, use a sheet of size 4 x 4 ¾ inches. Decorate the inner side of the card as well with a sheet of size 5 ¾ x 5 ¾ inches.Your card should look like this.


Step 10
To make the stopper for the easel, I chose the Happy Birthday sentiment. Stamped using Versafine Onyx Black ink on a scrap piece of whitecardstock and colored with diagonal brush strokes using distress inks and Fuji watercolor folios. I then fussy cut it and attached a foam tape to the back.


Step 11
I wanted the focal point to be a shaker, so chose heart framed diecuts gifted by a dear friend. Diecut the frame on craft foam first to add dimension. Here I have used 2 craft foam heart frames one on top of the other and then the main heart frame in cardstock. I colored it using peacock feathers distress inks and doodled a simple pattern using black marker. I’ve used an OHP sheet cut out and some basic sequins, along with a Happy Birthday party prop for the inside of the shaker. This collage explains this step.


Step 12
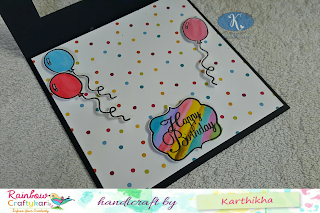
I stamped, colored and fussy cut some balloons for the inside of the card and attached them using foam tape.  This completes the swing easel card.


Here are some more pics!


Hope you liked this card and enjoyed the tutorial! Do try it out and let me know.


Supplies Used:

Black cardstock
White cardstock
Papericious Birthday pack
Birthday clear stamps
Versafine onyx black ink
Fuji watercolor folios
Distress inks
Foam tape
Craft knife
Cutting mat
Scissors

 
Above listed Materials are available at Rainbow Craftykari Store or you can pre-order.

Regards,
Karthikha.