
Continuing from Part 1 http://bit.ly/2hgY6LR
Next lets get our page inserts ready.
Next lets get our page inserts ready.
Take the 6 3/4”x 5 3/4” cardstock sheets and keeping on the 6
3/4” side score at 5 1/2”. Fold along the score line and press with the bone
folder. This forms the flap. I wanted some design, hence I die cut the flap.
You could use nay decorative punch or die for this or leave the flaps as it is.


With our pages, hinges and inserts complete, we now only have our
base of the album to do.
For this pick the two 8 1/2” x 12” cardstock pieces and attach them together. Apply glue on the last 1/2” on one sheet and place the second sheet on top and press nicely.
For this pick the two 8 1/2” x 12” cardstock pieces and attach them together. Apply glue on the last 1/2” on one sheet and place the second sheet on top and press nicely.

Keeping this long sheet as the base, we now need to stick our
chipboard pieces. The arrangement goes this way- front, spine, back, spine and
front. Between each piece leave a gap equivalent to the thickness of the
chipboard.
Trim the sides of the cardstock and fold all sides inwards and
stick them to cover the pieces (like a look binding). The placement of the
hinges is the next important thing to ensure
the pages alternate when opening the album. Before placing the hinges, cut them
at an angle. This will help are pages slide in smoothly.


The first hinge is to be placed 1/2” away from where the first
spine piece starts and the second hinge is to
be placed 1/2” from where the second spine starts. By hinge I mean the peak
point and not the beginning flat part. Notice the marking on the page and the
hinge placement in the picture below. Stick these hinges down and press firmly
with the bone folder. Go over the score lines, as well as the gaps between the
chipboard pieces so they fold over easily.

This is what our base should finally look like.

With this done, you have completed most of it. Next, comes the
decoration bit and then attaching the pages. It would be good to first design
the pages and then stick them. It’s easy to work this way. I wanted to add a
flap inside on the back of the album. So for that take a 6 3/8” x 5” cardstock
and keeping on the 5” side score at 4 1/2”. Put some glue on the fold and stick
it onto your album on the back piece inside. You can also die cut the edge. I
wanted to make it magnetic so i stuck two pieces of magnet- one centre of the
flap and one on the chipboard piece where the flap would close.


Now we can begin sticking our pattern paper. Start by sticking at
the back of your album- front, spine and back pieces and then inside. I haven’t
given measurements for this as it depends on how much of a black border you
would like to leave.


For the pages, you can use a paper sized 14.5 cm and 14.5 cm front and back and for the inserts 13.5 cm x 13.5 cm both sides.


I’ll teach you two styles of pockets for the pages of this album. You go do more styles too :)
A simple pocket- Cut a piece of patterned paper measuring 7” x
3”. You can increase the height of the pocket.
Keeping the 7” side, score at 1/2” and 6 1/2”. Turn the paper 90 degrees
and score at 2.5”. Fold along score lines. When you open them you will see two
mini squares at the corners. Cut them out and stick the bottom fold onto the
side folds. You pocket is ready to stick to your page.


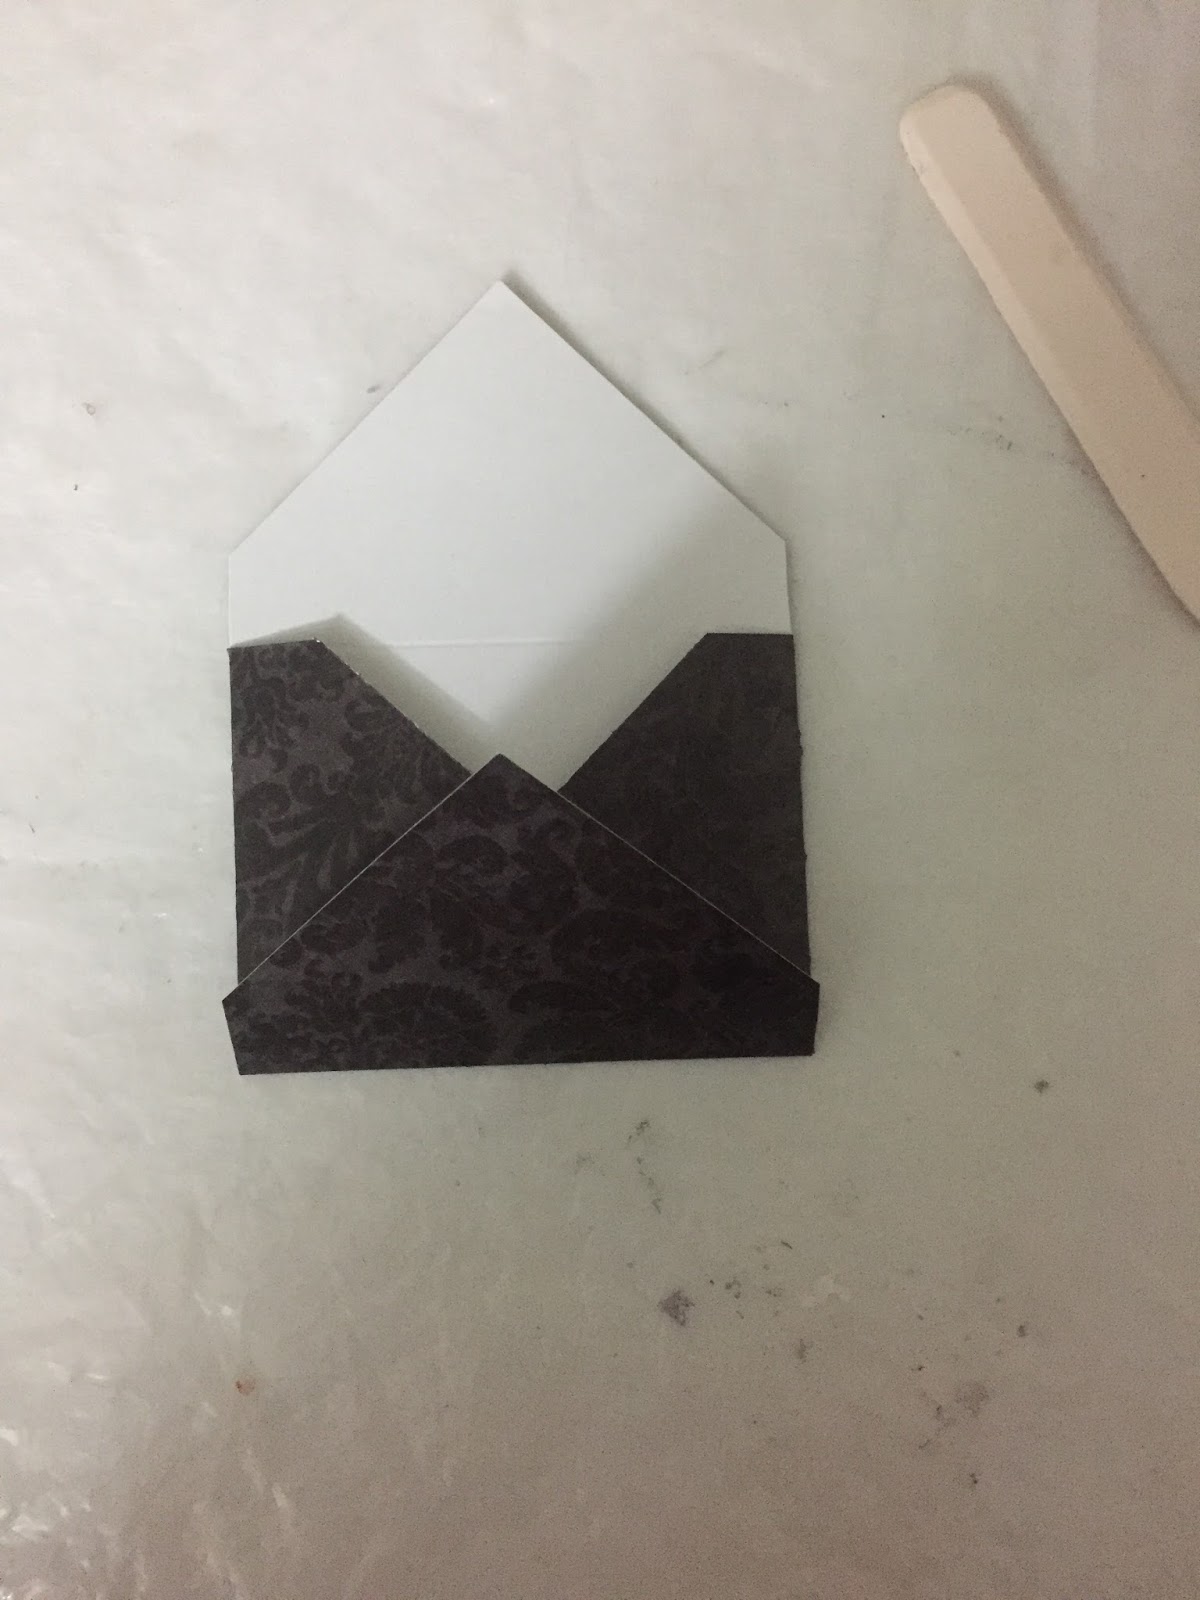
A mini envelope- Cut a piece of pattern paper measuring 5 1/2” x
5 1/2”. I used the envelope template given with my scoring board and scored at
2”; turned 90 degree and scored at 2.5”. Repeated this again. Fold along the
lines and open. Cut out four mini triangles fired at the line intersection,
fold the sides and then stick the bottom. I cut the pointed edges of the top
and bottom flap. I then stick this onto my page, and used some left over paper
to form a band to secure the envelope.


Once you have decorated your pockets, you need to stick them
inside your album. For this apply glue on both side of a hinge, slide down your
pocket and press firmly and hold until it sticks together.


Stick all your pages like this. They would alternate, from the
bottom- first the right then the left. So when you open
your album your first page will be the one from the left. I decorated the album
with some stickers, brads, buttons, tags, die cuts, flowers, charms, metal
embellishments, etc.. going with my theme. You are free to decorate it the way
you wish to :)!
Hope you enjoyed this tutorial! Here are some pictures of the
album inside.


Black cardstock 270gsm
Chipboard 900gsm
Tacky glue
Fevicol
Kaisercraft PP 6*6 - Kaleidoscope
Scissors
Scoreboard and Bone folder
Ruler
Paper Trimmer
Embellishments - flowers, metal charms, stickers, die cuts etc.
Lock.
Above listed Materials are available at Rainbow Craftykari Store or you can pre-order.
Regards
Aditi
Blog- https://dotstolinesblog.
Wonderful..
ReplyDeleteThank you :)!
DeleteAbsolutely fabulous detailed tutorial Aditi and Sunita! Love it!
ReplyDeleteThank you Vinitaji:)!
ReplyDeleteawesome
ReplyDeleteAwesome album with a beautiful tutorial! Very well explained! Thanks a lot 😊
ReplyDeleteAbsolutely beautiful album! And easy-to-understand tutorial too.
ReplyDelete- Khushboo Gandhi
Good.. I will also try😀😀
ReplyDeleteThank you Roshini, Karthikha, Khushboo and Yugal :-)!! Yes please share your creation with us @Yugal :-)!
ReplyDelete