
Hello My Dear Friends
I am back and as usual very excited to be here on this platform. Today I have two lovely projects to share with you guys. After a real long time I wanna to play with cardstock and pattern paper so I created a cute little book card and cash envelope which is an excellent way of gifting small things with personalized touch. They make an excellent way of presenting return gifts for children’s birthday party and can be resized easily depending upon the requirement so let’s get started. But first have a look at the project.

From the outside it looks like a tiny book and inside it has space for gift.

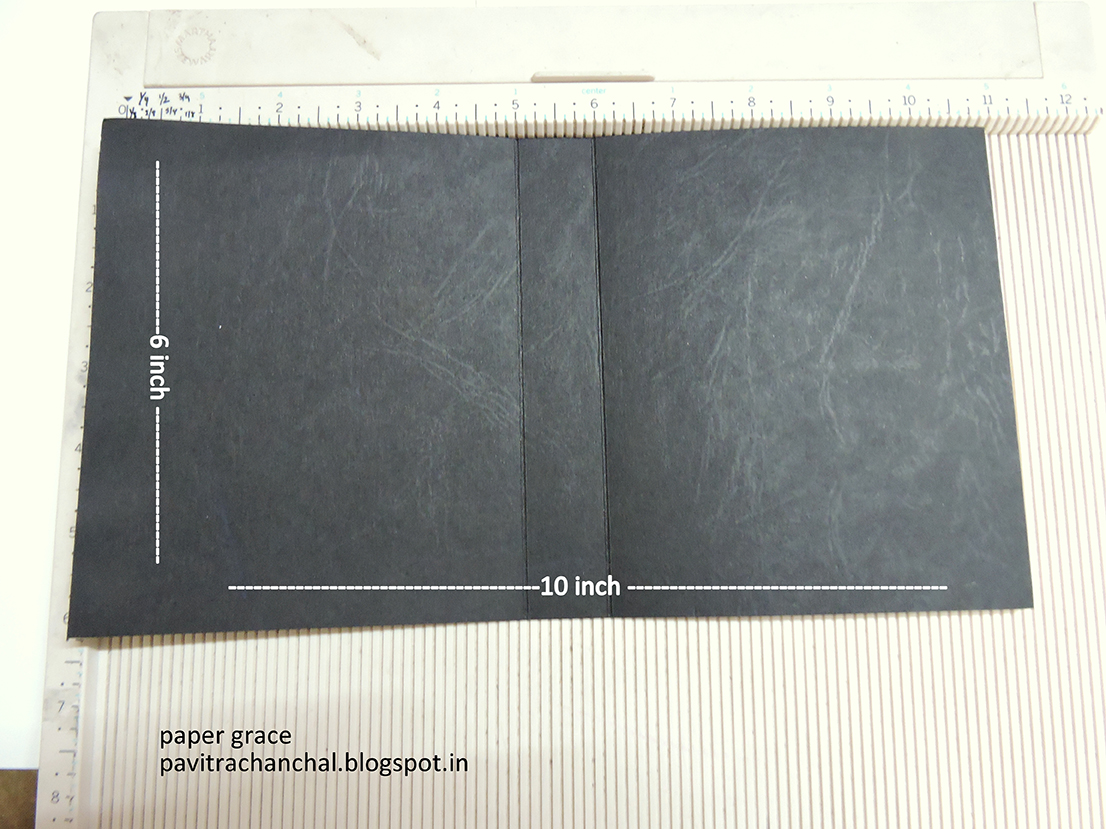
Below you will find the instructions : Cut black cardstock 6 x 10 inch.

Score at 5 inch – 1 inch – 5 inch as shown in above image using scoring board and fold.

Cut two pieces of black cardstock measuring 6 x 4 and 5 x 4 inches.

Score at every 1 inch and fold in a zigzag way mimicking alphabet M OR W. Overlap them together forming a frame (as shown in below pic) and paste the edges with glue.


Center it inside the book cover and paste with tacky glue or tape.

Cover with pattern paper and attached a ribbon for closure. For the outside I placed a filigree die cut out, a resin lady embellishment in the center and finish off with a flower and a sentiment cutout.


From the outside it looks like a tiny book and inside it has space for gift.

Below you will find the instructions : Cut black cardstock 6 x 10 inch.
Score at 5 inch – 1 inch – 5 inch as shown in above image using scoring board and fold.

Cut two pieces of black cardstock measuring 6 x 4 and 5 x 4 inches.

Score at every 1 inch and fold in a zigzag way mimicking alphabet M OR W. Overlap them together forming a frame (as shown in below pic) and paste the edges with glue.


Center it inside the book cover and paste with tacky glue or tape.

Cover with pattern paper and attached a ribbon for closure. For the outside I placed a filigree die cut out, a resin lady embellishment in the center and finish off with a flower and a sentiment cutout.


Stamped Envelope Tutorial
Secondly I have a stamped envelope made from scratch for you to go with the Book Card, have a look!!!

Let's Start, Firstly Cut red cardstock 11 x 9-1/2 and score at 4 , 8 fold (on longer side i.e 11 inches).

Score 1 inch on both the sides (from smaller side i.e. 9-1/2) and fold.

Trim the 1 inch portions form both the flaps leaving the center portion as shown in below pic.

Fold the flaps inward, round the upper edges as shown and paste with glue as shown in below pics.


Cut iris sheet 270 GSM 7-1/4 x 3-3/4 inches

Dab distress ink aged mahogany, spiced marmalade, fired brick, abandoned coral on nonstick mat, spritz with water and place iris sheet on top of it.

To make it splotchier, I tried spritzing archival ink red carnation with liquid sanitizer, since it contains alcohol it helps the archival ink to move and believe me I really loved the outcome.

Next I stamps big maple leave from just right stamp set, using spiced marmalade, vintage photo and aged mahogany distress inks.

I first applied spiced marmalade on the entire leave, than aged mahogany on the outer sides and vintage photo on the extreme edges.

Using the smaller leaves from same set I fill up the empty space and stamp the leaves using aged mahogany and vintage photo distress inks.


Lastly I stamp a tiny postage stamp with vintage photo distress ink and finish off my background.

Paste it on top of cardstock envelope base with tacky glue.

I die cut iris paper with spellbinder die set using the smallest dies, colored them with distress ink – spiced marmalade and layered them on top of each other with 3D tape.

On the top most layer I applied a layer of clear glitter with glossy accent and finally placed it in the center of the envelope


I hope you like this tutorial and will try to make one for yourself.
Material List:
For Book Card - Black Cardstock
Pattern paper
Ribbon
Resin embellishment
Mulberry flower
Tacky glue
Tacky tape
Butterfly cutout
For Envelope -
Red cardstock 200GSM
Iris paper 270GSM
Distress ink – spiced marmalade, vintage photo, aged mahogany
Archival ink – red carnation
Just right stamp – shabby chic , autumn leaves
Spellbinder die
Tacky glue
3D tape
Hand sanitizer
Clear glitter
Secondly I have a stamped envelope made from scratch for you to go with the Book Card, have a look!!!

Let's Start, Firstly Cut red cardstock 11 x 9-1/2 and score at 4 , 8 fold (on longer side i.e 11 inches).

Score 1 inch on both the sides (from smaller side i.e. 9-1/2) and fold.

Trim the 1 inch portions form both the flaps leaving the center portion as shown in below pic.

Fold the flaps inward, round the upper edges as shown and paste with glue as shown in below pics.


Cut iris sheet 270 GSM 7-1/4 x 3-3/4 inches

Dab distress ink aged mahogany, spiced marmalade, fired brick, abandoned coral on nonstick mat, spritz with water and place iris sheet on top of it.

To make it splotchier, I tried spritzing archival ink red carnation with liquid sanitizer, since it contains alcohol it helps the archival ink to move and believe me I really loved the outcome.

Next I stamps big maple leave from just right stamp set, using spiced marmalade, vintage photo and aged mahogany distress inks.

I first applied spiced marmalade on the entire leave, than aged mahogany on the outer sides and vintage photo on the extreme edges.

Using the smaller leaves from same set I fill up the empty space and stamp the leaves using aged mahogany and vintage photo distress inks.


Lastly I stamp a tiny postage stamp with vintage photo distress ink and finish off my background.

Paste it on top of cardstock envelope base with tacky glue.

I die cut iris paper with spellbinder die set using the smallest dies, colored them with distress ink – spiced marmalade and layered them on top of each other with 3D tape.

On the top most layer I applied a layer of clear glitter with glossy accent and finally placed it in the center of the envelope


I hope you like this tutorial and will try to make one for yourself.
Material List:
For Book Card - Black Cardstock
Pattern paper
Ribbon
Resin embellishment
Mulberry flower
Tacky glue
Tacky tape
Butterfly cutout
For Envelope -
For Envelope -
Red cardstock 200GSM
Iris paper 270GSM
Distress ink – spiced marmalade, vintage photo, aged mahogany
Archival ink – red carnation
Just right stamp – shabby chic , autumn leaves
Spellbinder die
Tacky glue
3D tape
Hand sanitizer
Clear glitter
Very well explained Pavitra! Both are so beautiful!
ReplyDeleteBeautiful work and tutorial Pavitra :)
ReplyDeleteBeautiful wrok pavitra like always
ReplyDeleteLovely projects Pavitra..and great tutorial..
ReplyDeleteLove
Richa