Showing posts with label Aditi Mahajan. Show all posts

Friday 14 April 2017

Birthday Double Surprise Explosion Box by DT Aditi Mahajan

Hello guys,

Today I'm at the Rainbow Craftykari Blog, with an inspiration for the ongoing challenge. Do check the challenge here.

Onto the creation. I've created a Birthday Theme Explosion Box for a girl. 

I've used the Fairy Land Paper Pack by Papericious for this box. 

The first box, opens to one layer, with triangular pockets (made using pearlescent cardstock and Martha Stewart border punch) in the pack on the four flaps to insert photos. We've decorated these with some flowers. Inside this, is a smaller box, that opens to two layers and a decorated 3 D cake inside. I've decorated the inside with flowers, and some sentiment words like beautiful, love, enjoy, etc die cut using sizzix dies (on cardstock). I've followed the colours of the challenge for this creations. Some embellishments have been fussy cut from the sheet in the paper pack. The patterned paper was distressed before adhering to the base. 

FullSizeRender 90
FullSizeRender 95

Here are pictures of how it looks inside:

FullSizeRender 93
FullSizeRender 96


FullSizeRender 89
FullSizeRender 94

Supplies used:

Papericious- Fairy Land Collection
Sizzix- Celebration, Adventure and Friends Set
Assorted flowers
Martha Stewart Border Punch
Distress Ink- Picked Raspberry
Pink and Green Cardstock

Hope you're inspired and looking forward to your creations for the challenge:)!


All the Materials are available at Rainbow Craftykari Store, If something you are missing out, you can Pre-Order us at rainbowcraftykari@gmail.com

Regards,
Aditi
Dots To Lines

Tuesday 28 March 2017

Experiments with Gel Press by DT Aditi Mahajan

Hello Everyone,

Aditi here, Today we're here at the Rainbow Craftykari blog with an interesting post for you. Its an information packed post, with a lot of play and examples. 

We've heard a lot about Gel press, and seen videos, but our very first interaction was during Creativation 2017. We took up a class, saw demos and were fascinated with the power of this one tool.

Gel Press® is the original, superior monoprinting plate - permanent and reusable! Make stunning prints for use in your artwork: Mixed Media, Scrapbooks, Cards, Art Journaling, Home Décor and more! - https://gelpress.com/

As they suggested, gel press aids in making stunning prints to be used in any kind of project. Many of you might say, its the same, paint your background, stencil, stamp, etc. Well yes, but using this plate, life is so simple, you get faster prints, it's addictive so you keep going on and on. You can create intricate prints, with multiple patterns.

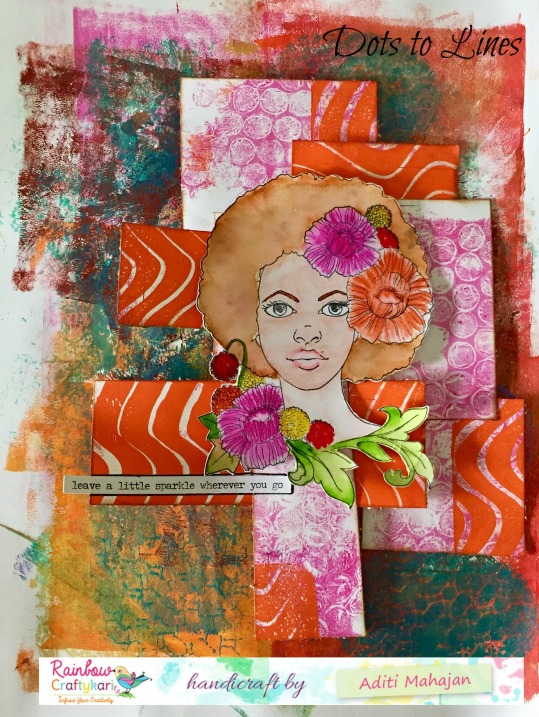
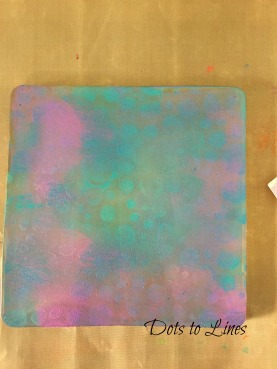
Here is a journal page we made using gel press prints.

Journal page fin.jpg

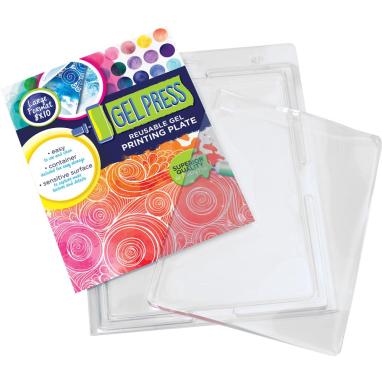
This plate is a silicon transparent jelly like plate.

Gel-Press-8x10-Plate-open-package

These come in varied sizes and shapes:

12"x12", 12"x14", 8"x10", 5"x7", 6"x6", 3"x5", 8" round, 6" round, Petites Set- Oval, hexagon, rectangle, triangle, square and circle (small).

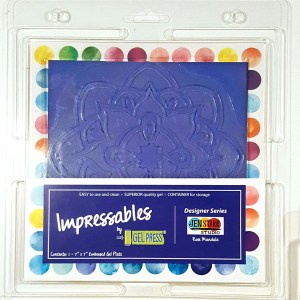
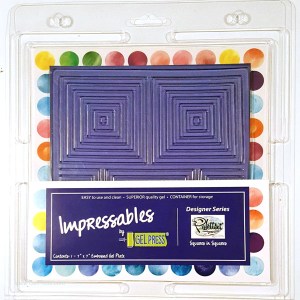
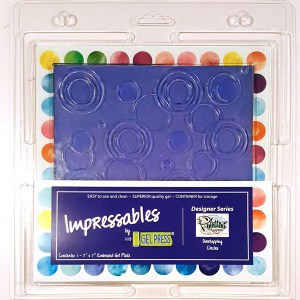
The latest products are the Impressables. These come with certain patterns in the plate, so your first print has a self pattern.

impressable 2impressable 3impressable 4impressable1

This is the basic information. Now lets play with them and show you some results.

Firstly, always keep the plate on a craft mat or acrylic mat. Since it has baby oil any other surface will absorb it. The smaller ones can be used by removing only one acrylic sheet and leaving the other mounted. In between, if you want to clean your plate, use a baby wipe. You can work with acrylic paints, most brands work. And if  the paint dries up quickly you could use a retarder or acrylic glaze medium on your paint. We have tried working with inks and we got great results with distress inks and oxides. 

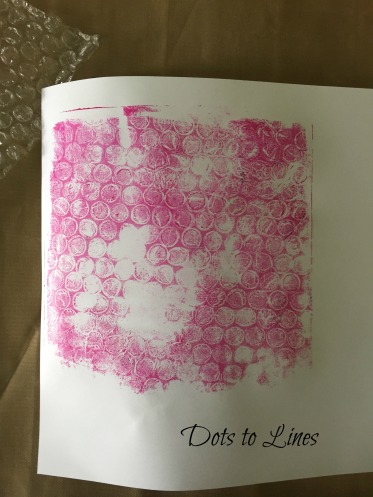
1. Add some paint on the plate, spread it with the brayer. Use bubble wrap and press onto the paint and lift it. Keep a sheet of paper and rub on the back to lift the print on the side touching the plate. 

4

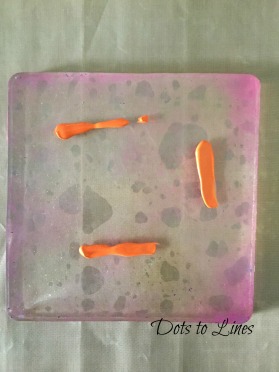
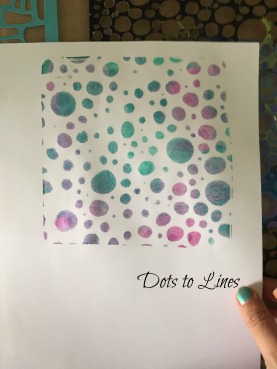
2. Add a different colour on the plate and spread with the brayer. Using any texture comb, create a design and lift on your paper. On the left base, create some circles with a bottle cap and a contrasting colour and lift the print.

56

78

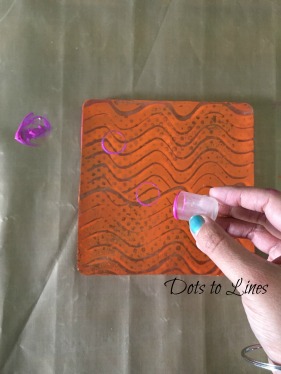
3. On a cleat plate, place the stencil and through the stencil add two colours and spread with the brayer. Lift the stencil and take a print on the paper from the plate. You could also take a print from the paint on the stencil by rubbing it on the sheet.

                       91011

4. Add two colour onto the plate and spread with the brayer. Place a stencil on the plate. Press a paper and lift the print. This will give you the print only through the stencil. Next take a print from the stencil. And third, press the paper onto the plate again once the stencil is lifted- this will give you a ghost print.                  

                 121314
15

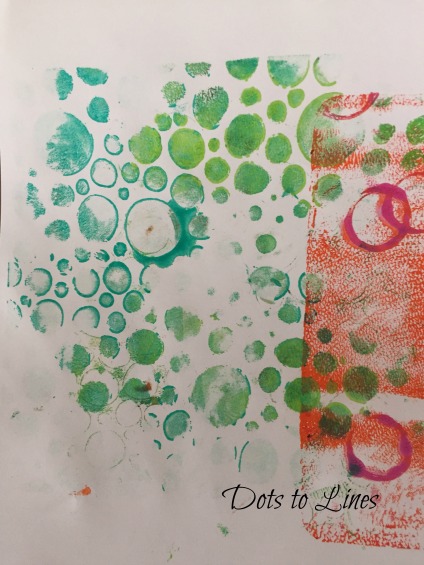
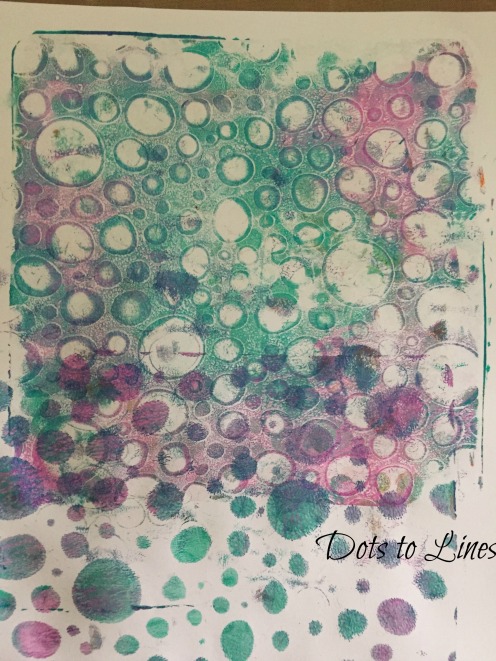
5. We kept a plain sheet of paper next to us, and every time we used the brayer, we moved it on this sheet to clean the brayer before moving onto another colour. This gave us a great background, which we used for our journal page above. We had some prints to it with the small oval plate and stencil for more interest.  We cuts pieces from sheets show in technique 1 and 2 for our layers. 

17

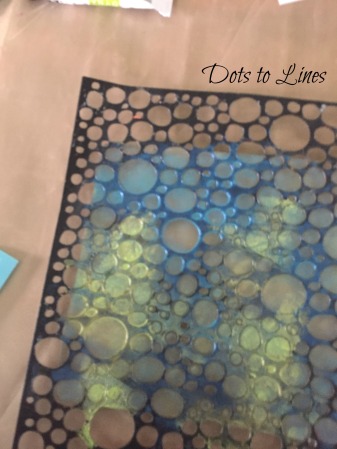
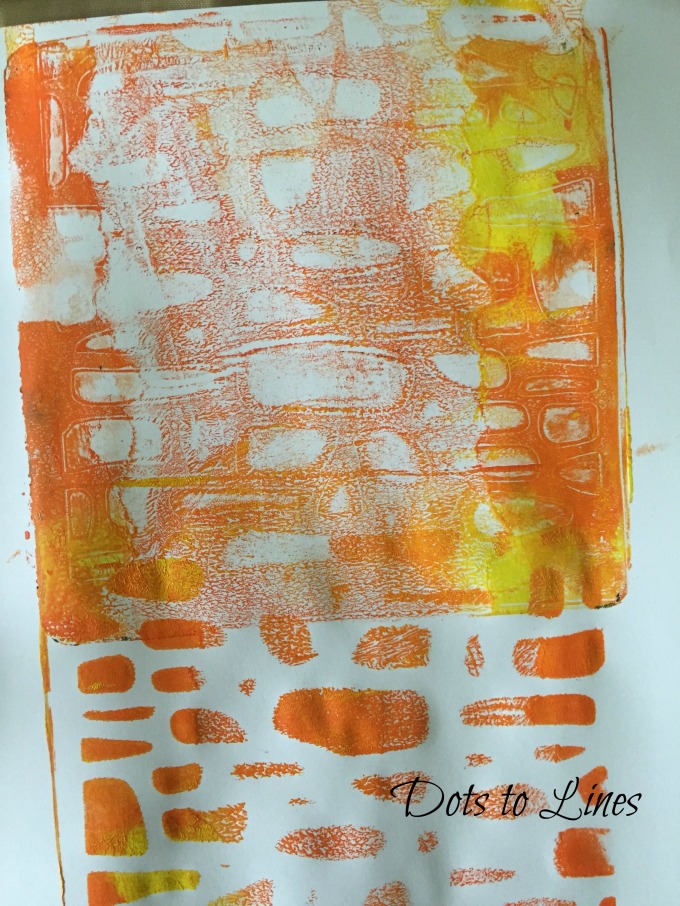
6. Some play with oxides. We used the mini rectangle and hexagon plate. Added one colour of the oxide onto the plate directly from the ink pad. Next, we rubbed a darker colour onto the uprooted side of and embossing folder and pressed it on the plate. We then took a print onto our paper. We stamped from the folder directly on the paper, to take a print from the remaining ink as well.  In the last hexagon, after taking a print, we stamped another shaded using acrylic stamps and printed it over the first hexagon print for more interest. In the same way, you could add colour and stamp on the plate and take a print for a different background.

16

As you see above, stencils, stamps and found object work really well. Anything to create texture and patterns as with the plate all you're doing is lifting prints and getting some fabulous paper ready for your projects. Not just paper, your could print on fabric and other surfaces as well. We've only introduced this tool and there are many more techniques to explore.

We hope we've inspired you to play and explore :)

Regards,
Aditi
Dots To Lines

Friday 20 January 2017

Shabby Chic Layout By Guest DT Sunila and Aditi

Bonjour Crafters

We’re back with an inspirational post and our third project for Rainbow Craftykari! What a delight :)

Today we’re here to inspire you with a shabby chic layout and with Valentine’s day nearing, we though love would be a fabulous theme to work with!

What is shabby chic? Shabby chic (/ˈʃæb.iˈʃiːk/) is a form of interior design where furniture and furnishings are either chosen for their appearance of age and signs of wear and tear or where new items are distressed to achieve the appearance of an antique. When incorporated in art and craft its as simple as creating something that appears worn off, old, faded and distressed. Pastel colours (pinks, blues, white) are the go to colours in this style.

Here is the Layout we have created for this one


For this layout we chose one 12x12 sheet with a pastel pink and floral elements as our base. We picked various sizes of pattern papers for our layering. If you notice this layout is a three picture layout- one big and two small. We assembled our papers and photos and made rough marks once happy with the arrangement. We then made cut marks on the top right and bottom left of the page, tore it and folded it like draping it. We distressed all our edges with distress inks. In the peep through places, we added another piece of paper underneath. We mounted our base piece onto white cardstock. We distressed the edges of all our paper pieces and photos for the vintage look. We then chose our chipboard pieces, painted them gold and added them onto our layout, some above and some peeking from beneath a picture. We added some texture using modelling paste and a stencil around our arrangement. Once content we adhered everything down in place. We then adhered a few flowers going with our layout.

Its Pastel, Its Subtle and Its Romantic


Products used:
Papericious Paper Stacks- Infinity and Ephemera
Papericious Chippies- The Wedding Theme, and Hearts
Photos off the internet
Flowers
Mont Marte Modelling Paste
Finnabair Dots and Lines Stencils
Distress Ink- Vintage Photo and blending tool
Gold acrylic paint
Fevicol
Two sided tape
Scissors

Above listed Materials are available at Rainbow Craftykari Store or you can pre-order.
Regards,
Sunila & Aditi

Tuesday 13 December 2016

GDT Sunila & Aditi: "Bestie" Mini album tutorial - Part 1

Hello lovely crafters,

A very lovely Welcome and a warm Good Morning in this cold winter.

Today in our Teaching and Learning Program we have a beautiful mini album tutorial which our Guest DT Aditi using the theme ''Bestie''. In this tutorial she has shown every details beautifully with the pictures and instructions. Its a long post today so grab some hot snacks and coffee and enjoy the tutorial. To ease your learning we have divided the Tutorial in to two parts, Please check the link at the end for 2nd & Last Part.

Over to you Aditi,

Hello everyone,

This is my first post as a guest designer for Rainbow Craftykari and I am super excited :)

For this tutorial, I have created a mini album and my theme was ‘Bestie’ something you can gift your best friend and treasure memories of times together.


Before I begin the step by step tutorial, here is the final album,


Let me warn you, this is going to be a long tutorial :) !! The trick in this album is first getting the measurements right and next preparing the entire base structure.

To begin with, lets cut all our cardstock and chipboard pieces. I have used a 270 gsm black cardstock and 800 gsm chipboard.

To work easily lets divide this album into four parts- the base, the pages, page inserts and the hinge system.

For our pages we need 6 pieces of 6”x6” cardstock; for the inserts we need 6 pieces of 5 3/4” x 6 3/4” cardstock; for the hinges we need 2 pieces of 5 7/8” x 6” cardstock to cover the chipboard we need 2 pieces of 8 1/2”x12” cardstock.


For our front, back and spine we need to cut our chipboard. Measurements are as follows: Front covers - 2 pieces of 6 1/4”x 3 1/4”, Spine- 2 pieces of 6 1/4”x 1 3/4” and back- 1 piece of 6 1/4”x 6 1/2”.

Once you’ve cut all these pieces you’re good to begin.

Lets begin with our pages for the album. Keeping the 7” side, score 1/2” on both sides. That means once at 1/2” and once at 6 1/2”. Fold along the score lines.


On the folded lines apply glue and stick the 6”x6” cardstock piece onto this to form a pocket that opens from two sides.


Complete all six pages in the same manner.


Once your pages are ready, put them aside and lets begin working on the hinges. The hinges are the most important part of an album, as they are going to hold all the pages in place and the entire album intact.
 

Begin with the 5 7/8” x 6” cardstock cut for the hinges. Keeping the 6” side on the score board, score at 1 1/4”, 1 3/4”, 2 1/4”, 2 1/2”, 3”, 3 1/2”, 3 3/4”, 4 1/4”, 4 3/4”


Flip over the scored sheet and keep it vertically. Start folding upwards at the first line. Open and fold on the second line. Skip the third line, and fold up at the fourth line. Fold up on the fifth line and skip the sixth line. Continue the same upward fold on the last to lines and open them. Turn over and fold up on the third and the sixth line you skipped earlier. These are the 1/4” scored spaces that will lay flat to form the hinges. The 1/2” scored lines will form mountain peaks and 3 hinges on each piece.


This seems difficult, but isn’t. You need patience while doing this. Once the 1/4” lines have been folded, you’ll see peaks emerging.So pinch together pieces, the first and the second1/2” parts folding on the second line will form the first hinge. Once you get your three hinges, go over the 1/4” lines with a bone folder to have then lay flat as a support between each hinge. Go over the folds as well with the bone folder to get crisp peaks. Once this is achieved, turn over and glue the hinges together. I used paper clips to hold the pieces together until the glue dries.


Once the glue is dry, remove the clips and turn over your hinge, and go over the score marks with your bone holder. Like this you need to make two sets of hinges- one for the left side and one for the right side of our album.

With this done, you’ve completed a major part of this album:)! Feel proud of yourself!

From here on-wards, I'm continuing the tutorial to 2nd & last part, Please click at http://bit.ly/2gU3iCh

If you have any questions please leave comments here, we'll get back to you!