Showing posts with label Decoupage. Show all posts

Wednesday 23 May 2018

Decoupage +Mixed Media- Altered Box Tutorial by DT Megha

Hello everyone,

Today I am here with a Tutorial post for you all. I have incorporated decoupage and mix media techniques into one project.

I am making a book box for a mother from her daughters on the occasion of Mother's Day! Here's a look at the book box:


Step 1: To make this, begin by choosing a box which opens like a book, of any size. Choose a decoupage pattern paper or card stock which looks rich and vintage. I have picked up the Vintage papers from Papericious. 


Step2: Cut the papers according to the size of your box. I prefer using a paper trimmer for this, as it gives a neat cut and precise measurements. Use decoupage glue and adhere the papers on the insides of the box, all sides and the inside lid.


Step 3: Use acrylic paints and paint the rim and corners of the box. In this case, I have used a Royal Blue Colour. 


Step 4: Time to add texture. Apply modelling paste on the outer sides of the box with a spatula. For texture, use a pointed sharp object and run through it. In this case, I have used a long needle to mimic the effect of book pages. 


Step 5: Time to add colour to the texture. You could use any form of spray colours. Acrylic colours watered down will also work. I have used the 13 Arts Sprays. When adding colours, always remember to work in layers. Dry between coats. For my box, I have used the colours Brown, Yellow and Grey. I have done this on the three sides of the box, leaving the spine untouched.


Step 6: Next time to decorate the outside of the box. Choose pattern paper for the top, bottom and spine of the box. Once cut down to size, using decoupage glue adhere it. 


Step 7: Lets add some textures and dimension. Using a stencil add modelling paste. I've added texture to depict grandness and give it a vintage look. You could further add texture with cut pieces of burlap like I have done. Once down in place, randomly brush white gesso.  


Step 8: Next, time to add elements. You could use chipboard and metal elements. I have used some pattern chipboards as well as the Star Confetti from Rainbow Craftykari. Once your elements are glued down, cover them with a coat of white gesso.


Step 9: Since I had a vintage look in mind, I decided  to use the rust and patina paste to add colour and texture. I am applying each colour in turn and building the colour intensity, starting from darkest to lightest.


Step 10: Next, I wanted to incldue the photographs on the box. I have used corrugated sheet to uplift them. I have also added paper flowers in white and shades of brown. For more texture, I have mixed yellow rust paste and a tinge of blue patina paste in the art stones to get the mustard rust look and adhered them with matte gel medium. Waxes highlight all this amazing texture. I have used Brass and White Gold waxes to highlight the details.


Step 11: For me, a project like this is completed with splatters. I have added rust yellow and white paint splatters, making sure to dry one colour before splattering the next.

Step 12: Next, let's complete the spine of the book box. Using the same stencil which we used on the lid, create a pattern with modelling paste. I have used diluted yellow rust paste to add colour. Once dry, I've used the waxes to finish it up for a vintage look.

Step 13: To complete it, use some background stamp with Black and Coffee Archival Ink and randomly stamp,  highlighting texture and details all over the box where needed. 

Screw the hinges and assemble the box to complete it.


Here are some more pictures:


Supplies used:

  • MDF Book Box
  • Modelling Paste 
  • White Gesso 
  • Stencil
  • Matt Medium 
  • Burlap Sheet 
  • Papericious Pattern Paper 
  • Decoupage Glue 
  • Flowers 
  • Metal Charms
  • Stamps
  • Archival Inks,
  • Rainbow Craftykari MDF Star Confetti
  • 13 Arts Colour Sprays 
  • Acrylic Paint
  • Finnabair waxes
  • Patina and Rust Pastes
  • Art Stones
  • Liquid Glue
  • Heat Gun
Most of the above-listed materials are available on the Rainbow Craftykari Store and can also be pre-ordered by sending an e-mail at rainbowcraftykari@gmail.com.
Do visit the Rainbow Craftykari store HERE


Visit our BLOG for more inspiration, tutorials and check out our ongoing challenge.


Happy Crafting!


Tuesday 17 April 2018

Travel Watch Box inspiration by DT Vidhi

Hello Crafty folks,
How are you all? What’s happening?  Are you done with your planning for this summer vacation? Come summer and everyone is bitten by the wanderlust bug. As the travel is on cards, here I am, back again at Rainbow Craftykari blog with my DT Inspirational post dedicated to Travel.

Do you have any idea as to who travels the most? It's the “Postal Stamps”. Nowadays they
aren't in vogue courtesy the New Fast Technology ... Nostalgia associated with Postal
Stamps compelled me to reuse them. There is one more element closely associated
with travel I feel and it is “Time”. The trio of Travel, Postal Stamp and Time looked so disjointed. But on a closer look together they inspired me to create a Masculine Watch Box with decoupage.


Let’s hop on to the project:

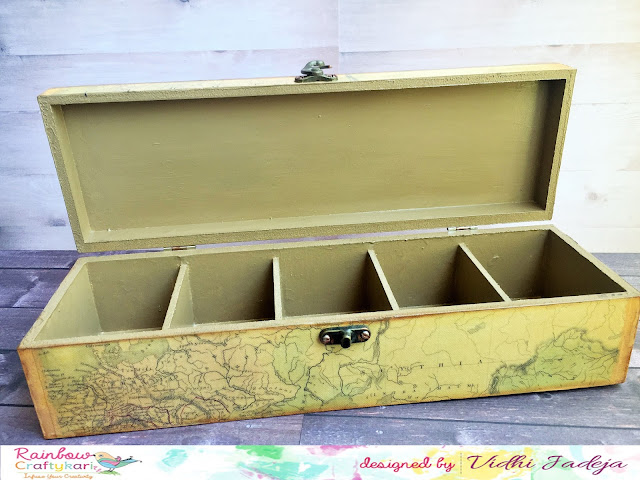
I took a raw MDF Watch Box with 5 partitions inside and gave it a coat of white
gesso to prime the entire box. Next, I painted it with Chalk paint and covered
all sides of the box. Then I distressed all my postal stamps with distress
ink for a vintage look.


After that, I started applying Postal Stamps on the top of the box with Mod Podge.
This was a random arrangement. I purposely did not cover the entire portion with stamps. I left some place on one side to add more zing to it.


On the left side of the top, I stamped some post and travel related stamps with Archival Black ink. With this addition, the lid of the box was ready.

Then I covered the three sides of boxes with decoupage paper and decoupage glue. I
chose a world map paper to match the travel theme. I distressed all the edges of the box with Vintage Photo distress ink and the box was ready!


Last and most important, I covered all the sides of the box lid with masking tape
and applied a fine layer of resin. When resin dried completely I removed the
masking tape and smoothened the edges with sand paper. 
Postal stamps, time, travel and watch box….an adorable quartet!


Most of the above listed materials are available at Rainbow Craftykari store and can
also, be pre-ordered by sending an email at rainbowcraftykari@gmail.com.

Do visit the Rainbow Craftykari store HERE

Visit our BLOG for more inspirations , tutorials and check out our ongoing challenge.

Happy Crafting

Hugs,

Wednesday 29 November 2017

Revamp your bag by DT Khushboo

Good morning all you lovely crafters out there!

I'm Khushboo and I'm here with a new Inspiration Post today.


Often times, we love certain possessions of ours, and when they start showing signs of wear and tear, we are left with no option but to throw them out! That really breaks my heart. Recently, I was again faced with the same dilemma - when my favourite bag (which I haven't even used all that much :(!) started to lose its resin material from the sides. If I wasn't a crafter, with a very heavy heart I would have had to throw the bag away. But now that that's not the case, I know exactly how to give my bag a new life :D - all thanks to the Decoupage technique! Yep, today, I'll share with you how you can use decoupage on your bag and make it look as good as new!


Let's take a look at the pictures of my finished project first and I'll then explain how I managed to do that!


(My bag originally look like this. And all the brown piping and stitched boundaries that you see started to rip away.)


Pic credit: Pinterest


These are some of the pictures of my transformed bag. Notice how I decoupaged with designer paper napkins on the boundaries.


Materials used:

  1. Designed tissue paper
  2. Mod-Podge (or any other decoupage glue)
  3. Gesso
  4. White paint
  5. Paint brushes
  6. Tweezers
  7. Clean rag
  8. Water

Brief steps for transforming your old bag into new:

  • Wipe your bag with a clean cloth to get rid of the dust, dirt and grease.
  • Pluck out the ripped and lose hanging resin pieces on your bag (this is to enable that the part where you will stick the tissue is even and flat, no uneven texture).
  • Apply two coats of gesso and let it dry after every coat.
  • Paint the surface with white paint once the gesso is dry.
  • Rip small pieces of decoupage tissue according to the size of the surface you want to cover.
  • Start laying it down on the surface with the help of your paintbrush and decoupage glue.
  • Apply two coats of decoupage glue and let every coat dry thoroughly.
  • Finish it off with a nice clear varnish or spray.


Signing out,

Hope you guys enjoyed my creations and the tutorial. Can't wait to see how you add your own twist to this!


Above mentioned products are available at Rainbow Craftykari Store OR you can pre-order the products by sending an email at rainbowcraftykari@gmail.comThat's it from me, folks!


Khushboo R. Gandhi

Wednesday 22 November 2017

Altered Bottles by DT Anila

Hello friends!

Don't we all like to hoard things? We not only like to buy and hoard new items but also like to collect things which can be reused/upcycled in some form or the other, with the hope of giving these junk/scrap items new life sometime. 


I have a huge collection of glass bottles, cardboard/paper boxes, invitation/greeting card, tissue paper rolls and what not.


Today I am showcasing an upcycled glass bottle. This is just an inspiration for you to start using/revamping those things you have been hoarding endlessly. 


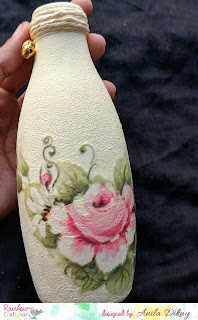
Here, I have decoupaged the (2) glass bottles to convert them into beauties to adorn your homes. They can also be given out as gifts.

Here's a look at the project -


Materials used

  • Chalk paints
  • Decoupage tissue papers
  • Sponge
  • Paper string
  • Thread and bells.


Method -
  • Firstly, remove any sticker on the bottle. Wash the bottle clean and dry it completely. 
  • Cover the bottle completely by dabbing the sponge with chalk paint over it. Let it air-dry.
  • Repeat the process to get a more uniform finish. 
  • Pick the tissue to be used and trim the design as desired. 
  • Carefully remove the backing/second ply of the tissue.
  • Apply a coat of Mod-Podge and stick the tissue over it carefully avoiding any creases. Let dry.
  • Apply a coat of Mod-Podge over the tissue paper to seal it. 
  • Tie a paper string to the neck of the bottle, covering it fully.
  • Tie a set of bells/Ghungroos with the help of a thin thread.


More pictures follow -


Hope, I could inspire you to finally start working on those things and give them a new life.

Do check out our ongoing challenge on the blog here
And do not forget to participate. 

Love,
Anila