Showing posts with label mixed media art. Show all posts

Tuesday 22 May 2018

Altered Diary Cover Inspiration by DT Saloni

Good Morning all you lovely crafters out there!

Saloni here with a new inspirational post today !! Today I have a Mixed media altered project again.

Why should the inside of your diary just be filled with pretty art, transform your diary cover with mixed media and simple techniques!

So, here's how it looked after all the hard work:


To begin with, I have applied a thick coat of heavy gesso and primed the surface. Next, I applied the fiber texture paste to it. To add some more texture, I have used a brick stencil with texture paste. Once dry, I started adding colours to it. To keep it simple, I have used just different shades of blue with a hint of white. It's such a beautiful colour strikingly soft yet stands out pretty loud. Further to embellish the diary, I have adhered some flowers, moss, metal charms. In the end , I have added a few art stones, frosting powder & created white splatter with watered down white gesso.

Here are some more close up shots...


Materials Used:

. Old Diary 
. White heavy Gesso 
. Fiber texture paste
. Modelling Paste
. Prima art alchemy waxes and patina paste
. Color sprays
. MDF Chipboard
. Flowers & Moss
. Texture sand 
. Frosting Powder
. Tim Holtz Idea-ology Sticker

Most of the above -listed materials are available on the Rainbow Craftykari Store and can also be pre-ordered by sending an email at rainbowcraftykari@gmail.com.

Visit our BLOG for more inspiration, tutorials and check out our ongoing challenge.
Hope my project inspires you !!

Love
Saloni

Wednesday 16 May 2018

Cinderella Jar- Inspiration post by DT Vidhi

Hello folks,

                    I am back on the blog with another Inspirational post!!! When you are surrounded by two little beautiful daughters, all you can think about is fairy tales and princesses !!! So this time I am inspired by Cinderella, her beautiful blue coloured dress, and sparkling glass sandals.


This is my first time altering a mini-object. It’s always difficult to alter a mini object as handling it is an issue and the space to be creative gets limited. I have still tried giving textures and put little elements on it. Hope you guys like it.

                    
First, I took a ketchup jar and altered it for my mini project. I started with modelling paste, applied two to three textures through stencils on the Jar with a knife. Then I stuck small pieces of lace on it. Next, I covered the surface with white gesso.


Next, I randomly added mini and mega stones in soft gloss gel to give more depth to the jar. With the hot glue gun, I have tried giving a look of hanging flowers along with some small hearts and twinkling stars


I used texture paste to create a rough surface for the lid of the jar and as a highlight "a glass sandal " on the top. I took a toy sandal from one of my daughter's toys and gave a coat of white gesso. To make it look like a glass sandal, I added silver glitter on it. I used Lindy's magical shakers on the jar to give shades of blue colour, as Cinderella's Blue dress is quite tempting for little girls. In the end, I added some glass stones on the lid near the sandal to make it look like as it was winter and covered in snow. 


Hope you guys like my project and it inspires you to try your hands on your very own alter mini project !!! The jar is even smaller than Lindy's Magical shaker bottle !!!  It's quite challenging but the whole process was fun. 


Supplies:

  • Texture Paste
  • Mini and Mega Art Stones by Finnabair
  • White Gesso
  • Lindy's Magical Shakers
  • Glass Stones
  • Silver Glitter
  • Lace
  • Flowers
  • MDF Hearts & Stars

Do visit the Rainbow Craftykari store HERE

Visit our BLOG for more inspiration, tutorials and check out our ongoing challenge.

Happy Crafting

Hugs,


Wednesday 18 April 2018

Heart Layout by DT Saloni


Hello all Crafty friends!!!

My brother always tells me that "I am a big hoarder" and sometimes I do agree with him. So this time I have created a mixed media layout with a picture, I have been hoarding for a long time.  Making a mixed project is also so fun. You can add so many techniques and style and the end results are always a surprise.

I am here today with my first " Picture tutorial post "at Rainbow Craftykari as a DT member.


So here is how I made the layout:-

Enjoy the video flip through and the step by step instruction below.

Step 1: For this beautiful layout, I have taken an MDF base measuring 12x12 inches. You could use anything that is handy for you or even a 12x12 scrapbook paper. TO begin with, prime the surface with black gesso and let it dry. Next, for an edgy look, apply crackle medium evenly with a brush and let it dry. The crackle medium should be dry completely before applying the second layer of colour. 


Step 2: Once the base is dry, apply the second layer of colour. When using crackle medium, you should use the dark colour as your base, so that when the second layer of colour cracks, the darker shade is visible.


Step 3: Next, add some more elements on the background by stamping. I have used some clear stamps and distress ink for this.


Step 4: Mixed media is all about layers. Next, add some texture with modelling paste. To further enhance the look, add colour on the edges and let it flow. 


Step 5: Select the photo of your choice that will be the focal point of your project. I have used a picture which is very close to my heart. Pick out a few papers to create layers underneath your picture. Distress the edges with ink. Fuss cut some elements for layering, or grab your embellishments. Play around with them and see what looks good before sticking them.


Step 6: Once you are happy with the arrangement and placement of the layers, embellish the layout with the buttons, flowers, tags and stones.


Hope you all like it and get inspired by it to create something equally beautiful for yourself!!!

Supplies used:

  • MDF Base
  • Balck Gesso
  • Crackle Medium
  • Chalk paint
  • Modelling Paste
  • Pattern papers
  • Flowers
  • Colour Sprays
  • Tags

Most of the above-listed materials are available on the Rainbow Craftykari Store and can also be pre-ordered by sending an e-mail at rainbowcraftykari@gmail.com.

Do visit the Rainbow Craftykari store HERE

Hope you're inspired to create yours! Do participate in our ongoing challenge.


Happy Crafting

Saloni

Monday 20 November 2017

Mixed Media Wooden Piece Tutorial by DT Priya


Hello Crafty Folks,

A very good morning to all of you.I'm back with a Picture Tutorial for a Mixed media Wooden Piece. Here I have explained how I have made this piece totally out of scrap. Except for colouring and glueing you don't need any supplies to make this kind of a project.
Here is what I made....


So let's Start...


Step 1:
I had this wooden plank which is about 2.5 feet in length. You can take any base be it wooden or canvas, Procedure will be the same. I used some masking tape on corners and sides to fill the uneven parts. Also attached a hook at the back so that I can hang it on my wall.


Step 2:

I gave it a coat of white gesso.


Step3:

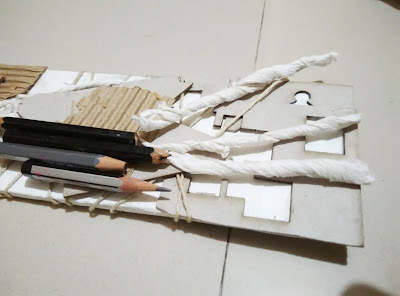
Here you can see the things I have used on the base to create textures. Some negative of chippies, Gauze cloth, Twine, some nails, buttons, tissue paper, pista shells, broken pencils, tags, broken toys etc.


I cut and glued the negative chippies on the base as shown in the picture below and also tied some twine on desired spaces.


Step 4: 

Then I arranged some gauze around the chippies and adhered some corrugated sheet here and there and also attached lace at few places.


Step 5:

Then I arranged tissue rolls, some chipboards, metal charms, tags, broken pencils and other embellishments using 3d matte gel.


Here are some close-ups of the arrangements in case you are interested.


Step 6: 

Then I gave a coat of white gesso on it after all things dried up. Also used a light coat of Decoart crackle texture paste here and there.


As you can see I arranged some broken jewellery pieces on it to add more textures and finally added a butterfly chipboard to give some height.

Step 7:

Then I started colouring this after it is fully dried. Firstly I gave a coat of Chalk paint Sailing sky and Mint green Patina Paste. Then I started dry brushing with Rust and Brass Patina paste mixed together. Also rubbed blue patina paste here and there for the effect.


Supplies Used:

Wooden PlankPapericious White gessoFinnabair Patina Effect Paste ( Mint Green, Blue, Rust, Brass)
Deco Art Crackle Paste

Rangers 3D Matte Gel

Acrylic paint Rust

Papericious ChipBoards

Corrugated sheets

Laces
Gauze


You can get all the above-mentioned products from Rainbow Craftykari Shop or can pre-order by sending an email to rainbowcraftykari@gmail.com.


Also, do not forget to participate in our ongoing challenge here and check out other gorgeous projects and tutorials from our awesome Design Team.

Hope you like my project.

Hugs,

Priya

Monday 28 August 2017

"This is my Dream" by DT Kriti Mishra

Namaste Friends!!

I am Kriti and I am back with a new project and this is an inspiration post. A layout with some bright colours titled "This is my dream". A dream leads to hope, this is a dream of a wish to come true and all we have is hope.

The lines which I have used are from a song....these lines focus on the motivation and hope we get while dreaming.

Here's the project:


 Some close-ups:


Here's a brief about this project:

To start with, I have taken a wooden plank (Size is 10" x 8") and affixed a few chipboard rectangular pieces on the right-hand side to make a wall and gauge on the left-hand side. Then covered the entire surface with gesso.

Next, I have used a bubble stencil to make the background more interesting using modelling paste and covered the entire surface with gesso again. Next, I have added this beautiful Dreamcatcher chipboard and few beads and again covered the surface with gesso.

After that, I used spray colours i.e., yellow, orange and red(Spray some water too to let them run). I then used gold, copper and black colour to highlight the textures. I then used few stamps, text, brick and music notations to make it more interesting.

Lastly, I embellished it with some coloured gauge, flowers, and a beautiful song lyrics.


Supply List
  • A wooden plank
  • Rectangular chipboard pieces(small)
  • Gauge
  • Dram catcher Chipboard (Papericious)
  • Beads
  • Gesso (Papericious)
  • Bubble Stencil
  • Text, bricks and music notation stamps
  • Black Archival ink
  • Heating tool
  • Spray/Acrylic colours (Red, Yellow, Orange, gold, copper, black)
  • Water mister
  • Handmade mulberry flowers
  • Paper smooches Leaf die
  • Big shot
Above mentioned products are available at Rainbow Craftykari Store or you can pre-order the products by sending e-mail at rainbowcraftykari@gmail.com

Thank you for stopping by!!
Hope you got inspired by my work!


Kriti Mishra