Monday, 6 March 2017

Recycle Empty Tape Roll Photo Frame Tutorial by Our Guest DT Mounika K

Hello Crafters,

A lovely Good Morning to you all,

We are back today with an awesome tutorial in our Teaching and Learning Program. Our Guest DT Mounika has recycled the glue tape rolls into a beautiful photo frame. So from now onward don't throw your rolls but create a beautiful frame like this. Sit back and enjoy the tutorial.


Over to you Mounika,

Hi everyone,

I am so happy to be part of Rainbow Craftykari Guest Design Team member, my heart-full thanks to Maninder Kaur and Team for this opportunity.

Today as part of GDT I am going to show you  how to create photo farm using empty tape rolls.


We
start with clean the tape roll and softly sand them to get rid of any stickiness and dirt on it. To prepare the base give two coats of gesso and let them dry.

Trace the circle on chipboard using the rolls and cut them for the base and also cut three extra circle in different sizes and pattern papers for the same and distress the edges.


For this I have use Papericious the Floral Season Collection.


Using
Camel texture paste and stencils to create some texture on the rolls and let it to dry. You can use any stencils of your choice.


Once
they are dry, dab them with some acrylic colors using sponge brush, I have used green and blue colors.


Place
all the circle together to make a frame as shown in the picture below and adhere them using white glue. Don't disturb until it dry completely.


For
embellishment, I have arranged mulberry flowers and some lace flowers, once I was happy with the arrangement I adhere them using glue gun or you can use white glue. As I thought of love theme for this project I choose camera, couple birds and dragon fly, arranged them once I am happy with arrangement, adhere them using glossy accent left them undisturbed for some time.


In
the middle frame I adhere a photo and on left side I glued some twine, pearl string and heart, for which is distressed with mustard seed and seedless preserve distress inks and added some diamond dust on it. And for the last frame I added a sentiment and some lace to finish off it.


Here are few close up of finished work,


Materials used

Empty tape rolls
Pattern papers – Papericious The Floral Season & Golden Garden
Chipboard
Acrylic colors
Stencil
Gesso
Texture paste
White glue
Distress inks
Mulberry flowers
Pearl stings
Metal charms
Hope you all enjoyed the tutorial.

Above listed Materials are available at Rainbow Craftykari Store or you can pre-order to them by sending an email at rainbowcraftykari@live.com.

I hope i have inspired you all to make the beautiful project by recycling it. Don't forget to participate in our monthly challenge, "Revamp your Scraps" and grab a chance to win a prize. Checkout the details at
https://tinyurl.com/gn46msc

Regards,
Mounika.

Wednesday, 1 March 2017

RCS Challenge # 1 - Revamp your Scraps

Hello Crafters,

This is Aditi today and I'm so very thrilled to Bring First Challenge at the Rainbow Craftykari Blog, hosting the March Challenge.

The challenge of this month "Revamp your Scraps" is to alter any found object and create a piece of altered art.


Challenge Guidelines:
  • Create any altered art project.
  • Use only found objects to alter and not new resources like MDF bases.
  • Use any technique.
  • Your Project must be New.
  • Use any form of butterfly in your project. (stamped, die cut, fussy cut, 3 D sticker, anything, we want to see at least one butterfly)
  • This challenge is open till 31st March, 2017.

General Guidelines:
  • Be a follower of our Blog
  • Like our Facebook page
  • Create a new project for the challenge and link it to our blog for the current challenge. No back links allowed. You could also link it up from your social media account in case you don't have a blog. 
  • Link directly to the project you are submitting and not to your blog.
  • Each participant is allowed upto 2 entries.
  • You can use the same project to enter at a maximum of 3 challenges.
  • This Challenge is currently valid for Indian participant only.
*Above given guidelines are mandatory to qualify in the challenge. If any participant fails to follow the guidelines, they will be disqualify from the challenge.

To Inspire you all, Here is my project to kick your creativity. Looking forward to your projects and good luck!


Here is the Inspirations by our GDT's

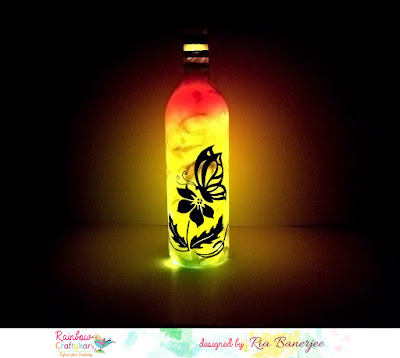
Revamp your Scrap Bottles by GDT Ria Banerjee
I started with Acrylic Spray Paints viz. Orange and Yellow. Make sure that the wine bottle is cleaned before applying spray on it. I sprayed yellow first, then applied orange from the top. Let it dry for  an hour. Do not apply too much color as it will increase the opacity. Take black acrylic paint and draw whatever comes to your mind. I prefer silhouette image will provide the opacity and the image will come to life.Insert LED lights from the top and you are done! For more details check here https://tinyurl.com/rybgdtrb

Time to revamp your scrap : Bottles by GDT Ria Banerjee

In Second Project,
I started with white Acrylic spray paint and painted on the bottle.
I took a decoupage napkin and glued to the bottle.
I took some peacock feathers that I had in my home and some leaves to embellish.
I took mulberry flowers and glittered pollens (I made with glue and glitter) and adhered on the bottle.
I finished it with some aluminum foil, wrapping it on the neck.

For more details check here https://tinyurl.com/rybgdtrb


Altered Household Items by Guest DT Richa

To alter the pen stand, follow the same steps. Cover it with mod podge, layers of tissue paper and black gesso/acrylic paint. Leave it to dry. To embellish punch out some flowers and emboss the petals with embossing tool. I have added the button in the shape of a butterfly and have also added plastic embellishment spelling 'Dear Friend' To Make this/For More Details Click here


Revamp Old Chocolate Tray Into Home Décor by DT Pavitra

For this altered piece I used prima’s newly launched waxes and patina effect paste and I really enjoyed working with them. They are super easy to work with and instantly glam up any project. For more details click here