Monday, 21 August 2017

Altered Wall Art Tutorial By DT Priya Mishra

Hello Crafty Friends,

Priya here today with a detailed pictorial tutorial for a Mixed media Wall art. Mixed media is always fun and I enjoy a lot creating different textures and I'm showing how to get different textures on your project here today with simple little things from your stash.

Take a look at the final outcome:


Let's start the tutorial:

Step:1 I altered a square shaped MDF board, which actually was a cake base. You can take any size of a board. Here's the base:


Step 2: I gave a thick coat of white heavy gesso on the base. Once it was dry I gave another coat.


Step 3: Next, I created some texture.Here you can see, on the lower part of the board, I glued some crumpled tissue paper and also attached lace.


Step 4: At this point, I created some texture with the help of a stencil on the left side. As you can see my son also helped me in this.


For quick drying, I used the heat tool.


Step 5: Then, on the right side of the lace on upper part, I applied some texture paste and tried some random texture using my quilling comb.


A dotted tool for some more texture here and there.


Step 6: After drying, I started adding embellishments randomly. I added flowers, chipboards, resin and metal embellishments and glued them all with a glue gun.


Step 7: Then I added a few Big and small pearls, Art stones and sprinkled seed beads.


Step 8: Then I started adding colours. Here I used acrylic colours. I mixed Pink and yellow colours to get this colour and at the lower side I added black pearl acrylic colour.


This is how it looked when finished. This photo was taken at night after I finished, so the picture isn't very clear.


Here are a few close ups of the project.


Supplies Used:

  • MDF Board/ Chipboard
  • Art Basic Heavy gesso
  • Rangers Texture Paste
  • Tim Holtz Stencil
  • Rangers Heat Tool
  • Hot Glue gun
  • White glue
  • Tissue Paper
  • Lace
  • Papericious Chipboard
  • Chipboards
  • Resin frame
  • Metal Charm
  • Flowers
  • Pearls
  • Seed Beads
  • Acrylic Paints

Hope you enjoyed the tutorial. All the above mentioned products are available at Rainbow Craftykari Store or you can preorder them by sending an email to rainbowcraftykari@gmail.com.

Don't forget to participate in our ongoing challenge Rainbow Friendship. Link your projects here.


Hugs,


Friday, 18 August 2017

Altered MDF Box by DT Priyanka Thukral

Hello Everyone, :)


I am at Rainbow Craftykari Blog today to share my very first inspiration post as the DT member for Rainbow Craftykari. I am Elated..!! and I hope to stand up to the expectations laid down on me.


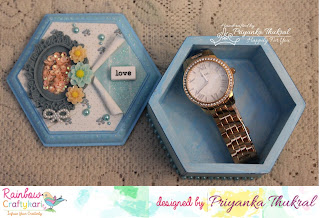
Today I have an Altered MDF wooden box to share as a part of my inspiration project.
Altered MDF projects have been my favorites since forever & no wonder I begin my term with one of these.


Here is the complete picture of my project


For this project, I picked up a hexagonal MDF box (another current favourite of mine.. :P ) I began with painting the base with gesso which works as a primer (tip: Gesso creates a coat on the base of the wooden material that holds the paint otherwise the wood absorbs the colour).


Next, I painted the box with blue acrylic colour. I chose coordinating patterned papers from Eno Greetings paper pack, cut them to the desired size & distressed them on the edges. For the cover, I cut the paper from one end to the centre point & rolled the two sides on the opposite sides.

On the exposed part of the base, I added glitter using stickles in the coordinating colour & a word tile over it. On the other part, I added a resin oval frame & sequins in the middle of it & adorned it with the resin flowers & bows.
On the sides, I again used stickles in the same colour to give an embossed look (I love how they look like tiny droplets resting on the edge) & added rhinestones to lift up the whole look.

and tada..!! the box is done... :)

The box is perfect to gift a watch to someone or keep it on your dresser as a jewellery box, can be used in multipurpose ways.

Check out some more close up pictures


Supplies Used: 

  • Mdf hexagonal shaped box
  • Gesso by Camel
  • Blue Acrylic paint by Fevicryl
  • Eno Greetings- Pattern Papers
  • Word Tile
  • Resin frame - Oval
  • Resin flowers
  • Bow
  • Stickles(aqua colour)
  • Rhinestones
  • Distress Ink
  • Glossy Accents

Above-mentioned products are available at Rainbow Craftykari store or you can also pre-order by sending an email at rainbowcraftykari@gmail.com

Don't forget to participate in our ongoing challenge Rainbow Friendship. Link your projects here.

Hope you liked my project!


Priyanka Thukral

Wednesday, 16 August 2017

DIY Dreamcatcher by DT Mounika


Hello Everyone, 


I am Mounika and am here today with my very first post as a DT member for Rainbow Craftykari. It is such an honour to be on the blog and I have a tutorial for you all. 

Here is what I made ... A Dreamcatcher, to catch the dreams as they flow by :)


Let's begin making the dream catcher


1. Gather all the materials mentioned in the supply list below. 


2. Take a smaller embroidery hoop and stretch a fabric in it, for the base. 


3.Using a brick stencil create a background with texture paste, allow it to dry. 


4. Now take a larger hoop and stretch a lace fabric. We will use this as our main base. I  applied glue on the sides to keep the lace fabric intact and not move.  


5. Now go back to the smaller hoop which would have dried. Using Lindy's Sprays add colour to the brick background and dry it using a heat tool.


6. Next, take a sheet of white card stock and cut out multiple leaves, shape and colour them using different shades of distress inks. Attach a  thick cotton thread at the back of the leaves and add some beads into each leaf thread. 


7. To make hangings for the dreamcatcher, I have cut down 1.5" strips of lace fabric on long side and then tied them to the larger hoop along with the leaves. 


8.For the sentiment, I have used an MDF embellishment.  To colour it, I first sprayed orange photo colour, once dry I added blue and yellow colours with dry stroke technique.


9. Finally, it's time to assemble everything. Using a glue gun, attach the smaller hoop onto the larger one, and then added flowers, some feathers, butterfly and the MDF sentiment and any other embellishments. Tadaaa..your dream catcher is ready!


Here are some detailed shots of my dream catcher: 


Supply List:

  • Embroidery hoops -two different sizes 
  • Papericious Sigma Card Stock
  • Texture Paste
  • Stencil
  • Lace fabric and Plain fabric for base
  • Mulberry flowers and fillers
  • Cotton threads 

  • Beads

  • MDF Sentiment
  • MDF embellishments
  • Artificial feathers
  • White glue
  • Hot glue gun
  • Lindy sprays- Gossamer Gold, Violaceous Violet  
  • Acrylic colours- Yellow Ochre, Light Blue

  • Camel Photo Colours


All the above listed materials are available at Rainbow Craftykari Store or you can e-mail your pre order at rainbowcraftykari@gmail.com

Hope you all enjoyed the tutorial!
Participate in the ongoing challenge here: http://tinyurl.com/y9lvzxxg

Happy crafting
Mounika

Monday, 14 August 2017

Rainbow Mixed Media Canvas by DT Shylaashree

Hello Friends,


I am Shylaa Shree here today to share my first post on my DT assignment with Rainbow Craftykari team.  Here is my inspiration for our current challenge theme "Rainbow Friendship"


I have a made a special artwork on a canvas for my son who celebrates his birthday this month. My daughter insisted me to make something for him.


I started with an A4 size canvas and applied a coat of white gesso to prime it. I then created a background using stencils and modelling paste. I then used my homemade colour sprays to add colour. I randomly spritzed them and moved them around. I then picked my photo, matted it and adhered it to the canvas with foam tape. I chose butterflies to embellish the canvas as my kids love them. I then randomly added 3D Stickles and sequins. I then printed out a saying (you could even use a phrase sticker or a stamp) and added it to the canvas with foam tape. I then used paper varnish to give a final protective coat.


Materials used:

  • Canvas
  • Sakura Modelling Paste 
  • Acrylic Paints 
  • 3d Stickles 
  • Sequins 
  • Tim Holtz stencils. 


Hope you are inspired! I can't wait to see your creative work for our current challenge theme. Link your projects here.


Above mentioned products are available at Rainbow Craftykari Store OR you can pre-order the products by sending email at rainbowcraftykari@gmail.com


Happy Crafting!

Shylaashree