Hi Lovely People,
Hope you are enjoying the lovely onset of winters? Well, I am most definitely enjoying it with a hot cup of tea all snuggled up in my cosy blanket ;)
There is definitely something amazing about this season with the winter chill, celebration & wedding vibes all around which makes it a December to Remember always.. as they say, "last one but the best one" .. ;)
Without boring you anymore with my love for winters I will take you straight to today's post.
Today I am sharing two CAS cards with you (CAS: Clean & simple Cards), CAS cards are a challenge for me as much as it for most others but this time I decided to do a tutorial on it for you I hope I do justice to your expectations :)
Let's begin
Card 1:
Step 1: I started with taking a white cardstock, Base dimension: 4.5"X10" & scored it at 5" & now my card measures 4.5"X 5"
Step2: Next I stamped my images Piggy & the fence using Versa onyx ink on a separate cardstock & coloured using the DUO watercolour pencils& fussy cut them.
Step3: I adhered the fence right in the middle of the card using the double-sided foam tape & then the piggy half over it.
Step 4: Lastly, to complete the card I picked the sentiment "I miss you PIG time" & using the Versafine Onyx black ink I stamped the sentiment right below the fence.
Tada our first card is ready :D easy ain't it??? ;)
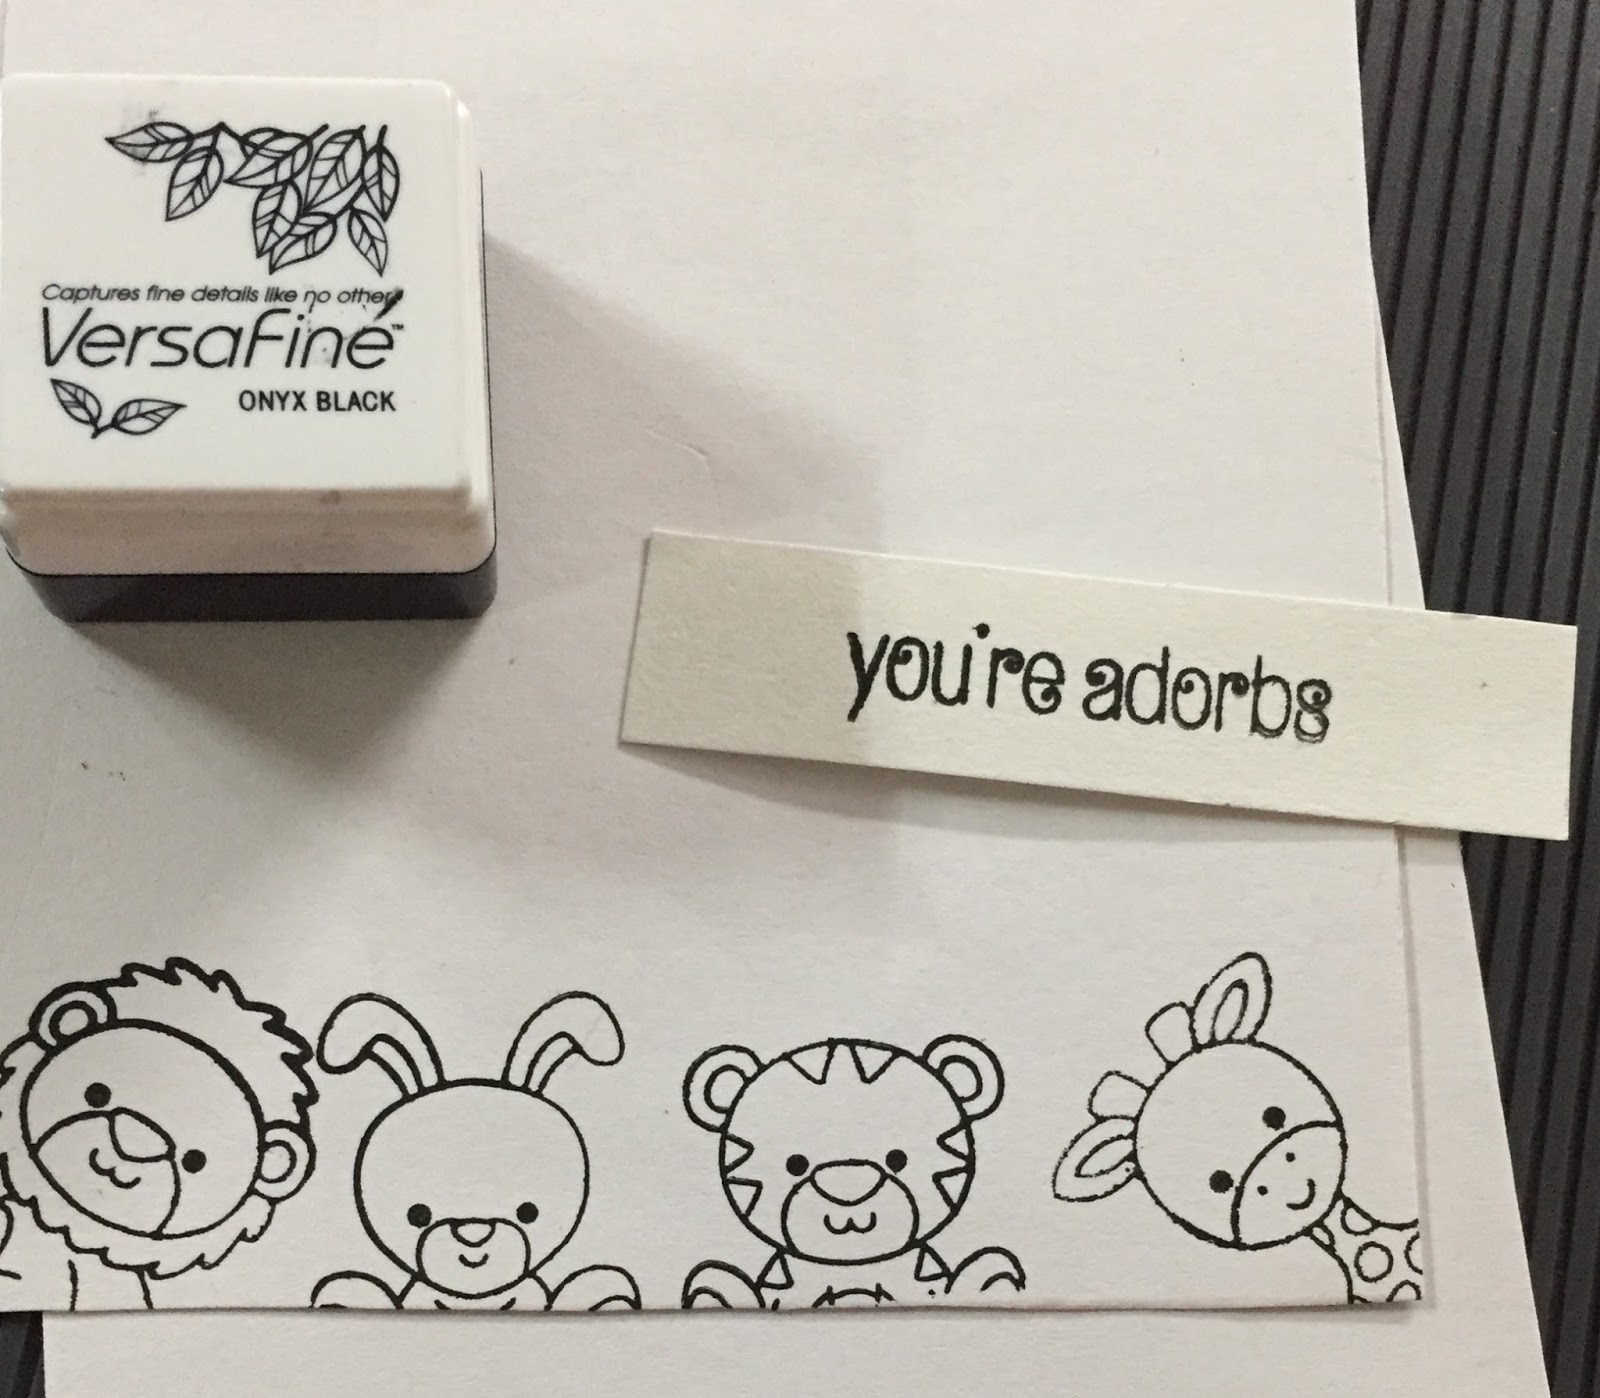
Moving onto the 2nd Card:
Step1: I again picked the cardstock in the size 4.5"x10" & scored it at 5" to make my card measuring 4.5"X5", I also cut out a cardstock in 4.25"x4.75"
Step2: using my VersaFine Onyx Black ink I stamped images using Clearly Besotted stamp set- I stamped with the animals at the bottom, with just the faces, to give it a look of the animals peeking out and picked the sentiment from the same stamp set & stamped it on a separate tag.
Step3: Using DUO watercolour pencils I coloured the stamped images & distressed the edges of the card stock.
Step4: Using an orange gingham print washi tape I added it above the animals & adhered my stamped sentiment using the double-sided Foam tape
Step5: Lastly I adhered the cardstock to my scored & folded card & Lalala! the card is ready!
Here are some more pictures:
Materials used:
1. White Cardstock
2. Clearly besotted stamp set
3. Versafine Onyx Black ink
4. Duo watercolour pencils
5. double sided foam tape
6. WRMK score & cut
7. Tsukineko ink in dew drop size
Almost all of the material mentioned above are available at the Rainbow Craftykari store or can be pre-ordered by sending an e-mail at rainbowcraftykari@gmail.com.
Hope you enjoyed the tutorial.
Hi everyone,
I am Mounika and today I am here with an inspirational post. I've used an MDF number for this project and decorated it on a floral theme for a birthday photoshoot.
To start with, I sanded and cleaned the mdf base and applied two coats of chalkpaint. Once it dried, I applied glue all over the number and stuck lace fabric and let it dry. I next, arranged flowers randomly, once I was satisfied with the arrangement, I glued them all together.
Supplies Used:
- MDF number cutout
- Lace fabric
- Chalkpaint peach
- Whitecardstock(for main flowers
- Mulberry and paper flowers
- Pollens
- Butterfly Diecuts
You can find all the above mentioned products from rainbowcraftykari store or you can preorder the same by writing to rainbowcraftykari@gmail.com.
Happy Crafting
Mounika
Hello everyone!
It's December already now and time to say goodbye to the Year 2017 and welcome the coming year!
This time I am presenting a simple but an elegant card as an inspirational post!
Presenting a true beauty of the Season with all joy and festivity! It is in Traditional colors with a lot of theme challenge elements like stars, glitter, snow! Check out the challenge here.
I started by choosing the wooden papers from Papericious, distressed the edges. Applied vintage photo DI on all 4 sides and lay them on a Kraft CS. For the focal panel, At the bottom added a crochet lace and tied a golden string with a pipe cleaner.
Die cut some pine boughs leaves out of green glittered sheet, added some pom-poms, star buttons, rose mulberry flower along with glittered leaves.
Now at the top, I added a big jute flower along with 2 more small jute flowers and decorated them with adding different leaves, pom poms, string.
Now die cut star shape from glitter and burlap sheet and added the star-shaped chipboard on it and created all the layers. Love the intricate design of star showing all the layers!
To finish it up added some snow paste a and crystal clear powder.
Love the snowy and frosty look! Don't you!!!
Some more pics with close-ups!
Supplies used:
Cardstocks: Textured Kraft CS, Textured snow effect sheet in cream color
Glittered green foam sheet, Burlap sheet
Pattern paper: Wooden Collections from Papericious
Crystal clear Powder: Papericious
Aleene's True Snow paste
Glittered Star-shaped chipboard
Artists Gesso
Dies: Pierced Stars from Spellbinders, Pine boughs from Poppystamps
Other supplies: White pom poms, red mulberry tiny roses, jute flowers in 2 styles, crochet lace, golden string, green felt leaves, red pollens, red color pipe cleaner and star-shaped wooden buttons
All supplies are available at the store or you can pre-order.
Hope you all enjoyed my this term as a GDT at Rainbow Craftykari with loads of inspirations!
Have a wonderful day!Vinita Jain
Hello everyone,
Hope you've kickstarted your December with enthusiasm! After the Diwali month, December is my personal favourite because of the cheer you get to see around the world!
Keeping up with this festive spirit, today I am back with an Inspiration post for you. I have also incorporated the December Challenge in my creation. I used the colours Red and Green, Snowflake and Glitter.
I have altered two glass jars which make great gifts for Christmas. I personally have been flaunting them at home. To alter them this time, I decided to use techniques of paper crafting rather than mixed media.
Here's a look at the Jars:
To make these begin by choosing three to four pattern papers. Cut one to go around the circumference of the jars. Distress the edges and stick it. Next, cut two narrow strips for a different pattern to layer on top. Die cut a circle for the lid. Use glitter cardstock, and die-cut a snowflake element to decorate the lid. Embellish it with flowers and other die cut elements. You could go on with layering and embellish as per your imagination and liking. Fill them with cookies, chocolates, brownie and more for Christmas Gifts. Like you see, they are quick and easy to make so you can create multiple of these at once.
Here are some more pictures:
Supplies used:
- Glass Jars
- DCWV Paper Stacks- Cranberry Christmas 12x12", The Heirloom Christmas 12x12", Glitter Cardstock 6x6"
- Heartfelt Creations Die- Snow Kissed Flake
- Nested Circles Die
- Cherylynn Die- Flourish #8
- Distress Ink- Black Soot
- Liquid Glue
Hope you're inspired to create yours! Do participate in our ongoing challenge.
Happy Crafting!
Aditi