Showing posts with label DT Saloni. Show all posts

Tuesday, 3 July 2018

Farewell to the Summer 2018 RCS DT Team


Hello Everyone,

We are bidding adieu to our Design Team Members and wishing them all the best for their future!

The past three months flew by and our team came up with great posts for you all! We would like to thank each member for contributing to the blog with such great ideas and tutorials!

Their works are as follow:

Blog Coordinator Aditi


https://rainbowcraftykari.blogspot.com/search/label/Blog%20Coordinator


DT Priyadarshini


https://rainbowcraftykari.blogspot.com/search/label/DT%20Priyadarshini


DT Saloni


https://rainbowcraftykari.blogspot.com/search/label/DT%20Saloni


DT Vidhi Jadeja


https://rainbowcraftykari.blogspot.com/search/label/DT%20Vidhi


DT Megha Tainwala


https://rainbowcraftykari.blogspot.com/search/label/DT%20Megha


DT Spardha Angra


https://rainbowcraftykari.blogspot.com/search/label/DT%20Spardha


The NEXT DT season will be coming up soon !! Keep watching our updates at  FB.com/rainbowcraftykari and rainbowcrafykari.in

Thursday, 14 June 2018

Oil Painting Inspiration by DT Saloni

Greetings Everyone,

How have you been?
It's me Saloni here, Today I have created a Texture painting to share with all of you. If you've ever spread icing on a cake, you have an idea of the texture possibilities when using a palette knife to create an oil painting.

Take a look


I started the canvas with roughly designing the picture that I wanted. Once done, I started adding colours to it. There are two ways of doing it:- Either you can add texture first and then colour it or you can colour the entire canvas and add texture accordingly. Choose a palette knife based on the shape, as different shapes will create different effects. The way you hold the knife, its angle to the canvas, the amount of paint on the blade and the direction you pull it through the paint on the surface, all add different effects. It's super easy and fun and with minimum products, you can achieve great textures.


Some more close up shots:


Material used:

  • Canvas
  • Oil painting
  • painting knife
  • Painting Brush

I hope I was able to inspire you all.
Keep Checking the space for some amazing inspiration from my fellow team members.

Visit our BLOG for more inspiration, tutorials and check out our ongoing challenge.

Do visit the Rainbow Craftykari store HERE

Have a nice day!
Happy Crafting
Saloni

Friday, 1 June 2018

RCS Challenge #11 Back To School + Blog HOP

Hello everyone,

Wishing you all a very Happy June! With the new month, we have a fun new challenge! This month apart from the challenge, we also have a fun blog hop for you all!

Here's a look at the challenge first:


The challenge is all about creating any project on the theme of 'Back to School' with a twist of incorporating any school stationery in it! Feel free to create any crafty project be it a card, a layout, altered piece, tag, home decor art, album and anything art/craft related. The last date to submit entries is 25th June'18

One winner will win a goodie bag filled with CraftTangles supplies worth Rs. 400 (shipping free) as well as the winner's badge to flaunt on the blog. Top three entries will get to flaunt a badge on their blogs.  

Any entry which doesn't follow the guidelines will be disqualified and will be removed from the participation entries

Please go through the General Guidelines and Rules HERE.

Now coming onto the blog hop fun! Our team has created fantastic projects for you'll to be inspired from! Below is the Blog hop list, click and visit their blogs. To enter for the prize, leave a comment on all the team member's blogs as well as on the Rainbow Craftykari blog June Challenge Post. Additionally, subscribe to the Rainbow Craftykari Youtube Channel and follow/subscribe me (choose, one social media personal).
As simple as that!
Here's the list:

Rainbow Craftykari Challenge Post- ****YOU ARE HERE****

Blog Coordinator- Aditi MahajanToday I have created a simple yet colour messy layout! The word School takes me back to Primary Colours and artistic mess! I was also inspired by our DT Spardha's style of keeping the layout simple using minimal embellishments.


DT Megha TainwalaThese are fun and easy ways of giving your notebook and pencils a makeover, so easy and customizable that your kid could also have some fun going back to school.


DT PriyadarshiniEducation is the most powerful weapon which can change the world'- Nelson Mandela.

New academic year with more challenges and lots to learn, I made a door hanger 'My Study Time'


DT Saloni- Everyone's school days have the memories they can cherish and treasure for life. When I think about School, it reminds me of all the fun I had.. We used to play our own created games and draw for fun. Similarly, I wanted to create something which can also be fun.  So I have created two different cards trying to incorporate few elements which will remind us of our school days. 


DT SpardhaGet nostalgic and back to school for June!
Here's to the best years of our life, learning and becoming the beautiful little individuals we are now.


DT VidhiToday I have created a small 6 by 6 Photo Folio inspired by the 'Back to School' theme. As a school stationery, I used Paper Pin or U pin as the closure to the Folio. This folio is inspired by all things school and all the elements take me back to my school days.


Two winners will be announced on 8th June on the Blog and on Rainbow Craftykari's Facebook Page. Winners stand a chance to win a gift voucher to the Rainbow Craftykari Store. 


Tuesday, 22 May 2018

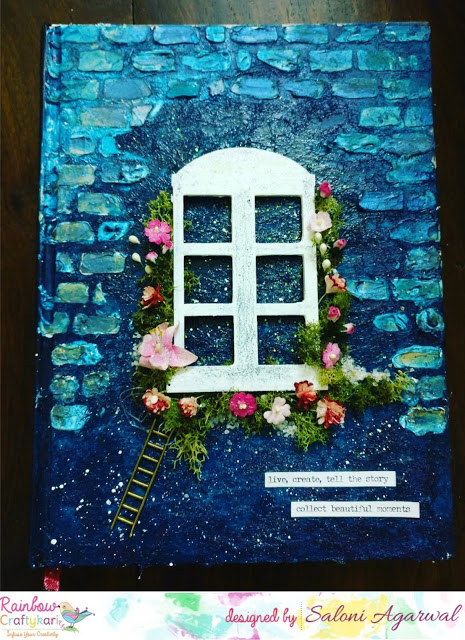
Altered Diary Cover Inspiration by DT Saloni

Good Morning all you lovely crafters out there!

Saloni here with a new inspirational post today !! Today I have a Mixed media altered project again.

Why should the inside of your diary just be filled with pretty art, transform your diary cover with mixed media and simple techniques!

So, here's how it looked after all the hard work:


To begin with, I have applied a thick coat of heavy gesso and primed the surface. Next, I applied the fiber texture paste to it. To add some more texture, I have used a brick stencil with texture paste. Once dry, I started adding colours to it. To keep it simple, I have used just different shades of blue with a hint of white. It's such a beautiful colour strikingly soft yet stands out pretty loud. Further to embellish the diary, I have adhered some flowers, moss, metal charms. In the end , I have added a few art stones, frosting powder & created white splatter with watered down white gesso.

Here are some more close up shots...


Materials Used:

. Old Diary 
. White heavy Gesso 
. Fiber texture paste
. Modelling Paste
. Prima art alchemy waxes and patina paste
. Color sprays
. MDF Chipboard
. Flowers & Moss
. Texture sand 
. Frosting Powder
. Tim Holtz Idea-ology Sticker

Most of the above -listed materials are available on the Rainbow Craftykari Store and can also be pre-ordered by sending an email at rainbowcraftykari@gmail.com.

Visit our BLOG for more inspiration, tutorials and check out our ongoing challenge.
Hope my project inspires you !!

Love
Saloni

Wednesday, 2 May 2018

Mosaic Art Tutorial by DT Saloni

 Hello Crafty friends!!

I am back on the Rainbow Craftykari blog with another fun project.This is the first time I have explored Mosiac art and I am happy with the result I have achieved.

A mosaic is a piece of art or image made from the assemblage of small pieces of coloured glass, stone, tiles or other materials. It is often used in decorative art or as interior decoration. Most mosaics are made of small, flat, roughly square, pieces of stone or glass of different colours, known as Tesserae.


In this tutorial, I will be showing you how to create mosaic art with tiles. I have made a wall hanging, but the technique can also be used for different projects.

Here's a look at creation:


1. Select the material you wish to use.
 Pieces of material used in a mosaic art are called tesserae. They can be glass, stones tiles, pebbles, or anything else you can find. You will also want to gather together any objects you might want to include.


2. Pick the base to adhere the mosaic tiles on.
 Tables, planters, wooden, or glass are just a few ideas to use.


3. Draw the pattern you wish to make into a mosaic.


4. Transfer the design to your base.
 Lay it on a flat surface and roughly lay the tesserae. Use glass or tile cutting tools to cut pieces to the desired size. You can also use a hammer to break pieces as well. Make sure the pieces are clean of any dirt before laying them out. Paste all the pieces and let it dry.


5. Prepare the grout mixture. You can procure this from any hardware store. Grout comes in many colours and there are colours you can add to the grout to change the colouring. Choose a colour that accents your mosaic. 


6.Mix the grout with water in a disposable container. Mix to a consistency of peanut butter And then spread with a  popsicle stick, or with your gloved hand. Make sure the grout fills in every nook and cranny.


7. Let the grout set for some time. Wipe the mosaic with a clean sponge and warm water. Rinse out the sponge regularly as you wipe away grout from the surface of the tiles. This is to remove the grout from the surface of the tesserae so that it remains smooth and levels with the edges of the tesserae. 


8. Seal the mosaic with varnish. This will coat the tiles and safeguard against damage, especially for outdoor mosaics subjected to fluctuating temperatures and adverse weather conditions. It will also give it a high gloss finish that will make the colours stand out.

Material used:

MDF Base
Broken Tiles
Tiles Nipper
Grout
Sponge

If you have any queries, feel free to drop a comment below in comments section, will reply asap :)

Most of the above-listed materials are available on the Rainbow Craftykari Store and can also be pre-ordered by sending an e-mail at rainbowcraftykari@gmail.com.

Do visit the Rainbow Craftykari store HERE

Hope you're inspired to create yours! Do participate in our ongoing challenge.

Happy Crafting
Saloni

Wednesday, 18 April 2018

Heart Layout by DT Saloni


Hello all Crafty friends!!!

My brother always tells me that "I am a big hoarder" and sometimes I do agree with him. So this time I have created a mixed media layout with a picture, I have been hoarding for a long time.  Making a mixed project is also so fun. You can add so many techniques and style and the end results are always a surprise.

I am here today with my first " Picture tutorial post "at Rainbow Craftykari as a DT member.


So here is how I made the layout:-

Enjoy the video flip through and the step by step instruction below.

Step 1: For this beautiful layout, I have taken an MDF base measuring 12x12 inches. You could use anything that is handy for you or even a 12x12 scrapbook paper. TO begin with, prime the surface with black gesso and let it dry. Next, for an edgy look, apply crackle medium evenly with a brush and let it dry. The crackle medium should be dry completely before applying the second layer of colour. 


Step 2: Once the base is dry, apply the second layer of colour. When using crackle medium, you should use the dark colour as your base, so that when the second layer of colour cracks, the darker shade is visible.


Step 3: Next, add some more elements on the background by stamping. I have used some clear stamps and distress ink for this.


Step 4: Mixed media is all about layers. Next, add some texture with modelling paste. To further enhance the look, add colour on the edges and let it flow. 


Step 5: Select the photo of your choice that will be the focal point of your project. I have used a picture which is very close to my heart. Pick out a few papers to create layers underneath your picture. Distress the edges with ink. Fuss cut some elements for layering, or grab your embellishments. Play around with them and see what looks good before sticking them.


Step 6: Once you are happy with the arrangement and placement of the layers, embellish the layout with the buttons, flowers, tags and stones.


Hope you all like it and get inspired by it to create something equally beautiful for yourself!!!

Supplies used:

  • MDF Base
  • Balck Gesso
  • Crackle Medium
  • Chalk paint
  • Modelling Paste
  • Pattern papers
  • Flowers
  • Colour Sprays
  • Tags

Most of the above-listed materials are available on the Rainbow Craftykari Store and can also be pre-ordered by sending an e-mail at rainbowcraftykari@gmail.com.

Do visit the Rainbow Craftykari store HERE

Hope you're inspired to create yours! Do participate in our ongoing challenge.


Happy Crafting

Saloni