Showing posts with label Inspiration. Show all posts

Wednesday, 13 December 2017

Family Layout by DT Anila Dikay

Hello Crafters!


Anila here with an Inspiration Post for you all. 
Today, I am showcasing a "Family Layout". Making layouts is always fun. Every artist has a different technique or style and today I am going to show you how all of us can make an LO with minimal supplies and no fancy techniques. All one needs is an eye for composition. 

Here it is!


Steps Followed:
  • I took an 8x8 sized pattern paper. 
  • Layered it with another 6x6 family script pattern paper. 
  • Mounted the photo using foam adhesive and two pieces of coloured CS at the corners.
  • I adhered a lace at the bottom of the photograph. 
  • Adhered paper strips and washi tapes on one side. 
  • Next, I added the sentiment and the quote stickers. 
  • Lastly, covered the corners with flowers. 

Materials used are:

  • Pattern papers
  • Sentiment stickers
  • Washi tapes
  • Lace
  • Flowers


Few more close-ups of the Layout follows


All the above-mentioned materials are available at Rainbow Craftykari or can be pre-ordered by sending an e-mail to rainbowcraftykari@gmail.com or to info@rainbowcraftykari.in


Thank you for stopping by!
Anila


Monday, 4 December 2017

Altered Jars by Blog Coordinator Aditi Mahajan

Hello everyone,

Hope you've kickstarted your December with enthusiasm! After the Diwali month, December is my personal favourite because of the cheer you get to see around the world! 

Keeping up with this festive spirit, today I am back with an Inspiration post for you. I have also incorporated the December Challenge in my creation. I used the colours Red and Green, Snowflake and Glitter.


I have altered two glass jars which make great gifts for Christmas. I personally have been flaunting them at home. To alter them this time, I decided to use techniques of paper crafting rather than mixed media. 

Here's a look at the Jars:


To make these begin by choosing three to four pattern papers. Cut one to go around the circumference of the jars. Distress the edges and stick it. Next, cut two narrow strips for a different pattern to layer on top. Die cut a circle for the lid. Use glitter cardstock, and die-cut a snowflake element to decorate the lid. Embellish it with flowers and other die cut elements. You could go on with layering and embellish as per your imagination and liking. Fill them with cookies, chocolates, brownie and more for Christmas Gifts. Like you see, they are quick and easy to make so you can create multiple of these at once. 

Here are some more pictures:


Supplies used:

  • Glass Jars
  • DCWV Paper Stacks- Cranberry Christmas 12x12", The Heirloom Christmas 12x12", Glitter Cardstock 6x6"
  • Heartfelt Creations Die- Snow Kissed Flake
  • Nested Circles Die
  • Cherylynn Die- Flourish #8
  • Distress Ink- Black Soot
  • Liquid Glue


Hope you're inspired to create yours! Do participate in our ongoing challenge

Happy Crafting!
Aditi


Wednesday, 29 November 2017

Revamp your bag by DT Khushboo

Good morning all you lovely crafters out there!

I'm Khushboo and I'm here with a new Inspiration Post today.


Often times, we love certain possessions of ours, and when they start showing signs of wear and tear, we are left with no option but to throw them out! That really breaks my heart. Recently, I was again faced with the same dilemma - when my favourite bag (which I haven't even used all that much :(!) started to lose its resin material from the sides. If I wasn't a crafter, with a very heavy heart I would have had to throw the bag away. But now that that's not the case, I know exactly how to give my bag a new life :D - all thanks to the Decoupage technique! Yep, today, I'll share with you how you can use decoupage on your bag and make it look as good as new!


Let's take a look at the pictures of my finished project first and I'll then explain how I managed to do that!


(My bag originally look like this. And all the brown piping and stitched boundaries that you see started to rip away.)


Pic credit: Pinterest


These are some of the pictures of my transformed bag. Notice how I decoupaged with designer paper napkins on the boundaries.


Materials used:

  1. Designed tissue paper
  2. Mod-Podge (or any other decoupage glue)
  3. Gesso
  4. White paint
  5. Paint brushes
  6. Tweezers
  7. Clean rag
  8. Water

Brief steps for transforming your old bag into new:

  • Wipe your bag with a clean cloth to get rid of the dust, dirt and grease.
  • Pluck out the ripped and lose hanging resin pieces on your bag (this is to enable that the part where you will stick the tissue is even and flat, no uneven texture).
  • Apply two coats of gesso and let it dry after every coat.
  • Paint the surface with white paint once the gesso is dry.
  • Rip small pieces of decoupage tissue according to the size of the surface you want to cover.
  • Start laying it down on the surface with the help of your paintbrush and decoupage glue.
  • Apply two coats of decoupage glue and let every coat dry thoroughly.
  • Finish it off with a nice clear varnish or spray.


Signing out,

Hope you guys enjoyed my creations and the tutorial. Can't wait to see how you add your own twist to this!


Above mentioned products are available at Rainbow Craftykari Store OR you can pre-order the products by sending an email at rainbowcraftykari@gmail.comThat's it from me, folks!


Khushboo R. Gandhi

Wednesday, 22 November 2017

Altered Bottles by DT Anila

Hello friends!

Don't we all like to hoard things? We not only like to buy and hoard new items but also like to collect things which can be reused/upcycled in some form or the other, with the hope of giving these junk/scrap items new life sometime. 


I have a huge collection of glass bottles, cardboard/paper boxes, invitation/greeting card, tissue paper rolls and what not.


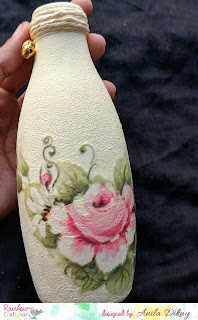
Today I am showcasing an upcycled glass bottle. This is just an inspiration for you to start using/revamping those things you have been hoarding endlessly. 


Here, I have decoupaged the (2) glass bottles to convert them into beauties to adorn your homes. They can also be given out as gifts.

Here's a look at the project -


Materials used

  • Chalk paints
  • Decoupage tissue papers
  • Sponge
  • Paper string
  • Thread and bells.


Method -
  • Firstly, remove any sticker on the bottle. Wash the bottle clean and dry it completely. 
  • Cover the bottle completely by dabbing the sponge with chalk paint over it. Let it air-dry.
  • Repeat the process to get a more uniform finish. 
  • Pick the tissue to be used and trim the design as desired. 
  • Carefully remove the backing/second ply of the tissue.
  • Apply a coat of Mod-Podge and stick the tissue over it carefully avoiding any creases. Let dry.
  • Apply a coat of Mod-Podge over the tissue paper to seal it. 
  • Tie a paper string to the neck of the bottle, covering it fully.
  • Tie a set of bells/Ghungroos with the help of a thin thread.


More pictures follow -


Hope, I could inspire you to finally start working on those things and give them a new life.

Do check out our ongoing challenge on the blog here
And do not forget to participate. 

Love,
Anila

Monday, 6 November 2017

Shabby Chic Jewelry Box by DT Priya Mishra

Hello Crafty Friends,

A very good morning to all of you. I'm Priya again with a photo inspiration post. This time I transformed a boring box into an interesting shabby chic jewelry box. 


The box I used is a drawer box and is beautiful inside. I just cut some pattern paper according to the dimensions and glued on it. So, here's the box I altered...


I cut the pattern papers according to desired measurements, distresssed the edges and glued on all sides of the box. Then I adhered some pearl string and rhinestone string on the top cover of the box. also some strings on the front opening of it. Then I adhered a beautiful leaf pattern lace on the top cover and attached a mandala die cut, some flowers, pearl stickers, twines and some more lace to decorate it.


Supplies Used:

Cardboard Box
Martha Stewart Score Board
Guillotine Paper Trimmer
Scissors
Eno greeting Pattern Paper
Papericious Lace
Twines
Tacky Glue
Distress Ink
Double sided Foam Tape
Chipboards
Flowers
Paper Flowers
Diecut
Pearl String
Rhinestone String
Pearl Stickers

Hope you are inspired. 
You can find all the above mentioned products from Rainbow Craftykari Store or you can pre-order the same by writing to rainbowcraftykari@gmail.com. 
Also do not forget to play along with us at our monthly challenge here.

Hugs,
Priya


Saturday, 4 November 2017

Vintage Style Love Card by GDT Vinita Jain

Hello Everyone!

Another month has started so another fun inspiration creation for the challenge!


This time, I tried a new concept for me, made a vintage style Love card with my own handmade flowers. My base is a textured white CS.


I added lots of layers of old textbook papers and adhered them on a distressed white piece. Distressed them with hickory smoke ink and applied fossilized amber Distress paint in the centre. Now added some white linen ink spray splatters too and applied some of the gesso at the edges! Die cut some rose flowers, distress and shape them. 


After that, I die cut some Hearts out of textured and vellum sheets. Die cut some clustered leaves, distress them too. Added lace trims and finally decorated my card using lots of flowers with some Thank phrase and few green transparent dew drops and lots of splatters!


Here is the inside view:  You can add a personal message too!


Hoping you are inspired by my creation and will play along.


Supply list:

  • White textured CS, cream color textures CS, vellum sheet
  • Old book text papers
  • Stamps: Love notes from Avery Elle and Polaroid from Kaisercraft
  • Dies: MFD 022 Heart from Nellie's; Mini and large royal rose from Die-namics; Clustered leaves from SSS
  • Distress inks: hickory smoke, mowed lawn, fossilized amber
  • Distress paint: Fossilized amber
  • Finger daubers
  • Camel Artists Gesso
  • Jet black archival ink
  • Clear gel tacky glue
  • White linen Dylusion Spray
  • Double colour jute string
  • Circle flourish Lace trim from Papericious
  • Green colour dew drops


All the above materials mentioned here are available at the store or you can preorder too at Rainbow Craftykari Store !

Happy crafting!
Vinita

Wednesday, 25 October 2017

Adventure Shadow Box by DT Monica

Hi everyone,


Monica, here  I am back with an inspiration post. I made a Mixed Media Shadowbox and I titled this "Adventure".


For this, I took an MDF square shadow box measuring 6*6". I sanded the box roughly and cleaned it. Next, I brushed it with Papericious Black Heavy Gesso. Once it dried, I  used a brick stencil with Prima sand texture paste to add some texture inside and outside of the box. I added embellishments and used a cardboard with twine around it and stuck it to the base. I again brushed everything with gesso, and once dry I started adding colours. I used Prima Art Alchemy Light Gold, Aged Bronze and some acrylic colours Burnt Sienna, Prussian Blue and White.


Materials: 

  • Mdf shadow box
  • Mdf gear embellishments
  • Prima sand texture paste
  • Prima art alchemy waxes
  • Prima typo bulb
  • Brick stencil
  • Papericious heavy black gesso
  • Acrylic paints- Burnt Sienna, Prussian Blue, White, Yellow
  • Twine


All a
bove-mentioned products are available at the Rainbow Craftykari store or you can pre-order them by sending an e-mail to rainbowcraftykari@gmail.com

Hope my project inspires you!


Happy crafting
Mounika Koneru