Showing posts with label Rainbow Craftykari. Show all posts

Monday, 8 March 2021

"YOU" Art Journal by Priya & "Amazing Grace" Plaque by Rupneet

Hello Friends,

This is Priya Mishra here from Sanskruti Arts & Crafts at Rainbow Craftykari Blog. Wishing you all a very happy Women's Day. I'm so happy and excited to join in this Women's day Insta hop and Blog Hop and Linky Party. Thank you to all the sponsors who have sponsored this beautiful hop !! For the next stop kindly click on this link

https://women-beyoutifullyyou.blogspot.com/2021/03/3rd-international-womens-day-blog-hop.html


My project is called -  YOU and I have added a quote "No one is you, and that is your superpower" 
When a woman stands for herself, she automatically stands up for all women. Before encouraging others, you should look within and find that support and confidence that defines you as a woman.
Keeping in this thought, to encourage the all the women out there, I've created an Art Journal Page today...


For making this Art journal page, first I created the background. Layered some papers, Tim Holtz die cuts and roughly dry brushed with white gesso. Created a little texture with some stenciling and stamping. Colored with chalk paint in shade of pink.

Then added some metal charms and wooden die cut for some added layers. Used a black marker to create some extra interest.


Finally added a Tim Holtz doll and sprinkled some black gesso and pink chalk paint all around. I added a sentiment " No one is you and that is your super power". Here are some more close ups of my project.


Now Over to another beautiful Artist, who has created inspiring project on this occasion. Over to You Rupneet

Thank you and Warm Regards
Priya Mishra
Sanskruti Arts & Craft


                  ***************************************************************


Hello Crafty Peeps

Rupneet here From SylviazArt at the Rainbow Craftykari Blog. Wishing you all lovely women out there  a very happy Women's Day. I'm glad to join in this Women's day Blog Hop and Linky Party. Thank you to all the sponsors who have graciously sponsored this beautiful hop. For next stop click on this link:
https://women-beyoutifullyyou.blogspot.com/2021/03/3rd-international-womens-day-blog-hop.html


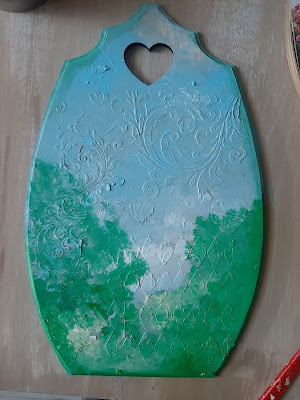
Today's artwork' theme is encouragement and what better a way to present it for the womens day... so chose this Plaque , which is primed and sanded well


Over this plaque I chose to give a textured background using a texture paste through a beautiful filigree stencil... once the texture is dried, I colored the background....


And thereafter I chose a beautiful image from newspaper image, a icecream tub lid and some flora to embellish...

I primed the plastic lid with gesso and decoupaged the image using modge podge and blended the colors over the corners, and after the image on the plastic lid dried, I chose to stick it to the middle of the Plaque, such pretty landscape image goes well with the background,  isn't it....

To embellish It further,  i use some flowers around the lid and stick them using a hot glue gun and a quote saying "you are amazing " comes on top of the Plaque which its look enhances making it look as one piece. 


I enjoyed working on this colorful make and loved its cheerful vibe... hope you enjoyed the process with me..

Thanks for reading through!

Rupneet
Creative Head
Team Sylviaz

Tuesday, 12 May 2020

Brush Blending on Pinewood Plank Tutorial | Maninder Kaur | Rainbow Craftykari

Hello Everyone,

Rainbow Craftykari Present An in-depth Brush Blending Technique Tutorial onto Wooden Plank by Maninder Kaur, Calambour Italy Certified Decoupage Teacher.

RCS is known for Providing and Sharing Highest Quality of Tutorial Videos, through which countless people have learned intensive projects!!

This tutorial explained the Brush Blending Technique step by step, which you can apply at any surface, not only this, the tutorial has covered a whole project from beginning till the end induced with various tips & tricks. Check out the tutorial video below:


Materials List is mentioned here:
https://youtu.be/3eYd-Mv9m5A

You can drop us a message at www.facebook.com/rainbowcraftykari or send an E-Mail at info@rainbowcraftykari.in

Wednesday, 4 July 2018

RCS Challenge #11 Back to School - Winner & Top 3 Projects

Hello Everyone,

Today we're here to announce our June Challenge Winners.

We've had some lovely entries, and we love your interpretation of the challenge!

We love all the entries, and it's always hard to choose a few. However, some things have to be done...


Let's move on to the announcement!!


The Top three in no particular order are:


C A Mayyuri

All the school elements work perfectly well in this project!


We love this cube card! It is interactive and the school elements are great!


Lovely interactive tag with great school elements!

Top three, do grab your badges from the blog and
flaunt them!


Now onto our winner!!

Pallavi Jain


This project is beautiful! Loved how she was inspired by the theme and used many elements in her project!

Kindly grab your badge from the blog and flaunt it.

Winner kindly e-mail us at rainbowcraftykari@gmail.com with the subject Challenge #11 Back to School Winner to claim your prize. 


Thursday, 19 April 2018

Victorian Effect Jewellery Box Inspiration by DT Megha

Hello everyone,
Hope you've kickstarted your Summer with some juicy mangoes and buttermilk to beat the heat!

Today I am here with my first DT Inspiration post for you through Rainbow Craftykari. I have also incorporated the 'Love' theme for April Challenge in my creation.

I have altered a jewellery box which makes a  great gift for near and loved ones. I personally have decided to gift this to my aunt who 'Loves" jewellery ;)!
To alter this, I decided to use techniques of mixed media. Here's a look at the altered project:


To make this begin by choosing any jewellery box, could be from your mother's or one of your own. Next, prime it and lay elements which you would like and take a picture, to refer later. Next, apply modelling paste through a stencil which will depict grandness. Pick your colours, I choose blues and yellows and covered the top and sides of the box. Next, I prepare the elements, here I gold embossed the chipboard frame (from Rainbow Craftykari), and the chipboard swirls with clear embossing powder. I used patina pastes and altered the metal butterfly. 


Keeping the Victorian lady as my focal point, I adhered all elements, along with a corrugated sheet to add texture, flowers, a vase, a skeleton leaf behind the frame to add detail and some art stones and glitter sprinkles. Lastly, I used waxes to bring out the details on the elements and added splatters with white paint.


Like you see, this is quick and easy to make so you can alter these and these would make perfect gifts for ladies.


Here are some more pictures:


Supplies used:
  • Jewellery box
  • Modelling Paste, White Gesso, Stencil, Embossing Powders
  • Matt Medium, Corrugated Sheet, Skeleton Leaf
  • Flowers, Metal/plastic Charms, 
  • Glitter Sprinkles
  • Rainbow Craftykari Chipborads
  • 13 Arts Colour Sprays
  • Finnabair Waxes, Patina Pastes, Art Stones
  • Liquid Glue, Heat Gun

Most of the above-listed materials are available on the Rainbow Craftykari Store and can also be pre-ordered by sending an e-mail at rainbowcraftykari@gmail.com.

Do visit the Rainbow Craftykari store HERE

Hope you're inspired to create yours! Do participate in our ongoing challenge.

Happy Crafting!

Megha


Friday, 1 December 2017

RCS Challenge #8 X-Mas Joy

Hello Everyone,


A very happy December to you all! Another new month and another new challenge! 


This time we have another unique challenge for you all!

Here's a look at our challenge


(Pic credit Google and Vecteezy)


The theme of course is X-MAS JOY and it comes with a few elements to be used on your project. Use at least three of the mentioned elements- Red, Green, Star, Snowflakes or Glitters. Let us know how you interpreted the challenge and also make sure to use the challenge banner in your post. 


Feel free to create any crafty project be it a card, a layout, altered piece, tag, home decor art, album and anything art/craft related. Last date to submit entries is 28th December'17


One winner will receive a Gift Voucher Coupon worth Rs 450/- as well as the winners badge to flaunt on the blog. Top three entries will get to flaunt a badge on their blogs.

Any entry which doesn't follow the guidelines will be disqualified and will be removed from the participation entries


Please go through General Guidelines and Rules HERE.


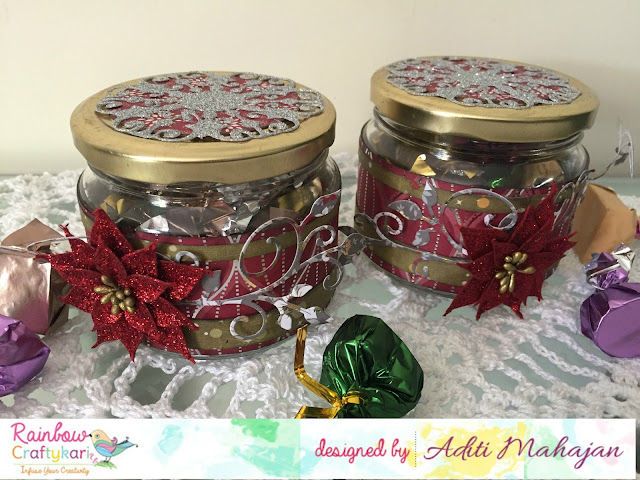
Here's what our Blog Coordinator Aditi made for the challenge (red, green, snowflake and glitter)


Here's what our GDT Vinita has made: (red, green, star, glitter)


Look out for amazing inspirations during the month!

Link your entries below to participate in the challenge.


Friday, 10 November 2017

Everyday Sentiment Cards by DT Ishani

Hello Dear crafters,


I love making cards and sending them to my dear ones. Am sure you love it too, especially to see or hear the joy when they receive it! Today, I am here to inspire you and encourage you with my cards.


Friendly Birds


My first card today is something I created primarily using dies and pretty patterned paper.

Materials: 

  • White cardstock

  • Pattern Paper

  • Birdhouse dies

  • Stitched circle

  • Watercolours

  • Spectrum Noir Sparkle Pen

  • Corner Chomper

  • Die - cut sentiment

  • Sequins

  • Glue

I cut a circle on the front panel of the card base and just behind it, I did some watercoloring to create a scene of sky and grass. Then I cut a fence, birdhouses and birds out of dies and some patterned paper. I adhered behind the cut circle, the fence and one of the birdhouse so that they are on the upper panel. The other birdhouse was adhered inside the card, protruding till the cutout circle. Some glossy accents for the birds and spectrum noir for my background watercolour. I used a die cut sentiment, chomped off the upper corner and some added sequins to finish off my card.


Shaker card


Materials: 

  • White cardstock

  • Stamp

  • Embossing powder

  • Versamark ink

  • Heat Tool

  • Zig clean color brush pen

  • Pattern Paper

  • Scalloped square frame die

  • Acetate sheet

  • Foam tape

  • Double sided tape

  • Sequins  


For this, I stamped out a cake with Versamark ink and heat embossed it with a gold embossing powder. Then with zig clean colour brush pens, I coloured the cake and fussy cut it. 
For the shaker card I cut a frame from a Scalloped square die and similar to the dimensions of the frame, I cut an acetate sheet, a pattern paper with the birthday theme and the card stock.

On the base which is the card stock I stuck the pattern paper and glued the cake over it. I took the scalloped square die cut and adhered the acetate sheet with a strong tape. I treated the acetate sheet and the pattern paper with anti-static powder and then put foam tape at the edges of the card. Before placing the acetate sheet and sealing, I put some sequins on the card.


Hope you liked these cards and would try to make similar too! 


All above-mentioned products are available at the Rainbow Craftykari store or you can pre-order them by sending an e-mail to rainbowcraftykari@gmail.com.


Happy Crafting

Ishani

Monday, 6 November 2017

Shabby Chic Jewelry Box by DT Priya Mishra

Hello Crafty Friends,

A very good morning to all of you. I'm Priya again with a photo inspiration post. This time I transformed a boring box into an interesting shabby chic jewelry box. 


The box I used is a drawer box and is beautiful inside. I just cut some pattern paper according to the dimensions and glued on it. So, here's the box I altered...


I cut the pattern papers according to desired measurements, distresssed the edges and glued on all sides of the box. Then I adhered some pearl string and rhinestone string on the top cover of the box. also some strings on the front opening of it. Then I adhered a beautiful leaf pattern lace on the top cover and attached a mandala die cut, some flowers, pearl stickers, twines and some more lace to decorate it.


Supplies Used:

Cardboard Box
Martha Stewart Score Board
Guillotine Paper Trimmer
Scissors
Eno greeting Pattern Paper
Papericious Lace
Twines
Tacky Glue
Distress Ink
Double sided Foam Tape
Chipboards
Flowers
Paper Flowers
Diecut
Pearl String
Rhinestone String
Pearl Stickers

Hope you are inspired. 
You can find all the above mentioned products from Rainbow Craftykari Store or you can pre-order the same by writing to rainbowcraftykari@gmail.com. 
Also do not forget to play along with us at our monthly challenge here.

Hugs,
Priya