Showing posts with label art journal. Show all posts

Monday, 8 March 2021

"YOU" Art Journal by Priya & "Amazing Grace" Plaque by Rupneet

Hello Friends,

This is Priya Mishra here from Sanskruti Arts & Crafts at Rainbow Craftykari Blog. Wishing you all a very happy Women's Day. I'm so happy and excited to join in this Women's day Insta hop and Blog Hop and Linky Party. Thank you to all the sponsors who have sponsored this beautiful hop !! For the next stop kindly click on this link

https://women-beyoutifullyyou.blogspot.com/2021/03/3rd-international-womens-day-blog-hop.html


My project is called -  YOU and I have added a quote "No one is you, and that is your superpower" 
When a woman stands for herself, she automatically stands up for all women. Before encouraging others, you should look within and find that support and confidence that defines you as a woman.
Keeping in this thought, to encourage the all the women out there, I've created an Art Journal Page today...


For making this Art journal page, first I created the background. Layered some papers, Tim Holtz die cuts and roughly dry brushed with white gesso. Created a little texture with some stenciling and stamping. Colored with chalk paint in shade of pink.

Then added some metal charms and wooden die cut for some added layers. Used a black marker to create some extra interest.


Finally added a Tim Holtz doll and sprinkled some black gesso and pink chalk paint all around. I added a sentiment " No one is you and that is your super power". Here are some more close ups of my project.


Now Over to another beautiful Artist, who has created inspiring project on this occasion. Over to You Rupneet

Thank you and Warm Regards
Priya Mishra
Sanskruti Arts & Craft


                  ***************************************************************


Hello Crafty Peeps

Rupneet here From SylviazArt at the Rainbow Craftykari Blog. Wishing you all lovely women out there  a very happy Women's Day. I'm glad to join in this Women's day Blog Hop and Linky Party. Thank you to all the sponsors who have graciously sponsored this beautiful hop. For next stop click on this link:
https://women-beyoutifullyyou.blogspot.com/2021/03/3rd-international-womens-day-blog-hop.html


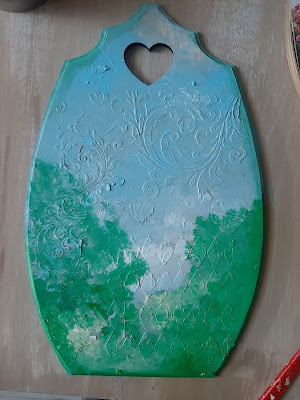
Today's artwork' theme is encouragement and what better a way to present it for the womens day... so chose this Plaque , which is primed and sanded well


Over this plaque I chose to give a textured background using a texture paste through a beautiful filigree stencil... once the texture is dried, I colored the background....


And thereafter I chose a beautiful image from newspaper image, a icecream tub lid and some flora to embellish...

I primed the plastic lid with gesso and decoupaged the image using modge podge and blended the colors over the corners, and after the image on the plastic lid dried, I chose to stick it to the middle of the Plaque, such pretty landscape image goes well with the background,  isn't it....

To embellish It further,  i use some flowers around the lid and stick them using a hot glue gun and a quote saying "you are amazing " comes on top of the Plaque which its look enhances making it look as one piece. 


I enjoyed working on this colorful make and loved its cheerful vibe... hope you enjoyed the process with me..

Thanks for reading through!

Rupneet
Creative Head
Team Sylviaz

Tuesday, 10 April 2018

Journal Page using Gel Press Tutorial by Blog Coordinator Aditi

Hello everyone,

Aditi here today on the blog with a new post to inspire you all. Today I have a video tutorial for you all. 

Have you seen the colour palette of our April Challenge? It is so beautiful and with the Theme of Love in mind, I decided to create a Journal Page.

In this tutorial, I will be showing how to create a quick and easy background with the help of gel press. Although I have made a journal page, this technique can also be used for a card, or background for any project. 

I have interpreted the theme of Love as Love for Art, Craft and Journaling that is something so important to keep and keeps my days bright and joyous. 

Here's a look at the creation:


Here's the tutorial, gather your supplies and get crafty with me:)!


Some close ups:


Supplies used:
  • White Ivory Sheet
  • Gel Press 8"x10" Plate
  • Dylusions Paints-White lines, Melted Chocolate, Cherry Pie, Pure Sunshine, Pomegranate Seed, Funky Fuchsia, Bubblegum Pink
  • Brayer
  • 13 Arts Bubbles Stencil
  • Finnabair- Grungy Grid 
  • Staz On Black Ink
  • Deep Purple Archival Ink
  • FInnabair Background Stamps
  • Distress Crayons- Seedless Preserves, Fossilized Amber
  • White Uniball Pen
  • Kaisercraft collectables- Oo La La
  • Tim Holtz Ideology- Small Talk
Most of the above-listed materials are available on the Rainbow Craftykari Store and can also be pre-ordered by sending an e-mail at rainbowcraftykari@gmail.com.

Do visit the Rainbow Craftykari store HERE

Visit our BLOG for more inspiration, tutorials and check out our ongoing challenge.

Wednesday, 30 August 2017

Art Journal Tutorial by DT Shylaashree

Hi Friends,


I am Shylaa here to share my step by step tutorial to create an art journal.


Step 1: I started by applying a coat of gesso using foam roller brush. It left a grainy texture after drying.


Step 2: I punched the flower shapes out of post it paper, to use as masks. After placing the flower masks on my page, then I used my gelatos to scribble randomly around them.


Step 3: Now I used my fingers to blend the Gelatos over the flower around my page. I used pink gelatos around the edges of the flower mask to give a bright look. Then lifted the flower mask


Step 4: I stamped the floral stamp inside the blank flower outline.


 Step 5: To create textures, I stenciled with gesso using Heidi Swapp spray stencil and allowed it to dry.


Step 6: Used a Black marker to draw the outline around the circle and on the border. Brushed with black water colors over the edges.Stamped with Hot off the press Simply Susan stamp randomly wherever I felt stamping it.


Step 7: Added some sequins and butterfly die cuts. Applied 3d stickles over the die cut.


Materials used:


  • Art journal notebook
  • Faber-Castell Metallic Gelatos Color & Clear Stamp 
  • Sakura Gesso 
  • Black marker
  • Heidi Swapp Spray Stencil
  • Monte Marte Foam roller 
  • Golden sequins
  • Jeff flower punch 
  • Butterfly die cuts
  • Hot off the Press - Simply Susan stamp 

I hope you enjoyed this tutorial. Hope this post has inspired you. 

You can preorder the materials from Rainbow Craftykari store by writing a mail at rainbowcraftykari@gmail.com


Participate in our current ongoing challenge with theme Rainbow Friendship and win exciting prizes.


Happy Crafting!
Shylaashree