Showing posts with label DT Anila Dikay. Show all posts

Wednesday, 13 December 2017

Family Layout by DT Anila Dikay

Hello Crafters!


Anila here with an Inspiration Post for you all. 
Today, I am showcasing a "Family Layout". Making layouts is always fun. Every artist has a different technique or style and today I am going to show you how all of us can make an LO with minimal supplies and no fancy techniques. All one needs is an eye for composition. 

Here it is!


Steps Followed:
  • I took an 8x8 sized pattern paper. 
  • Layered it with another 6x6 family script pattern paper. 
  • Mounted the photo using foam adhesive and two pieces of coloured CS at the corners.
  • I adhered a lace at the bottom of the photograph. 
  • Adhered paper strips and washi tapes on one side. 
  • Next, I added the sentiment and the quote stickers. 
  • Lastly, covered the corners with flowers. 

Materials used are:

  • Pattern papers
  • Sentiment stickers
  • Washi tapes
  • Lace
  • Flowers


Few more close-ups of the Layout follows


All the above-mentioned materials are available at Rainbow Craftykari or can be pre-ordered by sending an e-mail to rainbowcraftykari@gmail.com or to info@rainbowcraftykari.in


Thank you for stopping by!
Anila


Wednesday, 22 November 2017

Altered Bottles by DT Anila

Hello friends!

Don't we all like to hoard things? We not only like to buy and hoard new items but also like to collect things which can be reused/upcycled in some form or the other, with the hope of giving these junk/scrap items new life sometime. 


I have a huge collection of glass bottles, cardboard/paper boxes, invitation/greeting card, tissue paper rolls and what not.


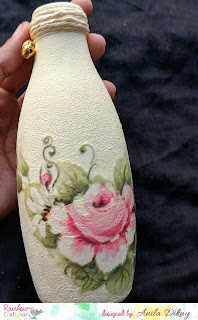
Today I am showcasing an upcycled glass bottle. This is just an inspiration for you to start using/revamping those things you have been hoarding endlessly. 


Here, I have decoupaged the (2) glass bottles to convert them into beauties to adorn your homes. They can also be given out as gifts.

Here's a look at the project -


Materials used

  • Chalk paints
  • Decoupage tissue papers
  • Sponge
  • Paper string
  • Thread and bells.


Method -
  • Firstly, remove any sticker on the bottle. Wash the bottle clean and dry it completely. 
  • Cover the bottle completely by dabbing the sponge with chalk paint over it. Let it air-dry.
  • Repeat the process to get a more uniform finish. 
  • Pick the tissue to be used and trim the design as desired. 
  • Carefully remove the backing/second ply of the tissue.
  • Apply a coat of Mod-Podge and stick the tissue over it carefully avoiding any creases. Let dry.
  • Apply a coat of Mod-Podge over the tissue paper to seal it. 
  • Tie a paper string to the neck of the bottle, covering it fully.
  • Tie a set of bells/Ghungroos with the help of a thin thread.


More pictures follow -


Hope, I could inspire you to finally start working on those things and give them a new life.

Do check out our ongoing challenge on the blog here
And do not forget to participate. 

Love,
Anila

Friday, 3 November 2017

Innovative Mailbox Tutorial By DT Anila Dikay

Hi Everyone!

Anila Here, I am back again, at the Rainbow Craftykari blog today with a tutorial and walk-through video. 

This is a mailbox shaped box for gifting.

Let's begin with a tutorial.
(This is a picture heavy post.... I wanted to include as many pictures as possible so when you try to recreate this you will have no problem at all)

Materials needed are:
Black CS
Pattern papers
Laces/ribbons
A Brad and a handle
Decorative material.

Method:
  • Take a CS measuring 12" x 7". Score the 12" side at 1/2" and 11 1/2". (Sheet 1)
  • Take a sheet of the same CS measuring 7" x 4". (Sheet 2) Stick the scored lines of sheet 1 to sheet 2 from the lower side. The box structure is ready.


  • Take a CS measuring 8" x 5" and score it at 1/2" from all the 4 sides. 


  • Trim the corners as shown and fold up the edges to form a tray.


  • Cut 2 pieces of the CS, little larger from all sides than the arch shape.


  • Make small cuts along the extra edge of the cutout and fold them inwards. Cover the folded edge with a strip of paper.


  • Take the other cutout, follow similar steps and stick it to the tray made.


  • Now cover the box with colourful patterned paper over the arch. 


  • Cover the side panel with colourful paper too (cutting the paper little larger and folding the sides inwards to cover the edges) Attach it to the box and stick it in place. This seals one end of the box completely. 


  • Similarly cover arched portion of the tray. Stick pattern paper from the inner side of the tray (as shown)


  • Adhere lace to the edge of the arch.


  • Cut a Flag shaped CS, cover it with pattern paper. Using a single hole punch make a hole. Attach this to the box using a brad. 


  • Attach a handle to the arch of the tray. Decorate the mailbox.


The Mailbox is now ready to hold any gifts inside.

Here are some final pictures with gifts inside.


That's all for today. Hope enjoyed making this mailbox with me. Would love to see if you create anything like this. Remember to tag us!

Here is the Walkthrough Video of Mailbox


Don't forget to participate in our ongoing this month challenge "Vintage"


All the above-mentioned materials are available at Rainbow Craftykari store.

Thank you!

Anila

Friday, 13 October 2017

Photo frame Tutorial by DT Anila

Hello, Friends!


I am back on the blog again with a tutorial post. 
This time I have a tutorial for a DIY photo frame.


I have explained it with complete details and lots of pictures making it easier for you to recreate the same.


With Diwali around the corner, I am sure this will be an awesome gift for your loved ones. I feel there is no other gift more personalized than photographs. Gifting memories in the form of photos are the best gift ever. But it is also necessary that your memorable photograph is framed in an equally beautiful photo-frame.


Let's learn how to make this frame with minimal supplies at hand.


Over to my Tutorial.


Cut 2 pieces of 7"x9" cardboard from a sheet.(This frame is for a 4 x 6 photo. The size of the cardboard pieces should be 1 and 1/2" more than the photo size from all 4 sides)


Mark the photo size - 4" x 6" in the centre of the cardboard. 


Cut the central rectangle window a little smaller than the actual photo size. (Approx. 3.75" x 5.75")


Cover the cardboard with a pattern paper by folding in the paper from all sides.


Mark and cut the smaller rectangle shown in the picture and again fold in the sides. 


The frame looks like this. 


Take the other cardboard and stick it on a solid cardstock of size 8" x 10". Cut 3 strips of craft foam (any colour) Stick them as shown on the 3 sides leaving one long side open. 


Fold the sides over the foam strip so it is not visible on the outside and stick them.


Cut and stick an acetate sheet to cover the window in the centre.


Apply glue tape/glue to the three sides with foam of the base cardboard and stick the top cardboard 


Like this...


Now to create a support stand for the frame. Take a piece of cardboard of size 2.5" x 4.5". Cover it completely (as shown in the picture) with the solid cardstock.


Take a piece of the same cardstock of sizes 2.5" x 1" and fold it in half. Take another piece of size 2" x 4.5", fold it in half and twist the two ends to form a half-inch step (refer picture). Stick one fold of these 2 pieces at the back of the stand as shown. (The 1" piece at the top and the other piece little away from the bottom.) 


Adhere the entire stand at the back of the frame by sticking the remaining two folds to it. 


The frame is now ready for decoration.


TIP: While inserting a photograph, stick a strip of paper at the backside... This helps easy sliding of the photo in/out of the frame. This strip can be folded at the back of the frame. (Refer Picture)


Final look of the frame


Picture Credit - Pixabay


Materials used 

  • Cardboard
  • Pattern Papers
  • Coloured CS
  • Acetate sheet
  • Craft foam/Foam Tape
  • Embellishments/Flowers/Laces/Chipboard


I would love to see if you make any. Do not forget to tag me :-)Do leave your lovely feedback in the comments below.

All the above-listed Materials are available at Rainbow Craftykari store or can be pre-ordered.

Love,
Anila Dikay