Showing posts with label mixed media layout. Show all posts

Wednesday 27 June 2018

MM Layout by DT Vidhi inspired by Blog Coordinator Aditi

Hello folks,

Hope you guys are having a great time. It's raining in Mumbai !!! I just love rains...Everything looks so fresh, alive, green and beautiful !!! 

I am here again at Rainbow Craftykari blog with my inspirational post. As you all know this month we all DT members are getting inspired by our very own Design Team.


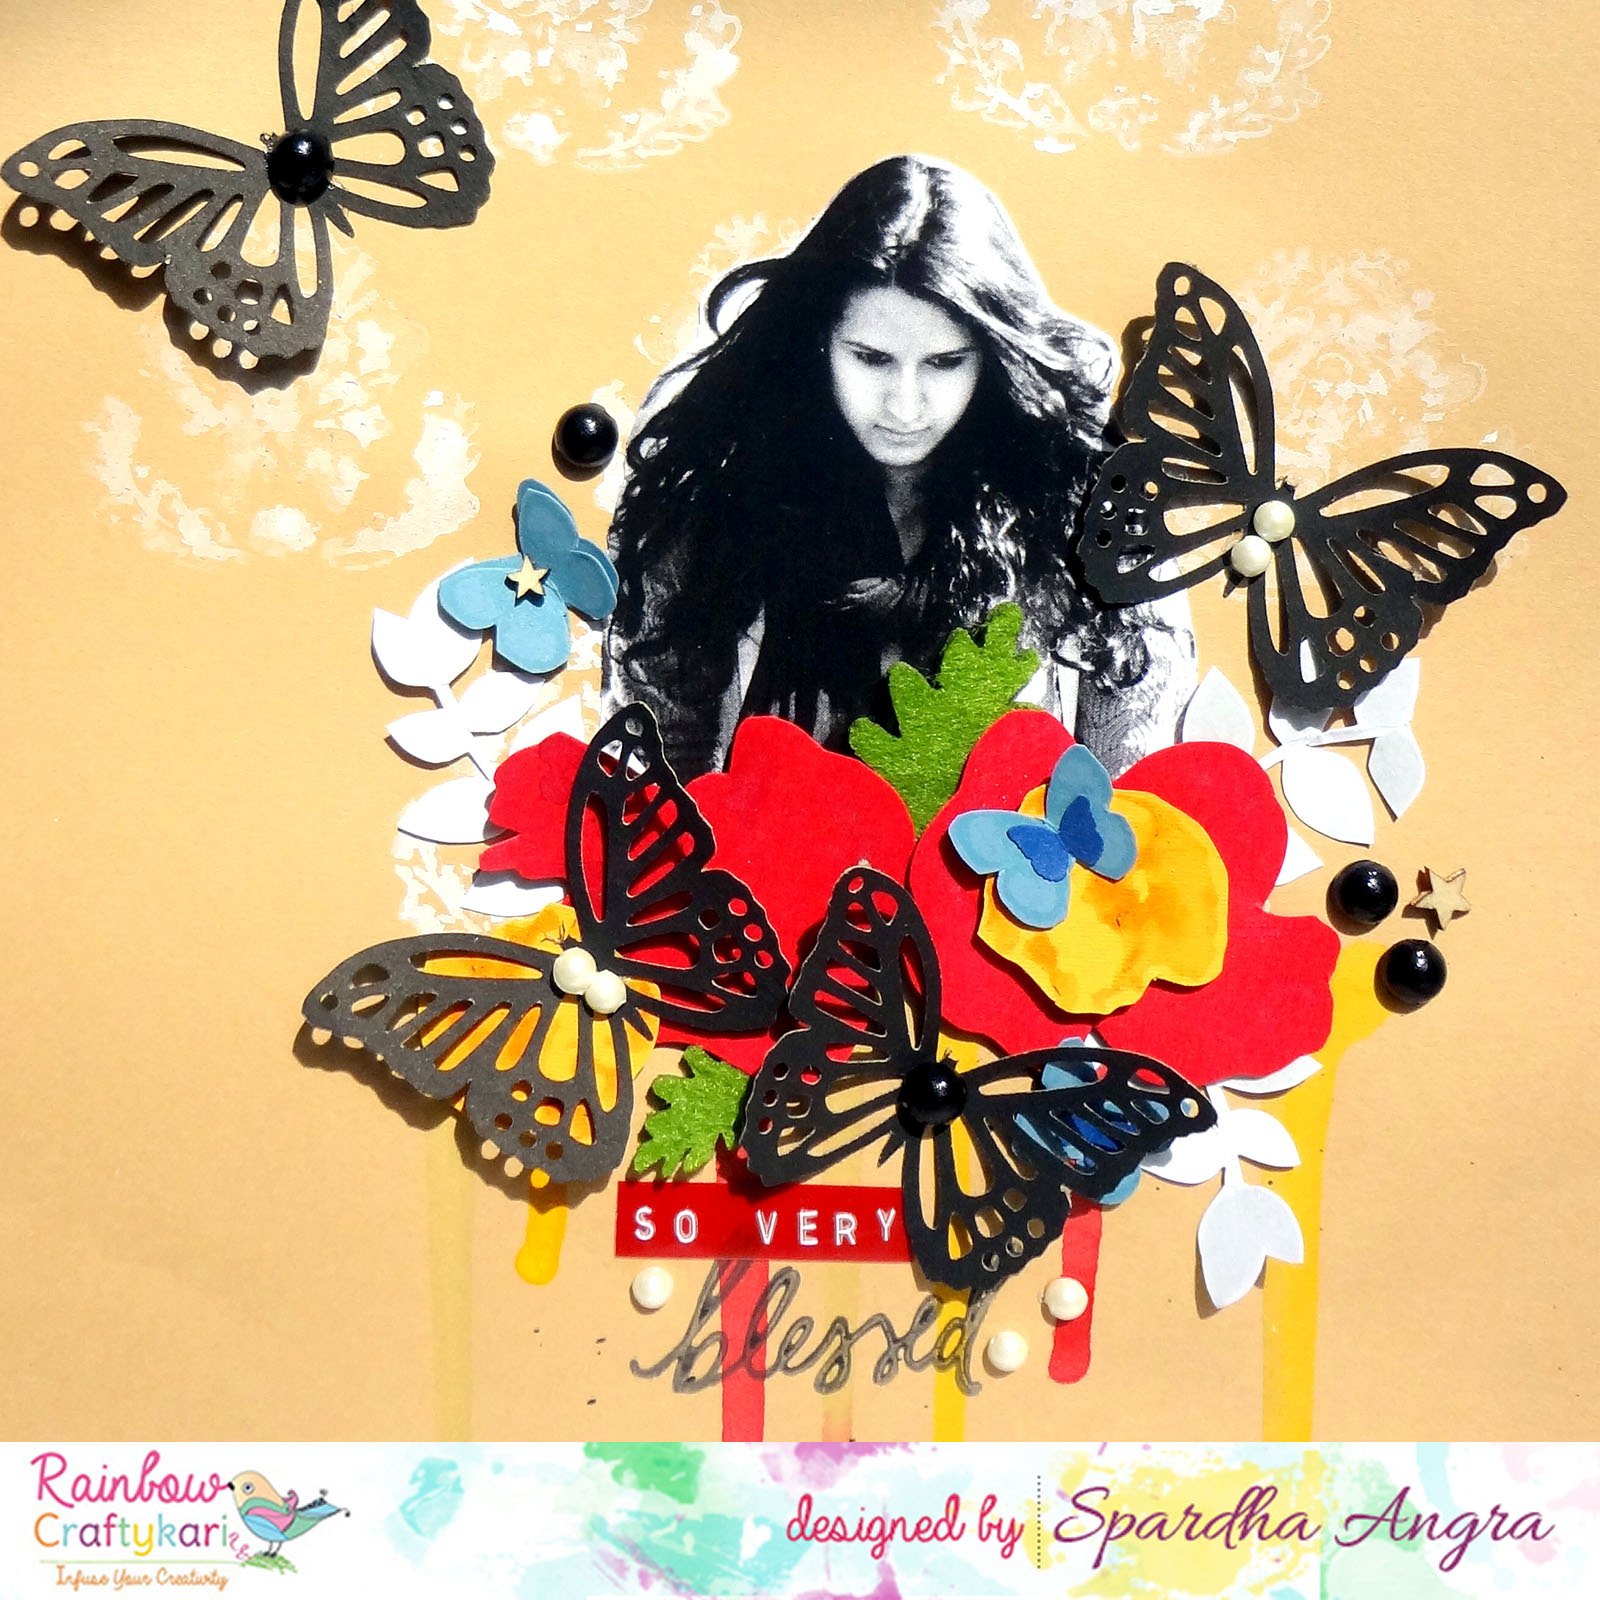
Today my layout is inspired by the wonderful artist and talented person, Aditi Mahajan. I just love her work. I Inspired by her layouts. Those are simply amazing and fresh. I went through her all creations and I just love it how she used bright and fresh colours, beautiful coloured die cuts of floral designs and lovely embellishments. I tried to add all that details to my layout !!!


I started my layout by taking two different pattern papers and arranged it. Gave a coat of clear gesso to prime the papers. Then through stencils, I have applied modelling paste and embossing paste randomly on papers. After drying I sprinkled some Lindy's sprays and magical shakers for adding colours.


Now it's time to add layers...I used lots of flowers, die cuts, leaves, stickers, glitter, dry mousse etc. After that, I added finnabair stones with the help of soft gloss gel.  And it's done. In today's layout this bright and fresh lemons gave the freshness to my layout which I am feeling now in Rains. So feel fresh and create your art !!!


Do visit the Rainbow Craftykari store HERE

Visit our BLOG for more inspirations, tutorials and check out our ongoing challenge.

Happy Crafting

Hugs,

Tuesday 24 April 2018

Scrapbook Layout Video Tutorial by DT Spardha

Hello guys!

Hope you are having an amazing month!

Continuing the happy spirit of Spring, today I have a scrapbooking layout tutorial for you. I love making scrapbook layouts especially using different mediums cohesively. 


So today I present to you a video tutorial on stamping and layering. I've used three different kinds of paints and a variety of stamping ink for this project. Checkout the tutorial https://goo.gl/tjYre8


If you're wondering how to DIY your own mists, CLICK HERE to read the blog post where I made them. If not, you can definitely go buy some great inks HERE!


I am glad the grungy look did not overpower the bright colours of spring *YAY*

On a side note - If any of you are wondering who the *pretty girl* is, it's me! *sobering up now*

Supplies Used:
  • Paper - Kraft Cardstock, Coloured Paper Scraps
  • Paints - Poster Paint, Acrylic Paints, Chalk Paint
  • Ink Pads - Blue and Green
  • Stamps - Bold Flowers {Fiskars}, Studio G, Ink n Layer {Prima} and Daydreamer {Kaiserkraft}
  • Tools - Scissors, Glue, Heat Gun, Digital Die Cutting Machine, Butterfly Punch {Martha Stewart} and Label Maker {Dymo}
  • Embellishments - Pearls and MDF star confetti 
Most of the above-listed materials are available on the Rainbow Craftykari Store and can also be pre-ordered by sending an e-mail at rainbowcraftykari@gmail.com.

Do visit the Rainbow Craftykari store HERE

Visit our BLOG for more inspiration, tutorials and check out our ongoing challenge.


Happy Crafting!

Wednesday 18 April 2018

Heart Layout by DT Saloni


Hello all Crafty friends!!!

My brother always tells me that "I am a big hoarder" and sometimes I do agree with him. So this time I have created a mixed media layout with a picture, I have been hoarding for a long time.  Making a mixed project is also so fun. You can add so many techniques and style and the end results are always a surprise.

I am here today with my first " Picture tutorial post "at Rainbow Craftykari as a DT member.


So here is how I made the layout:-

Enjoy the video flip through and the step by step instruction below.

Step 1: For this beautiful layout, I have taken an MDF base measuring 12x12 inches. You could use anything that is handy for you or even a 12x12 scrapbook paper. TO begin with, prime the surface with black gesso and let it dry. Next, for an edgy look, apply crackle medium evenly with a brush and let it dry. The crackle medium should be dry completely before applying the second layer of colour. 


Step 2: Once the base is dry, apply the second layer of colour. When using crackle medium, you should use the dark colour as your base, so that when the second layer of colour cracks, the darker shade is visible.


Step 3: Next, add some more elements on the background by stamping. I have used some clear stamps and distress ink for this.


Step 4: Mixed media is all about layers. Next, add some texture with modelling paste. To further enhance the look, add colour on the edges and let it flow. 


Step 5: Select the photo of your choice that will be the focal point of your project. I have used a picture which is very close to my heart. Pick out a few papers to create layers underneath your picture. Distress the edges with ink. Fuss cut some elements for layering, or grab your embellishments. Play around with them and see what looks good before sticking them.


Step 6: Once you are happy with the arrangement and placement of the layers, embellish the layout with the buttons, flowers, tags and stones.


Hope you all like it and get inspired by it to create something equally beautiful for yourself!!!

Supplies used:

  • MDF Base
  • Balck Gesso
  • Crackle Medium
  • Chalk paint
  • Modelling Paste
  • Pattern papers
  • Flowers
  • Colour Sprays
  • Tags

Most of the above-listed materials are available on the Rainbow Craftykari Store and can also be pre-ordered by sending an e-mail at rainbowcraftykari@gmail.com.

Do visit the Rainbow Craftykari store HERE

Hope you're inspired to create yours! Do participate in our ongoing challenge.


Happy Crafting

Saloni

Monday 11 September 2017

Home Layout by DT Anila

Hello Friends!

I am back today with an inspiration post for the current challenge
Here is the mood board of the challenge (Use minimum of any 3 elements from the board)

Image may contain: indoor

My project for the challenge


I wanted to include most of the colours from the mood board. I have tried to incorporate the woody texture with my base paper.

Here's a brief about my process:

I took an 8" x 8" pattern paper. This gives the look of a corrugated sheet but also resembles the woody structure from the mood board. I adhered this on a brown CS. Next, I adhered a Doily in the centre of this paper and mounted my sentiment with a lot of coloured paper matting under it.


Next came in the arrangement of the flowers, leaves and other elements. Once it was decided I adhered them in position. Then, I stuck a House sticker in one corner.
Lastly I added few sequins to add some element to the LO.

Here are some close-up snaps:


The materials used are

  • Pattern paper
  • Coloured CS
  • Flowers, Leaves etc.
  • Coloured sequins
  • Doily

All the above-mentioned materials are available with Rainbow Craftykari and/or can be pre-ordered for you.

Hope I could inspire you enough to participate in the ongoing challenge here.

Looking forward to your participation.

Keep Crafting!!