
Hello crafty friends,
Wishing you all a Happy New Year and this year let it fill with lots of happiness and joy to your life.
A lovely Good Morning to you all,
Today in our Teaching and Learning Program we have our Guest DT Vinita with her beautiful wall hanging with awesome Inspirational Quotations.
Over to you Vinita,
I hope all of you have a wonderful weekend and welcoming the New Year 2017!! Are you ready to drive back into card making, Mixed Media project and what would be better to start featuring with some Inspirational Quotations for the whole year to decorate your room!
 How to do:
Here are all 3 panels shown with details.
Firstly, I created my cardboard panel for each quote. One is for the base and one is in window form. I wanted it as a pocket letter style, as you can interchange the quotes or you can add your personal photographs in it easily.

I adhered all the window panels on the base using Fevicol. Leave the center top and inside edges of the window panel, don't glue that parts because we have to put the quote panel inside.
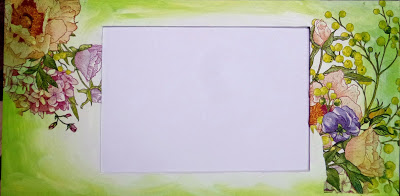
Applied Dylusion paint at the edges with my finger to the window panel and mixed it with white acrylic paint.

Now peel off the upper layer of Decoupage napkin and adhered it on the paper. Be careful while applying decoupage glue to appear any bubbles at the surface. I have applied the different decoupage napkins on all 3 panels.


Using some stencils and embossing paste I created the BG on all panels, distressed the edges using vintage photo ink to create more depth. Then I applied some Distress crackle clear paint with a brush and let it be dry naturally.

Look at the shine and crackle effects in some close-up picture.


Then I took a natural twig and added a thick wire and wrapped it with double coloured yarn like we did for knitting.

Take two equal sizes long strip of cardboard. Wrap the brown colored yarn on equal distance and make a punched hole at the top of the strip and tighten the wire along the hole and twing. Now die cut some flowers and leaf flourishes out of felt.

Die cut a sparrow out of blue colored felt and stitched it, decorate it with diamond gems and attached the floral wire to create the legs. Adhered the die cut foam nest and the sparrow on the twig.

Adhered all the flowers, handmade flowers and leaf flourishes on the twig. Decorate it with some buttons and attach a tiny bows.

Then I applied Inka gold in different colors on a MDF cutout and decorated the panel with different flowers, metal floral charm and applied some Inka gold colors on it too.

On the 2nd panel too, I did some stamping, textures and added a MDF brick cutouts to create the BG and decorated with some handmade flowers, fillers.

And the last panel is highlighted with loads of textural elements. I added a MDF flourish and embossed it with silver glitter. Attached a resin piece filled with some micro beads and embellished it with flowers, cabochons and some fillers.


Added some beads and pearls at the end. Hope you enjoyed the tutorial.
Supplies Used;
White cardboard 800gsm
Felt sheets- light & dark green, red, yellow, blue
Foam sheets- light & dark green, white
Yarns- brown, pink & purple
Natural twigs
Decoupage napkins
Stamp- lattice from Itsy Bisty
Stencils- TCW; Art is and mini bricks, flourishes
Dies- Spellbinders- Shapeabilites- flowers bundle, bird sanctuary, Die-namies- bird nest, Heartfelt
Dylusions paint- fresh lime, tinton falls
Inka Gold- platinum, old gold, haematite
White acrylic colour from Fabrica
Black Archival ink
Distress inks- black soot, vintage photo, pumice stone, wilted violet
Distress stain- Antique limen
Distress crackle paint- clear rock candy
WOW Embossing powder- metallic platinum sparkle
White gel pen
Studio G glitter glue, purple glitter from Oak arts
MDF cutouts- bricks, flourishes, floral circle
Resins- Eno greetings
Other supplies- beads, wires, mulberry flowers, micro beads, cabochons, metal charms, sparkle dots, buttons, diamond stones.
Thank you for stopping by.
Regards,
Vinita Jain
Wishing you all a Happy New Year and this year let it fill with lots of happiness and joy to your life.
A lovely Good Morning to you all,
Today in our Teaching and Learning Program we have our Guest DT Vinita with her beautiful wall hanging with awesome Inspirational Quotations.
Over to you Vinita,
I hope all of you have a wonderful weekend and welcoming the New Year 2017!! Are you ready to drive back into card making, Mixed Media project and what would be better to start featuring with some Inspirational Quotations for the whole year to decorate your room!

Here are all 3 panels shown with details.
Firstly, I created my cardboard panel for each quote. One is for the base and one is in window form. I wanted it as a pocket letter style, as you can interchange the quotes or you can add your personal photographs in it easily.

I adhered all the window panels on the base using Fevicol. Leave the center top and inside edges of the window panel, don't glue that parts because we have to put the quote panel inside.
Applied Dylusion paint at the edges with my finger to the window panel and mixed it with white acrylic paint.


Supplies Used;
White cardboard 800gsm
Felt sheets- light & dark green, red, yellow, blue
Foam sheets- light & dark green, white
Yarns- brown, pink & purple
Natural twigs
Decoupage napkins
Stamp- lattice from Itsy Bisty
Stencils- TCW; Art is and mini bricks, flourishes
Dies- Spellbinders- Shapeabilites- flowers bundle, bird sanctuary, Die-namies- bird nest, Heartfelt
Dylusions paint- fresh lime, tinton falls
Inka Gold- platinum, old gold, haematite
White acrylic colour from Fabrica
Black Archival ink
Distress inks- black soot, vintage photo, pumice stone, wilted violet
Distress stain- Antique limen
Distress crackle paint- clear rock candy
WOW Embossing powder- metallic platinum sparkle
White gel pen
Studio G glitter glue, purple glitter from Oak arts
MDF cutouts- bricks, flourishes, floral circle
Resins- Eno greetings
Other supplies- beads, wires, mulberry flowers, micro beads, cabochons, metal charms, sparkle dots, buttons, diamond stones.
Above listed Materials are available at Rainbow Craftykari Store or you can pre-order.
Thank you for stopping by.
Regards,
Vinita Jain


