Showing posts with label Water-coloring. Show all posts

Friday 15 September 2017

Masking and Colouring Tutorial by DT Ishani

Hello everyone, 

I am back with another card for you'll. Today we'll be learning the masking and colouring technique to create a scene card! 

Kitty party


This card is a simple one, it uses masking technique to create a scene. The important principle of this technique is that which ever image you would like to be at front create a mask for it. A mask is something that will cover the front image so that if you stamp anything over it, the stamp doesn't affect the front image but makes the second image look like it's behind the front image. Masking can seem somewhat confusing or difficult, but it is actually quite easy. Masks can be created from masking paper or smaller masks can be created using Post-it notes (which I'll be using) . If Post-it notes are used, be sure to stamp a part of the image over the tacky area as the adhesive will help to hold the mask in place.

For this card you'll need:(all measurements are in cms) 

Cardstock (let me tell you a little about it)

For the card base, I usually use a heavy cardstock mostly 180 gsm or more. I initially used to check foreign blogs which gave dimensions and if I followed that I would either waste a lot of paper or would fall short of a few cms. We all know the A4 size paper (the Indian size which is similar to UK) it is usually 21x 30 cms, and that is the best size! Till you choose your favourite brand( Papericious and Neenah white, have different dimensions) I would suggest, that cut the A4 paper in half, length wise or breadth wise and score it in the middle to get a perfect sized card base which measures 10.5 x 15 cms.

Supplies:

  • Cardstock- I have used Papericious 180 gsm (as this is not an exact A4 size sheet my dimensions are different from what I have told earlier) Base card 11.6 x 31 cms 
  • Papericious Pattern paper 11 x 15 cms  
  • Pink- Plaid Card panel 10.5 x 14.5 
  • Stamps (multiple stamps- to create a scene)
  • Inks and colouring medium (distress inks and koi brush pens)
  • Masking Paper/ Post-it notes
  • Acrylic block

  • Scissors

  • Masking tape or washi tape
  • Double sided tape
  • Foam tape
  • Glue
  • Embellishments (Stickles, Gossy accents, nuvo crystals- gloss white and sequins)

Let's begin.

1. Cut the base card as per the dimensions and score it in the middle to create a side folding card. Cut a card panel of the said dimensions (You can directly use the base card too for making a card, without the layers and make it a One Layer Card)


2.  To create a feminine background for my card, I put some Washi tape, a little above the half of the card. Then I used a light pink ink and blended above the tape to get a crisp line (which could be a wall in the scene).


3. I used a few stamps from different sets to create this scene. However, the two kitties I would need to be used for masking were stamped on a post it note. Carefully
cut out each image. It is important to cut on the stamped lines. If
images are cut outside of the line, a thin white space or halo will appear
around the image after stamping surrounding images.
I did not cut neatly above the tail, as that area will not be impacted by the
images I want to stamp above.


4. Arrange all the components of the scene together until the desired layout is achieved. Taking this extra step helps to visualise the final result and clearly indicates which stamps will appear in the foreground and which need to be stamped in the back (or over the mask).


5.The first thing I stamped was my sentiment, because I didn't want to end up with no space for it later. Then, I wanted to add some party hats to my kitty, but since I don't have a stamp for it, I hand drew them and made a mask.


6. For my birthday girl, I wanted her seated on this cute cushion, so after I stamped the kitty I put over it the mask that I had cut. I then stamped the cushion over it. Do you see the line which got stamped over the post it note? When you peel the mask it will appear as if the kitty is sitting on it!


7. Similarly, for the three kittens I'll have as guests for the party, I wanted one to be behind another. So for that, first stamp the kitten you want in the front, put
the mask over it and then stamp the kitten which should be behind. 

8. I stamped the other images, put party hats on all the kitties. The cupcake
and the gifts are from various other stamp sets. I could have used other things
like a banner but I didn't want to crowd my scene.


9. Now, that my scene was stamped, I coloured my kitties and other elements with
the water based sketch pens. I used water brush to dilute the colour and give
some lighter shade.


10.  The scene was ready to be put on the card base. I took a pretty pink plaid pattern paper, which had similar tints like my colouring. I cut it in dimensions 5 mm lesser than my base card and stuck it on with a double sided tape. For the card panel I used 3d foam double sided tape and then stuck it on the pattern paper.


11. For some added interest I used Ranger Stickles stardust on top of the hats, glossy accents on the hats and the bow and some nuvo crystal drops for the pearl necklace and on the 'i' of the birthday in the sentiment. I used golden and pink sequins for some glitter.


Hope you liked this little kitty party scene and will try the masking technique when you create a card. 


Almost all above mentioned products are available at the Rainbow Craftykari store for can be pre-ordered by sending a mail at rainbowcraftykari@gmail.com.


Happy Crafting!

Ishani


Friday 28 April 2017

Watercolor Cards Tutorial by GDT Ria Banerjee

Hello all,

Ria on this side. Today, I have brought some watercolor cards for you people. I know sometimes people find it hard to do CAS cards. I have tried to explain everything step by step so that your inspirations can leave us in awe.

Project 1: Bleaching Watercolor

This is a technique which many of you may be afraid of attempting, but trust me this is super fun. (Check the Materials Pic below)


Cut a cardstock diagonally and ink with distress inks. Dark colors are preferable.

Let it dry or heat dry it.
 

Apply anti-static powder on it.

Now choose any stamp that has some good outlines. Here, I have taken Renee Leaves by Winnie and Walter. Stamp it with Versamark and apply clear embossing powder. Heat dry it completely using Heat Tool.

Take a pinch of bleaching powder with a little amount of water and apply it inside the stamped outlines with the help of a brush.


Give some time the bleaching powder to react.
After that, Paste the cardstock with the bleached background on to a blank white notecard
 

I have finished the card with die cuts and sentiments from Sizzix Thinlits and Adorable Elephant by MFT respectively.


Here is another project inspired by the same technique.


PROJECT 2 : Watercolor and Embossing Folder


For this card,


I took the Geometric Embossing Folder and embossed the cardstock with the same in a bigshot machine.


Take a cardstock and color it with distress ink with some water. You can give an ombre look of any color. I have used three colors, Wilted violet, Blue sketch and Ocean reef/Mermaid lagoon as shown in the pic


I have colored the elephant with Artistry ink Aged stucco. I have dabbed some ink from the inkpad on the craft table, with the help of water and brush I have colored the image. One tip I would like to give that you have to be quick when coloring with distress inks as they leave some lines when get dried. The stamping has to be with Archival ink to prevent Blotting.


I have taken Gina Marie Circular Die to cut the panel. Preserve the cut out to use it for another card.
Then paste the embossed cardstock on to a blank white notecard using any white glue of your choice.
In the end, I have stamped some more images, colored and fussy cut from Adorable Elephants from MFT. Adhered them on to the panel with the sentiment from the same set.


Materials Used:


• White cardstock (Brustro WaterColor - 200gsm)
• Distress inks ( Bluesketch, Wilted Violet, Mermaid Lagoon)
• WOW Clear embossing powder- Semi Dull
• Paintbrushes
• Glitter paper- Silver
• Sizzix thinlit die- Wishes
• Adorable Elephants by MFT
• Enamel Dots ( black and blue)
• Geometric Embossing folders by We R Memory keepers
• Gina Marie stitched circle die set
• Glossy Accent by Ranger
• Ranger White Embossing Powder

All the materials listed above are available at Rainbow Craftykari Store or you can pre order them by sending an email at rainbowcraftykari@gmail.com.

Hope you got inspired to create one yourself. Do join us in the ongoing challenge "Exploding Surprise". Looking forward to see your entries. Happy Crafting!!

Love
Ria
https://www.facebook.com/criar80/

Friday 6 January 2017

Layout Tutorial By Guest DT Halak

Hello Lovely Crafters,

A very lovely Welcome and a warm Good Morning in this cold winter.

Today in our Teaching and Learning Program we have aour Guest DT Halak Shah with a lovely Layout which she made with one paper pack. Sit back and enjoy the tutorial.

Over to you Halak,

Hello and good morning dear friends!
I'm Halak and today I have this layout to share with you.
 

Before we begin, let me list out the basic materials :

Paper Pack - Ephemera by Papericious

Round Ink Blending Tool by Papericious

Stencils :

1. Art Is - TCW
2. Labyrinth - TCW
3. Stylish Borders - Hero Arts
4. Rhapsody - Memory Box
5. Andy Skinner
Distress Inks :
Primarily used Wilted Violet and Picked Raspberries
Red striped washi tape and
Polka dotted washi tape
Inkadinkado alphabets and numbers cling stamp
Brads by Kaisercraft
A 1" circle paper punch (I've used the one by EK Success)
And lastly,
Pink beads + Sequins.

Tip: If you do not have beads, you can opt for different sized sequins too! Alternatively, micro beads / seed beads and glitter will also look fabulous!)

Okay, so, layouts... what are they? Something on the lines of a journal, layouts are meant to add an image and jot down something, (a line or two max) about that image... capture a memory and freeze it in time...

While journals can be highly personal, layouts are primarily created to be displayed. They can be framed or bound in a book, the choice is yours!

Here's a fun close up!

My layout is a 12" x 12" piece intended for framing.

Let's get started!
The first thing I did was open the paper pack and fussy-cut some elements to use as embellishments.


After that I went through the sheets and cut out some sentiments + punched out some circles using the paper punch.

Took the Andy Skinner + Hero Arts stencil and slowly started building up layers.


Why stencils?
Stencils are a great investment, because unlike embellishments, you can use the same stencils over and over again. They help give the illusion of layers and add interest to a project without actually adding bulk to paper so it makes your project look good without the added weight! Win-win!

Next, I took Labyrinth and Rhapsody stencils and added more patterns to the paper.


Tip: If you want a dimensional look, you can use modeling paste with fun ink sprays / acrylic paints!

After this, I took some alpa and number stamps by inkadinkado and lightly stamped them in the background.
At this point, I was quite happy with the way the background looked so I decided to stack up my embellishments + accessories to ascertain positioning.


Tip: I always roughly position where I'd like to place my embellishments / accessories and click a picture to make note of it. I move around the pieces a couple of times, click pics and then pick the one I like best. It's always a good idea to plan where the embellishments and accessories go before you glue / tape them in place.

The next step was to adhere everything in it's place.
Once that was done I took a big white brad which had a lovely flower design on it and added it to my project. Also added an additional big butterfly die-cut.
Finished it off with some stenciling + added washi tape bits and adhered the beads and sequins!
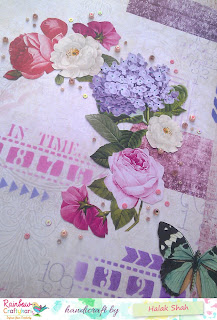
I absolutely love that floral arrangement decked with beads! Here's another close-up :


But wait! If you think that was all then I have Surprise for you all
As a bonus, Here's a card I made with a very detailed coloring tutorial.

Materials used :

1. Altenew - Wild Hibiscus stamp set

2. Poppy Stamp Die - Hello Word Balloon
3. Big Shot or any other compatible die-cutting machine
4. Staedtler Luna Coloring Pencils (Set of 24)
5. Ranger Archival Ink - Black
6. Cardstock
7. Cotton swabs
8. Baker's twine (black)
9. Paint brush (I used size 0 brush)
10. And lastly, some embellishments like sequins and rhinestones
 

The first thing I did was stamp the flowers with the butterfly onto white cardstock using my favorite, archival ink by Ranger.


I also took my hello word balloon die and die-cut the sentiment I wanted to use in black cardstock.


Next I took the color pencils and colored the images.
Here you can see my quick coloring.


I took the brush and with a little water, smoothed the pencil lines. That led to this subtle water colored look.


At this point I did like how the colors blended but they were a tad too light for me. So I decided to intensify the colors a little.

Check out the image below, the flower on the bottom left is the one where I began working. The first 5 petals when you compare with the previous image, you will notice that the colors have intensified.


To achieve this all I did was color a little over the petals using the same color pencils and then smooth it using a cotton swab!
I repeated the exact same process on the other flower and the butterfly after which the image looked like this.


I only wanted the sentiment minus the bubble so I trimmed it and adhered, matted the whole thing onto navy blue cardstock, added some twine and adhered embellishments to finish it off!
Here's the finished card.


What I absolutely love about the project is the coloring bit! So how could I end this post without a close up?! ^__^ Here you go.

That brings us to an end of this post dear friends! I hope you enjoyed my tutorial and it helped you learn something new.
A special thank you to Team Rainbow Craftykari for once again giving me the opportunity to share my papercrafting experience.
Till next time! *Big Panda Hugs*
Above listed Materials are available at Rainbow Craftykari Store or you can pre-order.

Regards,
Halak