Showing posts with label Layout. Show all posts

Tuesday 1 May 2018

RCS Challenge #10 - Be inspired

Hello Everyone,

Wishing you all a very Happy May! A new month, new hopes, new ventures and of course a new challenge!


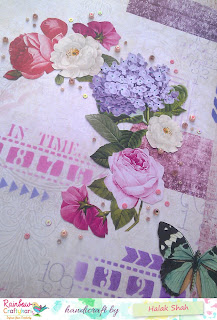
This month, we decided to challenge you all with something different.


We have a layout designed by our Blog Coordinator Aditi, and we want you to be inspired by that. Below is the challenge graphic with all the ways you can be inspired.


(Full Preview is available! Click on the image)


You can pick anything whether it's sketch, the theme, the colours, the shapes, elements or the photo and feel free to create any crafty project be it a card, a layout, altered piece, tag, home decor art, album and anything art/craft related and don't forget to mention what has inspired your from this beautiful layout. The last date to submit entries is 25th May'18

One winner will win a goodie bag filled with CraftTangles supplies worth Rs. 400 (shipping free) as well as the winner's badge to flaunt on the blog. Top three entries will get to flaunt a badge on their blogs.  


Any entry which doesn't follow the guidelines will be disqualified and will be removed from the participation entries


Please go through General Guidelines and Rules HERE.


Here's a look at what our team has created to inspire you all:)!

Blog Coordinator Aditi - Inspired by the colours and the elements of circles, I have created a Card. 


DT Priyadarshini - Inspired by the Photos of Venice, I have created a Romeo and Juliet Venetian Mask. 


DT MeghaThere were so many things in this layout to be inspired! I especially was inspired by the striking purple and pink colour and the die cuts in black! I made a card


DT Saloni
Travel..the best way to be lost and found all at the same time !! I was inspired by the pictures and minimal use of pink and yellow in the layout  I have a made an art journal using pictures of my dream travel destination "Paris"


DT Spardha
- I've made a window card for this month's challenge inspired by the colours from the layout and tried added a bit of a grungy look using paint splatters and modelling paste.


DT VidhiInspired by the colours and journey of two souls - “Love” your “ Life” and “Live” together forever I have created these ATC's. I've added dream catchers to protect love from devils eye!


Add your entries below!

Monday 11 September 2017

Home Layout by DT Anila

Hello Friends!

I am back today with an inspiration post for the current challenge
Here is the mood board of the challenge (Use minimum of any 3 elements from the board)

Image may contain: indoor

My project for the challenge


I wanted to include most of the colours from the mood board. I have tried to incorporate the woody texture with my base paper.

Here's a brief about my process:

I took an 8" x 8" pattern paper. This gives the look of a corrugated sheet but also resembles the woody structure from the mood board. I adhered this on a brown CS. Next, I adhered a Doily in the centre of this paper and mounted my sentiment with a lot of coloured paper matting under it.


Next came in the arrangement of the flowers, leaves and other elements. Once it was decided I adhered them in position. Then, I stuck a House sticker in one corner.
Lastly I added few sequins to add some element to the LO.

Here are some close-up snaps:


The materials used are

  • Pattern paper
  • Coloured CS
  • Flowers, Leaves etc.
  • Coloured sequins
  • Doily

All the above-mentioned materials are available with Rainbow Craftykari and/or can be pre-ordered for you.

Hope I could inspire you enough to participate in the ongoing challenge here.

Looking forward to your participation.

Keep Crafting!!

Friday 1 September 2017

Family Layout Tutorial & Video Tutorial by Blog Co-ordinator Aditi Mahajan

Hello Everyone,


A very happy September! With the beginning of a new month, we have a wonderful new challenge!


Today I'm here to share an easy to make Layout Tutorial with you all which is also an inspiration for our challenge this month.


Many craft brands come up with coordinated sets/kits. Most often we end up buying the paper pack alone and using it and then in a future date we end up buying the die cut/embellishments and use them individually. However, have you realised how worthy it would be to invest in the entire kit and use it in your projects? Sometimes we are creating an album, a layout, a card, and using all the coordinated elements leads to a great creation.


In my layout today, I will be using one such kit from Kaisercraft- The Golden Grove Collection. All the elements go so well together, that within minutes a quick layout can be created.


Let's begin...


Step1: First begin by choosing a photo and a base paper. 


Step 2: Choose a contrasting pattern paper to mount the photo on. Here I have kept it a 1/4" bigger than the photo on all sides. Stick the photo on the paper. Add some depth to the entire photo mat with waste chipboard/cardboard. Distress the edges of the paper.


Step 3: This Paper Pack has one sheet with flower clusters. So I fussy cut those from the sheet. Usually, every paper pack has one such pattern from which elements can be fussy cut. 


Step 4: Use a stencil and add some texture with modelling paste. 


Step 5: Pick inks of the colours on your base paper. Here I used distress inks. Randomly add some colour on your paper, especially to blend in the texture. Ensure to leave some texture white as that adds extra interest. Distress the edges of the base paper.


Step 6: Add more interest with stamping. Choose one colour that dominates the background colours (in this case green) and black. Stamp randomly around the focal image using two background stamps.


Step 7: Layer and play with the fussy cut elements, the collectables (die cut elements coordinated with the sheet) and the wooden collectables. Stick some with glue and some with foam tape. Run the blade of the scissors on the edges, to give the flowers and leaves some dimension. Pick a title from the collectables. 


Step 8: Complete the layout with some splatter in white and green.


Since this is a layout, and it's difficult to merely read instructions, I created a video tutorial for you all :-)! Click here


Supply List:

  • Kaisercraft Golden Grove Collection- Paper Pack, Collectables and Wooden Flourish pack
  • Kaisercraft Doily 12 x 12 Stencil
  • Mont Marte Modelling Paste
  • Distress Inks- Vintage Photo, Mustard Seeds, Peeled Paint, Crushed Olive, Forest Moss
  • Archival Ink- Jet Black and Library Green
  • Kaisercraft Stamp- Lattice
  • Finnabair STamp- Messy Script
  • Glue
  • Foam Tape
  • Photo courtesy Pinterest
  • Lindy's Spray- Drope Dead GOrgeous Green and Sidewalk Chalk


Hope you're inspired! Looking forward to your creations and participation in the challenge! 

Happy crafting!

Aditi

Friday 4 August 2017

Friendship Layout by DT Priya Mishra

Hello Crafty Friends,


I'm Priya Mishra and am very excited to share my first DT inspiration post for Rainbow Craftykari blog. I have created a project as an inspiration for our Rainbow Friendship Challenge.
 

Here's what I made...


The theme is absolutely wonderful and I wanted to make something CAS this time. This has been my weakness and I struggle to leave white space with pastel shades. So this was a challenge I took up!

The base is a 12"*12" white cardstock. As the theme is Friendship, I took the photo and the sentiment from google and printed them. For my layout, I began by brushing multi medium onto the whole paper. This creates a very good base. Then, I created texture using a stencil (Bubbles all over) and texture paste. Next, I began adding colour. I used Distress Inks and a brush to spread the colours. I have incorporated all the colours of Rainbow. The chippies are from Papericious and are brushed with a thick coat of white gesso. After arranging the photo and sentiment on the base I added some butterflies, flowers and a few sequins. I layered a doily under the photo mat. I finished it by sprinkling a few drops of colours with a brush.Here are a few close ups of the layout


Supplies Used:

  • 12"*12" White Cardstock 200gsm
  • Rangers Multi Medium Matte
  • Stamploration "Bubbles All over" Stencil
  • Papericious Chipboard Heart Mesh
  • Papericious Sequins Mixed Bag 
  • Distress Inks (Seedless Preserves, Pink Raspberry, Salty Ocean, Peacock Feather, Mowed lawn, Mustard seed, Cracked Pistachio)
  • Doily
  • 3D Butterfly Stickers
  • Flowers
  • Photo and sentiment from Google Images


Almost all the above-mentioned products are available at Rainbow Craftykari Store or you can pre-order by sending email at rainbowcraftykari@gmail.com
Hope my project inspires you. Do participate in the challenge and have fun.Hugs,


Friday 6 January 2017

Layout Tutorial By Guest DT Halak

Hello Lovely Crafters,

A very lovely Welcome and a warm Good Morning in this cold winter.

Today in our Teaching and Learning Program we have aour Guest DT Halak Shah with a lovely Layout which she made with one paper pack. Sit back and enjoy the tutorial.

Over to you Halak,

Hello and good morning dear friends!
I'm Halak and today I have this layout to share with you.
 

Before we begin, let me list out the basic materials :

Paper Pack - Ephemera by Papericious

Round Ink Blending Tool by Papericious

Stencils :

1. Art Is - TCW
2. Labyrinth - TCW
3. Stylish Borders - Hero Arts
4. Rhapsody - Memory Box
5. Andy Skinner
Distress Inks :
Primarily used Wilted Violet and Picked Raspberries
Red striped washi tape and
Polka dotted washi tape
Inkadinkado alphabets and numbers cling stamp
Brads by Kaisercraft
A 1" circle paper punch (I've used the one by EK Success)
And lastly,
Pink beads + Sequins.

Tip: If you do not have beads, you can opt for different sized sequins too! Alternatively, micro beads / seed beads and glitter will also look fabulous!)

Okay, so, layouts... what are they? Something on the lines of a journal, layouts are meant to add an image and jot down something, (a line or two max) about that image... capture a memory and freeze it in time...

While journals can be highly personal, layouts are primarily created to be displayed. They can be framed or bound in a book, the choice is yours!

Here's a fun close up!

My layout is a 12" x 12" piece intended for framing.

Let's get started!
The first thing I did was open the paper pack and fussy-cut some elements to use as embellishments.


After that I went through the sheets and cut out some sentiments + punched out some circles using the paper punch.

Took the Andy Skinner + Hero Arts stencil and slowly started building up layers.


Why stencils?
Stencils are a great investment, because unlike embellishments, you can use the same stencils over and over again. They help give the illusion of layers and add interest to a project without actually adding bulk to paper so it makes your project look good without the added weight! Win-win!

Next, I took Labyrinth and Rhapsody stencils and added more patterns to the paper.


Tip: If you want a dimensional look, you can use modeling paste with fun ink sprays / acrylic paints!

After this, I took some alpa and number stamps by inkadinkado and lightly stamped them in the background.
At this point, I was quite happy with the way the background looked so I decided to stack up my embellishments + accessories to ascertain positioning.


Tip: I always roughly position where I'd like to place my embellishments / accessories and click a picture to make note of it. I move around the pieces a couple of times, click pics and then pick the one I like best. It's always a good idea to plan where the embellishments and accessories go before you glue / tape them in place.

The next step was to adhere everything in it's place.
Once that was done I took a big white brad which had a lovely flower design on it and added it to my project. Also added an additional big butterfly die-cut.
Finished it off with some stenciling + added washi tape bits and adhered the beads and sequins!
I absolutely love that floral arrangement decked with beads! Here's another close-up :


But wait! If you think that was all then I have Surprise for you all
As a bonus, Here's a card I made with a very detailed coloring tutorial.

Materials used :

1. Altenew - Wild Hibiscus stamp set

2. Poppy Stamp Die - Hello Word Balloon
3. Big Shot or any other compatible die-cutting machine
4. Staedtler Luna Coloring Pencils (Set of 24)
5. Ranger Archival Ink - Black
6. Cardstock
7. Cotton swabs
8. Baker's twine (black)
9. Paint brush (I used size 0 brush)
10. And lastly, some embellishments like sequins and rhinestones
 

The first thing I did was stamp the flowers with the butterfly onto white cardstock using my favorite, archival ink by Ranger.


I also took my hello word balloon die and die-cut the sentiment I wanted to use in black cardstock.


Next I took the color pencils and colored the images.
Here you can see my quick coloring.


I took the brush and with a little water, smoothed the pencil lines. That led to this subtle water colored look.


At this point I did like how the colors blended but they were a tad too light for me. So I decided to intensify the colors a little.

Check out the image below, the flower on the bottom left is the one where I began working. The first 5 petals when you compare with the previous image, you will notice that the colors have intensified.


To achieve this all I did was color a little over the petals using the same color pencils and then smooth it using a cotton swab!
I repeated the exact same process on the other flower and the butterfly after which the image looked like this.


I only wanted the sentiment minus the bubble so I trimmed it and adhered, matted the whole thing onto navy blue cardstock, added some twine and adhered embellishments to finish it off!
Here's the finished card.


What I absolutely love about the project is the coloring bit! So how could I end this post without a close up?! ^__^ Here you go.

That brings us to an end of this post dear friends! I hope you enjoyed my tutorial and it helped you learn something new.
A special thank you to Team Rainbow Craftykari for once again giving me the opportunity to share my papercrafting experience.
Till next time! *Big Panda Hugs*
Above listed Materials are available at Rainbow Craftykari Store or you can pre-order.

Regards,
Halak