Wednesday 22 November 2017

Altered Bottles by DT Anila

Hello friends!

Don't we all like to hoard things? We not only like to buy and hoard new items but also like to collect things which can be reused/upcycled in some form or the other, with the hope of giving these junk/scrap items new life sometime. 


I have a huge collection of glass bottles, cardboard/paper boxes, invitation/greeting card, tissue paper rolls and what not.


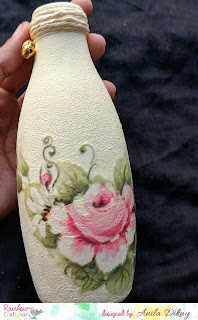
Today I am showcasing an upcycled glass bottle. This is just an inspiration for you to start using/revamping those things you have been hoarding endlessly. 


Here, I have decoupaged the (2) glass bottles to convert them into beauties to adorn your homes. They can also be given out as gifts.

Here's a look at the project -


Materials used

  • Chalk paints
  • Decoupage tissue papers
  • Sponge
  • Paper string
  • Thread and bells.


Method -
  • Firstly, remove any sticker on the bottle. Wash the bottle clean and dry it completely. 
  • Cover the bottle completely by dabbing the sponge with chalk paint over it. Let it air-dry.
  • Repeat the process to get a more uniform finish. 
  • Pick the tissue to be used and trim the design as desired. 
  • Carefully remove the backing/second ply of the tissue.
  • Apply a coat of Mod-Podge and stick the tissue over it carefully avoiding any creases. Let dry.
  • Apply a coat of Mod-Podge over the tissue paper to seal it. 
  • Tie a paper string to the neck of the bottle, covering it fully.
  • Tie a set of bells/Ghungroos with the help of a thin thread.


More pictures follow -


Hope, I could inspire you to finally start working on those things and give them a new life.

Do check out our ongoing challenge on the blog here
And do not forget to participate. 

Love,
Anila

Monday 20 November 2017

Mixed Media Wooden Piece Tutorial by DT Priya


Hello Crafty Folks,

A very good morning to all of you.I'm back with a Picture Tutorial for a Mixed media Wooden Piece. Here I have explained how I have made this piece totally out of scrap. Except for colouring and glueing you don't need any supplies to make this kind of a project.
Here is what I made....


So let's Start...


Step 1:
I had this wooden plank which is about 2.5 feet in length. You can take any base be it wooden or canvas, Procedure will be the same. I used some masking tape on corners and sides to fill the uneven parts. Also attached a hook at the back so that I can hang it on my wall.


Step 2:

I gave it a coat of white gesso.


Step3:

Here you can see the things I have used on the base to create textures. Some negative of chippies, Gauze cloth, Twine, some nails, buttons, tissue paper, pista shells, broken pencils, tags, broken toys etc.


I cut and glued the negative chippies on the base as shown in the picture below and also tied some twine on desired spaces.


Step 4: 

Then I arranged some gauze around the chippies and adhered some corrugated sheet here and there and also attached lace at few places.


Step 5:

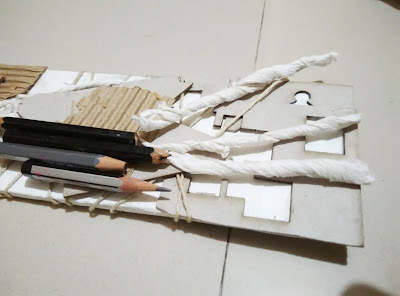
Then I arranged tissue rolls, some chipboards, metal charms, tags, broken pencils and other embellishments using 3d matte gel.


Here are some close-ups of the arrangements in case you are interested.


Step 6: 

Then I gave a coat of white gesso on it after all things dried up. Also used a light coat of Decoart crackle texture paste here and there.


As you can see I arranged some broken jewellery pieces on it to add more textures and finally added a butterfly chipboard to give some height.

Step 7:

Then I started colouring this after it is fully dried. Firstly I gave a coat of Chalk paint Sailing sky and Mint green Patina Paste. Then I started dry brushing with Rust and Brass Patina paste mixed together. Also rubbed blue patina paste here and there for the effect.


Supplies Used:

Wooden PlankPapericious White gessoFinnabair Patina Effect Paste ( Mint Green, Blue, Rust, Brass)
Deco Art Crackle Paste

Rangers 3D Matte Gel

Acrylic paint Rust

Papericious ChipBoards

Corrugated sheets

Laces
Gauze


You can get all the above-mentioned products from Rainbow Craftykari Shop or can pre-order by sending an email to rainbowcraftykari@gmail.com.


Also, do not forget to participate in our ongoing challenge here and check out other gorgeous projects and tutorials from our awesome Design Team.

Hope you like my project.

Hugs,

Priya

Friday 17 November 2017

Onsie Album Tutorial by DT Priyanka

Hola People!

Hope you are doing good! Today I am over at the RCS blog with another Tutorial. This time I am going to share with you a step by step instruction for making a "ONESIE ALBUM". This album is cuteness overloaded in every way & you can never get enough of looking at it..


Here is the glimpse of this adorable album..


Step-by-step on making a Onesie Album:

1. Preparing the Base: You can print out a Onesie shape on a printer sheet & cut it out to make the stencil or if you own a silhouette cameo you can also use that to cut out the base. My dimensions are 6.5"x4.5"
(Note: if you wish you can also choose to draw freehand)


(onesie shape stencil I cut out using my silhouette and cut out the rest using this) 


(traced the stencil on the rest of the sheets)


(cut out the traced onesies)


2. Choosing the right Patterned Paper: You can choose to pick any neutral colour or go with the traditional Pinks or blues for the onesie album. Here I have taken a neutral colour pp.Trace the design with a slightly smaller dimension from the base size as this will be adhered onto the base sheet to create an edge. For these I have taken the size 6.3"*4.3" (this varies a little as when we are making a software file of this sometimes it doesn't compress to the exact size on the curves and edges)
I forgot to take the picture of the traced & cut patterned papers)


(patterned papers)


3. Adhere the patterned papers onto the base (front & back) and punch on the top to put the binding rings/ribbon


(patterned papers adhered front and back on the base)


4.The base is now absolutely ready...!!

5.Embellish it!- This is the most fun part, you can add about almost anything to make these cuties look more beautiful.. resins, charms, sentiments, flowers, ribbons, notes, pictures and what not..!!
I have kept my embellishment on a lighter side you can add more if you wish.. :)


Voila!! Its R-E-A-D-Y!
Isn't it looking absolutely adorable...


Materials Used:

  • Yellow Cardstock
  • Patterned paper
  • Resins
  • Binding rings
  • Flowers
  • Snapcards
  • Diecuts
  • Ribbons

Almost all the material mentioned above are available at Rainbow Craftykari Store and you can also pre-order them by sending an e-mail to rainbowcraftykari@gmail.com

Hope You enjoyed the tutorial. Don't forget to give it a try. Would love to see your creations & take on the same.


Lots of love
<3 br="">
<3 br="">Priyanka Thukral

Tuesday 14 November 2017

Photofolio Tutorial by DT Mounika

Hello Everyone,


Mounika Here, I'm here to share a tutorial on my latest creation a Photofolio. Photofolio is a great way store many photos together .


So let's start....


1.To make the cover of the album, cut three pieces of 7"*7" & two pieces of 1"*7" black chipboard.


2. Cut a coloured cardstock measuring 25"*9 1/4". Arrange the black chipboard pieces as shown in the picture below on the cardstock. Adjust and stick them. Cut the corner and fold the flaps inside, crease and fold the album.


3. For the inner flaps on the left side, take two 6.5'*6.5" black cardstock & two pieces of 6 3/4 "*6 3/4 " and on the 6 3/4" pieces score at 1/8"one larger and one shorter end & fold the scored 1\8th side and apply glue. Stick 6.5"cardstock on top of the scored and folded side of 6 3\4" cardstock to form a pocket insert.


4. For the hinge of the album, take  2.5"*6 3/4" strip and on 2' side score at 3\4 and 1 1\4  in the middle and fold. Add the pocket flaps to this hinge using glue.


5. To make the insert on the right side of the album, take a cardstock sized 5.5"*12", score at 5 1/4" & 6 1/4" and fold on scored lines. Apply glue on the hinge formed in the middle of the cardstock and stick directly to hinge on album.


6. For the side pocket on right flap of album, cut cardstock measuring 5"*12", on the 12" side score at 1.5" & 6" respectively and fold. Cut a small notch on 1.5" strip, apply glue and stick at the edge of the flap.


7. To make a diagonal insert on left flap of the album, cut 5"*6" cardstock and cut diagonally , score 1/8" on both sides and fold and glue. Note: Before glueing,  stick desired pattern paper on background.


8. For the middle flap of the album cut two piece of 5"*6.5", score at 6" on the longer side on one piece & fold. On another piece score1/4" on three sides, fold and glue.


9. Before starting with pattern paper  choose how you want to close your album you can use ribbons to tie or a magnetic closure .


10. For inserts in the pocket envelopes cut two pieces of black cardstock measuring 6"*6" & one piece of each 5"*5",6"*5.5",6"*4".


11. Finally, decorate the folio with your chosen pattern papers, die cuts, sentiments and embellishments.


12. For the cover of the album, I choose two pattern papers one of size 7"*7" & another of 6.5"*6.5". I layered one on top of the other. I then coloured my Chipboard sentiment with blue chalk paint and distressed with picked raspberry distress ink. I added some glitter. Finally, I added some flowers  to complete the look.


Materials used

  • Black cardstock
  • Black chipboard
  • Eno greetings pattern papers
  • Mdf chipboard embellishments
  • Mulberry flowers
  • Coloured cardstock
  • White glue
  • Rainbowcraftykari neodymium magnets
  • Diecuts and embellishments

All the above-mentioned products are available at the rainbowcraftykari store or you can pre-order them by sending an e-mail at rainbowcraftykari@gmail.com


Hope you all like my project

Mounika