Wednesday, 11 April 2018

Spring Bird Cage Inspiration by DT Spardha

Hi guys!

Spardha here for today's inspiration post at the Rainbow Craftykari Blog. Hope you guys are enjoying the Spring Season, with the beautiful weather, flowers and the pretty pretty colours all around. 

Taking inspiration from the season, today's post will be a bit more "organic" {I know I can crack better jokes, I'm working on it!}


Today I have for you a beautiful spring-themed ornament made entirely with a sheet paper. These can be great centre-pieces for décor or out-of-the-box gifts. I will be keeping it at my craft desk as this season's mood-board.


To make your own birdcage, start by cutting a 3" circle from chipboard to act as a base. I covered mine with green felt fabric, but you can use paper or moss as well.

Cut a small circle for the top of the cage and stick four 1/2" strips of white paper to the centre of the circle cut-out. An easy way to make sure that your cage fits on to it's base is to wrap a 1" strip of paper around the periphery of the base and stick it's two ends so the circular strip pops out. 

Mark 8 points at equal distances on the circular strip and stick the ends of the 1/2" paper strip at each of these points. Let it dry and your birdcage is done!


Now all you have to do is unleash your creative cells and decorate it to your liking. I brought in a bit of actual nature in mine by using a dried stem as the main branch, using loads of paper flowers, fabric trims and bling to complete the look.


Supplies used:
Most of the above-listed materials are available on the Rainbow Craftykari Store and can also be pre-ordered by sending an e-mail at rainbowcraftykari@gmail.com.

Do visit the Rainbow Craftykari store HERE

Visit our BLOG for more inspiration, tutorials and check out our ongoing challenge.


Hope this project brings in some cheer for you this season and inspires you to get crafty.

P.S. There are a few more days to participate in our ongoing challenge.


--- Happy Crafting! ---
Spardha

Tuesday, 10 April 2018

Journal Page using Gel Press Tutorial by Blog Coordinator Aditi

Hello everyone,

Aditi here today on the blog with a new post to inspire you all. Today I have a video tutorial for you all. 

Have you seen the colour palette of our April Challenge? It is so beautiful and with the Theme of Love in mind, I decided to create a Journal Page.

In this tutorial, I will be showing how to create a quick and easy background with the help of gel press. Although I have made a journal page, this technique can also be used for a card, or background for any project. 

I have interpreted the theme of Love as Love for Art, Craft and Journaling that is something so important to keep and keeps my days bright and joyous. 

Here's a look at the creation:


Here's the tutorial, gather your supplies and get crafty with me:)!


Some close ups:


Supplies used:
  • White Ivory Sheet
  • Gel Press 8"x10" Plate
  • Dylusions Paints-White lines, Melted Chocolate, Cherry Pie, Pure Sunshine, Pomegranate Seed, Funky Fuchsia, Bubblegum Pink
  • Brayer
  • 13 Arts Bubbles Stencil
  • Finnabair- Grungy Grid 
  • Staz On Black Ink
  • Deep Purple Archival Ink
  • FInnabair Background Stamps
  • Distress Crayons- Seedless Preserves, Fossilized Amber
  • White Uniball Pen
  • Kaisercraft collectables- Oo La La
  • Tim Holtz Ideology- Small Talk
Most of the above-listed materials are available on the Rainbow Craftykari Store and can also be pre-ordered by sending an e-mail at rainbowcraftykari@gmail.com.

Do visit the Rainbow Craftykari store HERE

Visit our BLOG for more inspiration, tutorials and check out our ongoing challenge.

Thursday, 5 April 2018

Wooden Home Decor Tray by DT Megha

Hello Crafty Folks,

A very good morning to you all. Today is my first post for the Rainbow Craftykari blog and I am excited. 

I have a Picture Tutorial of a Wooden Tray with Decoupage and Resin. I will take you through the steps of making a beautiful utility tray and, you don't need many supplies to make this kind of a project. Here is a look at what I made:


Here's a video flip through:


Step 1: 
I had this wooden tray which is approximately 14 inch in length. You can take any size tray. To begin with, arrange the butterflies on the tray and take a picture of it for reference.


Step 2:

Begin by painting the tray. For this I gave a coat of sky blue and grey chalk paint on the insides and edges of the tray. I dabbed the paint with a sponge dabber so there is a texture on the tray. One can use any paint, chalk paint dries up quickly specially in this summer season.


Step 3:
After the paints dries, further enhance the design by using a pattern stencil. With the help of a woodgrain pattern stencil and brown chalk paint, I added another element of design to the inner sides of the tray.


Step 4:
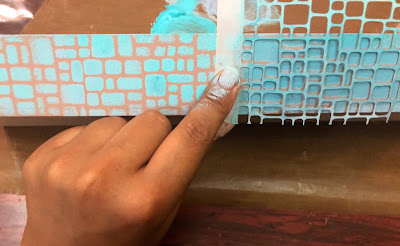
Next, paint the outside of the tray. I gave a coat of brown chalk paint on the outside of the tray and after it dried, with the help of a stone pattern stencil and sky blue and grey chalk paint, I added pattern to the outsides of the tray.


I reversed the colours which were inside the tray on the outside of the tray to maintain monotony in colour.


Step 5:
Remember the butterflies we arranged and clicked a picture, time to arrange and adhere them now, you can use any glue as long as the butterfly adheres flat on the base of the tray, apply a coat of varnish or glue which dries transparent on the base of the tray to protect the butterflies.


Step 6:
Coat the inside of the tray with resin, making it user friendly.For this, use Resin that is Clear and Hardner in 1:1 ration. Pour them in separate containers in equal amounts and the mix the Hardner into the Clear liquid with the help of a stick, please handle these with gloves on and use disposable cups.


Step 7:
Keep the tray on a flat surface and pour the contents of the cup on to the tray, with the help of a stick you can move the liquid to the corners and blow the bubbles with the help of a heat gun from a distance.
Leave for a day or over night to let it set and dry.


With that done, our tray is now ready. Here are some more pictures:


Supplies Used:

  • Wooden Tray
  • Chalk paints (sky blue, grey, brown)
  • Stencils
  • Butterfly Die-cuts
  • Decoupage Glue
  • Clear and Hardner (Resin)
  • Plastic Cups & Wooden Stick
  • Heat Gun, Sponge Dabbers, Palettes

Most of the above-listed materials are available on the Rainbow Craftykari Store and can also be pre-ordered by sending an e-mail at rainbowcraftykari@gmail.com.

Do visit the Rainbow Craftykari store HERE

Visit our BLOG for more inspiration, tutorials and check out our ongoing challenge.

Happy Creating!
Megha

Wednesday, 4 April 2018

Mixed Media Globe Inspiration by DT Saloni

Hello Crafty friends,

I'm Saloni Agarwal and I am very excited to share my first DT Inspiration post for Rainbow Craftykari Blog for the month of April.

This time I have created a mixed media project and titled it "The poetry of Earth is never dead".

So, here is a look at the project:


For this , I took a globe and painted it with black heavy gesso. Once dried.,I have used modelling paste to add some texture to it and covered the entire surface again with gesso. I started adding colors once the base was completely dried.I have used metallic paints and color spray to  highlight the texture . Then I started adhering flowers and embellishments to create the layer.

Now to add more elements to it, I have added few stones ,beads & metal charm (colored with it red and white). Finally to finish the complete look , I have added the typo bulb. 

Here are some more close up shots


Materials used:
  • Globe
  • Black heavy gesso
  • Texture paste
  • Prima art alchemy waxes and patina paste
  • Prima metallic colors
  • Color sparys
  • Prima typo bulb
  • flowers
Most of the above-listed materials are available on the Rainbow Craftykari Store and can also be pre-ordered by sending an e-mail at rainbowcraftykari@gmail.com.

Do visit the Rainbow Craftykari store HERE

Visit our BLOG for more inspiration, tutorials and check out our ongoing challenge.

Hope my project inspires you!!

Happy Crafting