Friday, 25 August 2017

Interactive card tutorial by DT Ishani

Hello Dear Crafters,

I am back today to share with you a tutorial on card making. I am sure this post will help all of you who want to try and make a card with a different technique and don't know where to begin!

Twirling Fairy


I am sure you love interactive cards like I do.  It gives you more joy when you see the recipient enjoying playing with it.
So, today I have a fairy card which twirls or spins.

For this card you'll need:

  • Cardstock For the card base - 14 x 28 cms (180 gsm)
  • Cardstock For inlay - 12 x 12 cms (180 gsm)

  • Pattern Paper - 14 x 14 cms (120 gsm)

  • An image/stamp (I used a digital image)
  • White cardstock for printing the image (I used Papericious 180 gsm)
  • Craft knife
  • Ruler
  • Pencil
  • Plastic cord
  • Double sided tape
  • Glue
  • Colours (I used Koi brush pens & Camlin watercolour pencils)
  • Embellishments (I used spectrum noir pen, half pearls, Glossy accent and shaker elements) 

Let's begin making it

1.  Decide your subject image, as the dimensions of the card may vary for you. I got a digital stamp printed on a sheet of cardstock. Take the cardstock of 14 x 28 cms and score it in half to create a top folding card.You have to cut one side of the card to create a window. If you have a die cutting machine and a die that cuts a window in which the image can move effortlessly, go ahead. But if you don't have all this, just take a craft knife and first mark your markings and cut with the knife.


2.  Now, cut the pattern paper of the desired dimensions. I cut a rhombus of 8x8 cms to ensure my fairy moved effortlessly.


3. Similarly, on the cardstock align the cutout window of the patter paper and cut similar window.


4. Now attach the card
base and the patter paper, so that the windows align together. I used a double sided tape for it. Using glue might warp the paper.


5. I only had the front side of the fairy, so I cut the similar image but on the plain side I drew her dress and hair. It was an easy image so I could do so. So be careful while
choosing an image to spin. There are many companies which make the spinning
card version stamps with the front and backside image available.


6.  I coloured the image with watercolours (koi pens and pencils). I used some gold and silver colour for her crown and wand. I used some embellishments, like glossy accents and shaker elements on her wand. With spectrum noir sparkle brush I put some sparkle on her gown and some half pearls for her crown.


7. Now that the images are ready, we need to put it together so that our fairy twirls. Take that plastic cord or any other neutral colour strong cord and place it carefully at the centre of your image. Stick it up with a strong tape and then stick both the parts of the image. You must ensure that the cord is straight before you stick the parts up. Check how it looks when suspended.


8. It is ready to be assembled and put in its window. I attached the cord with a strong tape and used a pretty washi tape to hide it. Change the direction of the image, to see if it's centred properly.


9. Now that the card is almost ready, I realised that if I write inside the card, it will be visible through the window. So, to cover it up I took 12 x 12 cms similar cardstock and stuck it inside.


10. Twirl your fairy and put it in an envelope, when the recipient opens the card, the fairy will twirl. 


I hope you enjoyed this and will make your own twirly interactive card/ spinning card. I have enjoyed making it and I and my family love to play with it. I don't think I'll be able to keep it safe to be presented to someone!

Don't forget to participate in our ongoing challenge Rainbow Friendship. Link your projects here.

Happy Crafting,


Wednesday, 23 August 2017

Elegantly Chic Shadow Box by DT Khushboo

Bonjour Crafters!

This is Khushboo here, back with an Inspiration Post this time. I often do colorful projects and work with color schemes. But for my latest project, I chose a different route. I've created a gorgeous 'Elegantly Chic Shadow Box' in a purely Black-and-Red relationship.


Setting up a shadow box, and further yet, creatively embellishing it is a lot of fun! It brings out the kid in me if nothing else. To arrange every single box/space is very cool! You can spin a different story in every space and yet make it all very cohesive on the whole.


My inspiration for this Shadow Box was Papericious' beautiful paper pack called 'Mi Estilio' - very stylish and extremely elegant. So once I knew what my central theme for the shadow box would be, I started collecting all my related embellishments and creative ideas. The result is as follows:


A Brief for creating this 'Elegantly Chic Shadow Box':

Shadow boxes come in different shapes and sizes, and with randomly sized inside spaces too. Select the one that appeals to you and get started.Cover the entire shadow box with 2 coats of black gesso (since I'm going with a black-and-red theme). Let it dry thoroughly between and after every coat.


Now color the whole box with black acrylic paint and let it dry completely.
Measure the inside box length and width and cut up your pattern paper accordingly.
Ink up the edges of the pattern paper with black and/or red distress inks and start gluing them down however you find them the most complementing.
Don't forget the sides of the shadow box. I've cut strips of pattern paper with random lengths and stuck them. They look dreamy!


Since my theme is 'Elegant and chic', I've embellished my shadow box with all royal-looking stuff like a chair, chandelier, photo frames, etc.
Papericious paper pack also has some beautiful shapes and motifs related to the theme like nail paint bottles, quotes, compact, lipstick, mascara, etc. I've used some of them here - on the front panel.


Finally, I've added glitter stickers like hearts and arrows on the floor of every space so as to not make it gaudy and yet maintain the elan. 


Materials used:

  • Shadow Box 
  • Black gesso 
  • Black acrylic paint
  • Papericious Paper Pack
  • Black cardstock
  • Metal embellishments
  • Resin embellishments
  • Papericious clock embellishments
  • Glitter stickers
  • Metal chain
  • Paper flowers
  • Flower pot
  • Fillers

Hope you guys enjoyed my creations and the tutorial. Can't wait to see how you add your own twist to this!

Don't forget to participate in our ongoing challenge Rainbow Friendship. Link your projects here.

Above mentioned products are available at Rainbow Craftykari Store OR you can pre-order the products by sending email at rainbowcraftykari@gmail.com

That's it from me, folks!

Monday, 21 August 2017

Altered Wall Art Tutorial By DT Priya Mishra

Hello Crafty Friends,

Priya here today with a detailed pictorial tutorial for a Mixed media Wall art. Mixed media is always fun and I enjoy a lot creating different textures and I'm showing how to get different textures on your project here today with simple little things from your stash.

Take a look at the final outcome:


Let's start the tutorial:

Step:1 I altered a square shaped MDF board, which actually was a cake base. You can take any size of a board. Here's the base:


Step 2: I gave a thick coat of white heavy gesso on the base. Once it was dry I gave another coat.


Step 3: Next, I created some texture.Here you can see, on the lower part of the board, I glued some crumpled tissue paper and also attached lace.


Step 4: At this point, I created some texture with the help of a stencil on the left side. As you can see my son also helped me in this.


For quick drying, I used the heat tool.


Step 5: Then, on the right side of the lace on upper part, I applied some texture paste and tried some random texture using my quilling comb.


A dotted tool for some more texture here and there.


Step 6: After drying, I started adding embellishments randomly. I added flowers, chipboards, resin and metal embellishments and glued them all with a glue gun.


Step 7: Then I added a few Big and small pearls, Art stones and sprinkled seed beads.


Step 8: Then I started adding colours. Here I used acrylic colours. I mixed Pink and yellow colours to get this colour and at the lower side I added black pearl acrylic colour.


This is how it looked when finished. This photo was taken at night after I finished, so the picture isn't very clear.


Here are a few close ups of the project.


Supplies Used:

  • MDF Board/ Chipboard
  • Art Basic Heavy gesso
  • Rangers Texture Paste
  • Tim Holtz Stencil
  • Rangers Heat Tool
  • Hot Glue gun
  • White glue
  • Tissue Paper
  • Lace
  • Papericious Chipboard
  • Chipboards
  • Resin frame
  • Metal Charm
  • Flowers
  • Pearls
  • Seed Beads
  • Acrylic Paints

Hope you enjoyed the tutorial. All the above mentioned products are available at Rainbow Craftykari Store or you can preorder them by sending an email to rainbowcraftykari@gmail.com.

Don't forget to participate in our ongoing challenge Rainbow Friendship. Link your projects here.


Hugs,


Friday, 18 August 2017

Altered MDF Box by DT Priyanka Thukral

Hello Everyone, :)


I am at Rainbow Craftykari Blog today to share my very first inspiration post as the DT member for Rainbow Craftykari. I am Elated..!! and I hope to stand up to the expectations laid down on me.


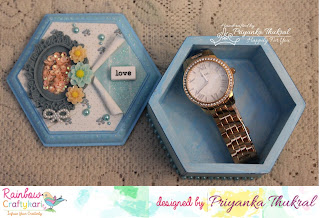
Today I have an Altered MDF wooden box to share as a part of my inspiration project.
Altered MDF projects have been my favorites since forever & no wonder I begin my term with one of these.


Here is the complete picture of my project


For this project, I picked up a hexagonal MDF box (another current favourite of mine.. :P ) I began with painting the base with gesso which works as a primer (tip: Gesso creates a coat on the base of the wooden material that holds the paint otherwise the wood absorbs the colour).


Next, I painted the box with blue acrylic colour. I chose coordinating patterned papers from Eno Greetings paper pack, cut them to the desired size & distressed them on the edges. For the cover, I cut the paper from one end to the centre point & rolled the two sides on the opposite sides.

On the exposed part of the base, I added glitter using stickles in the coordinating colour & a word tile over it. On the other part, I added a resin oval frame & sequins in the middle of it & adorned it with the resin flowers & bows.
On the sides, I again used stickles in the same colour to give an embossed look (I love how they look like tiny droplets resting on the edge) & added rhinestones to lift up the whole look.

and tada..!! the box is done... :)

The box is perfect to gift a watch to someone or keep it on your dresser as a jewellery box, can be used in multipurpose ways.

Check out some more close up pictures


Supplies Used: 

  • Mdf hexagonal shaped box
  • Gesso by Camel
  • Blue Acrylic paint by Fevicryl
  • Eno Greetings- Pattern Papers
  • Word Tile
  • Resin frame - Oval
  • Resin flowers
  • Bow
  • Stickles(aqua colour)
  • Rhinestones
  • Distress Ink
  • Glossy Accents

Above-mentioned products are available at Rainbow Craftykari store or you can also pre-order by sending an email at rainbowcraftykari@gmail.com

Don't forget to participate in our ongoing challenge Rainbow Friendship. Link your projects here.

Hope you liked my project!


Priyanka Thukral