
Hello Crafters,
Nikkita here again on India's Best Papercrafting Blog that's Rainbow Craftykari Blog. Hope you all are doing great. Often you want to decoupage the MDF Box with pattern papers but many doubts arises, Today in our Teaching and Learning program, I'm going to share step by step tutorial Decoupage on MDF Box using Pattern Papers. Also I'm going to share one more tutorial on how to prepare an Easel card, which is going to be inside in it and it will become an Wonderful gift to present to your loved ones. It's going to be lengthy post, so sit back and grab your favorite summer drink.
Decoupage Box with Pattern Paper:
Step 1
Take MDF box of 6"x6" size. I have bought mine from Rainbow Craftykari Store. It has good finishing and of highest quality. Clean it completely using fine sand paper. Shake off the dust thoroughly.

Step 2
Apply Light Coat of Gesso to all over the box, Coat only once. Let it dry completely or Heat Dry it using heat tool.

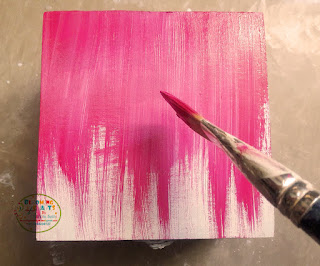
I'm using Prima Rossibelle Pattern paper, so i have picked the color from it, then apply DecoArt Reminisce chalkboard paint using sponge or brush, chalkboard paints give a smooth and neat finish and dries quickly.
Step 3
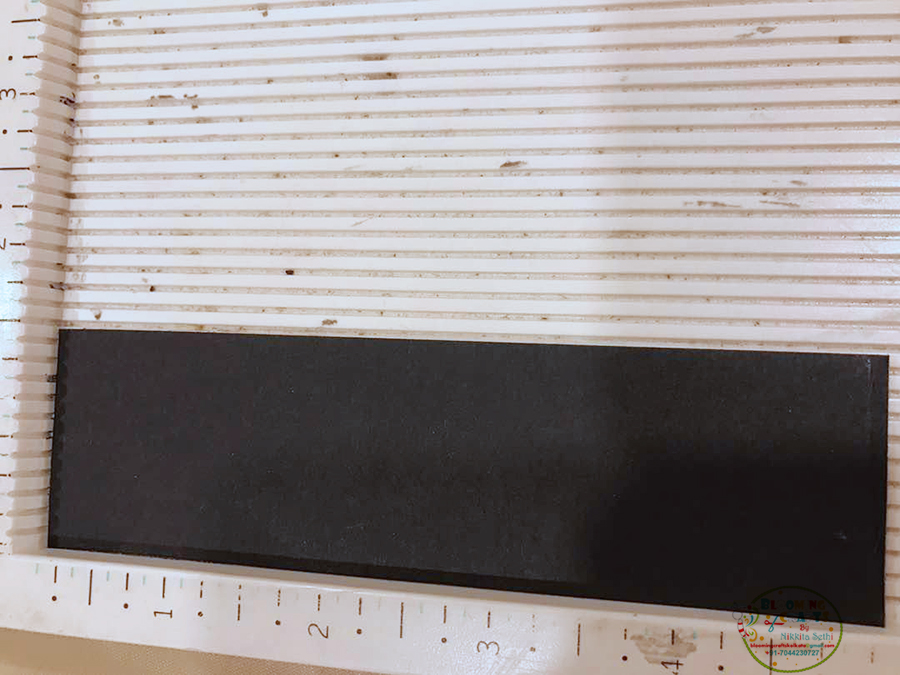
For 6by6 inches box, have cut the pattern papers into 5.75inches leaves a 0.25 inch gap which shows the background color of the box and distressed the pattern papers with Black soot distress ink or any other ink to give a finished look.
I used mod podge to stick the papers it's a fabulous product for decoupage. Apply Mod Podge in Horizontal and Vertical way so that it get apply evenly on on base and it won't form any bubbles.
Tip: When you'll adhere the pattern paper, before give a one good coat of Mod Podge glue which is sufficient. Than take any clean rough cloth, fold into small rectangle shape and by keeping good pressure of your hand move that cloth piece on to the pattern paper, it will set your pattern paper.

Stenciled using grey chalkboard paint and if you don't have grey use black and white acrylic paint. I have stenciled inside and outside before and after adhering the pattern papers. Heat Dry it.

For Inside have cut the pattern papers approx 7mm from all four sides. Adhere it using same technique.


Step 4
Coming to decoration, I have colored the Simple Lattice Chippie from Papericious and other chipboard elements with DecoArt Reminisce ChalkBoard Paint using Sponge brush. To give a brushed look i have Distress them using Black Soot Distress ink. I have even use left over chippies from Simple Lattice to give a unique look. Have adhered them inside and top of the box using glossy accents.

On the top of the cover, I've placed chippies, flowers, Metal Embellishments and die-cuts from the Prima Rossibelle Collection to give symmetrical composition. After that i have adhered them with glossy accents and tacky tape.
Tip: You can take photographs of you composition, It'll help you to make the placements of your decorative products to check the correct composition, Once you're satisfy, adhere them.


Our Decoupage Box is Complete, Keep it aside. Let's move to Card now.

Easel Card Tutorial:
Step 1
Take black cardstock of around 250-300 gsm measuring 5*11inches and score on long side at 2.75" and 5.5". Pre-fold all score lines.


Step 2
Take another piece of cardstock measuring 5x5.5" and adhere to 2.75" x 5.5" section as shown using tacky tape, Remove the Tape liner and adhere the 5x5.5" cardstock piece. Now the card base is ready.


Step 3
For embellishing the card I have used scraps from the collection left while making the box and have cut strips of 0.75" x 5.5" and now stick them randomly using tacky tape , now you can add a die cut and embellish it with the tags from the collection. I have added foam tape at the back to give 3D look. Take a strip of 1.75 *5 inches and add to the inside flap to make a stopper for the card to stand.


Step 4
I have added satin handmade flowers and embellished with diecut leaves using glue gun and glossy accents and added a sentiment in the inside flap to complete the card.

And now the easel card matching the mdf box is ready.


Material List for Decoupage Box
Deco art pink and grey chalkboard paints
Mod podge matte
MDF Box
Sand Paper
Stencil
Stencil brush
Papericious chippies
Prima Rossi Belle Paper Pack
Diecuts from my stash
Mulberry flowers
Black Soot Distress ink
Black gum drops
Material List for Easel card
250-300Gsm cardstock
Rossibelle pattern papers
Satin flowers
Tags from collection
Cherry Leaf Die
Tacky tape
Glossy accents
Foam tape
All the materials listed above are available at Rainbow Craftykari Store or you can pre order them by sending an email at rainbowcraftykari@gmail.com.
Hope you got inspired to create one yourself. Do join us in the ongoing challenge "Exploding Surprise". Looking forward to see your entries. Happy Crafting!!
Love & Warm Regards
Nikkita Sethi
Blooming Crafts by Nikkita
Nikkita here again on India's Best Papercrafting Blog that's Rainbow Craftykari Blog. Hope you all are doing great. Often you want to decoupage the MDF Box with pattern papers but many doubts arises, Today in our Teaching and Learning program, I'm going to share step by step tutorial Decoupage on MDF Box using Pattern Papers. Also I'm going to share one more tutorial on how to prepare an Easel card, which is going to be inside in it and it will become an Wonderful gift to present to your loved ones. It's going to be lengthy post, so sit back and grab your favorite summer drink.
Decoupage Box with Pattern Paper:
Step 1
Take MDF box of 6"x6" size. I have bought mine from Rainbow Craftykari Store. It has good finishing and of highest quality. Clean it completely using fine sand paper. Shake off the dust thoroughly.

Step 2
Apply Light Coat of Gesso to all over the box, Coat only once. Let it dry completely or Heat Dry it using heat tool.

I'm using Prima Rossibelle Pattern paper, so i have picked the color from it, then apply DecoArt Reminisce chalkboard paint using sponge or brush, chalkboard paints give a smooth and neat finish and dries quickly.

Step 3
For 6by6 inches box, have cut the pattern papers into 5.75inches leaves a 0.25 inch gap which shows the background color of the box and distressed the pattern papers with Black soot distress ink or any other ink to give a finished look.
I used mod podge to stick the papers it's a fabulous product for decoupage. Apply Mod Podge in Horizontal and Vertical way so that it get apply evenly on on base and it won't form any bubbles.
Tip: When you'll adhere the pattern paper, before give a one good coat of Mod Podge glue which is sufficient. Than take any clean rough cloth, fold into small rectangle shape and by keeping good pressure of your hand move that cloth piece on to the pattern paper, it will set your pattern paper.


For Inside have cut the pattern papers approx 7mm from all four sides. Adhere it using same technique.


Step 4
Coming to decoration, I have colored the Simple Lattice Chippie from Papericious and other chipboard elements with DecoArt Reminisce ChalkBoard Paint using Sponge brush. To give a brushed look i have Distress them using Black Soot Distress ink. I have even use left over chippies from Simple Lattice to give a unique look. Have adhered them inside and top of the box using glossy accents.

On the top of the cover, I've placed chippies, flowers, Metal Embellishments and die-cuts from the Prima Rossibelle Collection to give symmetrical composition. After that i have adhered them with glossy accents and tacky tape.
Tip: You can take photographs of you composition, It'll help you to make the placements of your decorative products to check the correct composition, Once you're satisfy, adhere them.


Our Decoupage Box is Complete, Keep it aside. Let's move to Card now.

Easel Card Tutorial:
Step 1
Take black cardstock of around 250-300 gsm measuring 5*11inches and score on long side at 2.75" and 5.5". Pre-fold all score lines.


Step 2
Take another piece of cardstock measuring 5x5.5" and adhere to 2.75" x 5.5" section as shown using tacky tape, Remove the Tape liner and adhere the 5x5.5" cardstock piece. Now the card base is ready.


Step 3
For embellishing the card I have used scraps from the collection left while making the box and have cut strips of 0.75" x 5.5" and now stick them randomly using tacky tape , now you can add a die cut and embellish it with the tags from the collection. I have added foam tape at the back to give 3D look. Take a strip of 1.75 *5 inches and add to the inside flap to make a stopper for the card to stand.


Step 4
I have added satin handmade flowers and embellished with diecut leaves using glue gun and glossy accents and added a sentiment in the inside flap to complete the card.

And now the easel card matching the mdf box is ready.


Material List for Decoupage Box
Deco art pink and grey chalkboard paints
Mod podge matte
MDF Box
Sand Paper
Stencil
Stencil brush
Papericious chippies
Prima Rossi Belle Paper Pack
Diecuts from my stash
Mulberry flowers
Black Soot Distress ink
Black gum drops
Material List for Easel card
250-300Gsm cardstock
Rossibelle pattern papers
Satin flowers
Tags from collection
Cherry Leaf Die
Tacky tape
Glossy accents
Foam tape
All the materials listed above are available at Rainbow Craftykari Store or you can pre order them by sending an email at rainbowcraftykari@gmail.com.
Hope you got inspired to create one yourself. Do join us in the ongoing challenge "Exploding Surprise". Looking forward to see your entries. Happy Crafting!!
Love & Warm Regards
Nikkita Sethi
Blooming Crafts by Nikkita
Beautiful set! Love the combo of colors and papers and Easel card is just gorgeous Nikkita!
ReplyDeleteFabulous projects and a great tutorial:)!
ReplyDeleteThat's a nice combination - Box and card inside :) Thanks for sharing the lovely tutorial too!
ReplyDeleteLovely project.
ReplyDeleteBeautifully explained.
Wow...This combo looks beautiful...Great tutorial...
ReplyDeleteLove
Richa