Hello everyone
I am thrilled to post my first post for Rainbow Craftykari as
GDT. Today, I have come up with an inspiration post for the ongoing
Monthly Challenge “Revamp your Scraps”. If you are still unaware of it
or have skipped anytime, here is the link to the challenge post.
For today’s post, I selected bottles (wine bottles) that we throw after consumption. I made three possibilities from the same bottle. Without wasting much time, let’s move to the projects:
Project 1
For the first project, I started with Acrylic Spray Paints viz. Orange and Yellow. Make sure that the wine bottle is cleaned before applying spray on it. I sprayed yellow first, then applied orange from the top.
Let it dry for an hour. Do not apply too much color as it will increase the opacity. Take black acrylic paint and draw whatever comes to your mind. I prefer silhouette image will provide the opacity and the image will come to life.Insert LED lights from the top and you are done!
Take a final look-
You must be wondering how it looks when it is lighted!
Some useful tips:
Always clean off the wine bottle and its label off the next morning.
Apply spray paint going outside your house.
Avoid spraying in front of kids.
Apply from a good distance and do not hold on to a single area for long.
This will make the paint thicker on the area and the effect will not be that good from a thicker painted base.
Wear gloves ALWAYS.
Do not keep the bottle in any contact with other material. The body surface will become hot after being lighted. Lastly HAVE PATIENCE while spraying.
Project 2
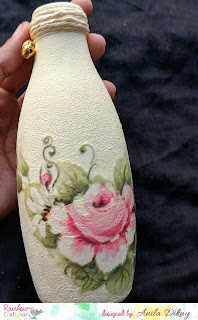
For the second project, I went over to make it close to Mixed Media.
I started with white Acrylic spray paint and painted on the bottle.
I took a decoupage napkin and glued to the bottle.
I took some peacock feathers that I had in my home and some leaves to embellish.
I took mulberry flowers and glittered pollens (I made with glue and glitter) and adhered on the bottle.
I finished it with some aluminum foil, wrapping it on the neck.
Project 3
For this, I chose it to be clean and simple.
I started off with Golden acrylic paint and let it dry for an hour.
I applied glue till the half of the bottle and followed it with applying golden glitter.
I finished it off with some die cuts that I had in my stash and received as gifts. The hearts are cut from the glitter paper.
Materials Used
1st Project
Acrylic spray paint- Orange and Yellow
Acrylic black color
Paint brushes
2nd Project
Acrylic spray paint white
Decoupage napkin
Decoupage glue
Mulberry flowers and leaves
Glitter powders
Pollens
3rd Project
Acrylic spray paint golden
Glitter golden
Glitter sheets golden
Adhesive.
Above listed Materials are available at Rainbow Craftykari Store or you can pre-order to them by sending an email at rainbowcraftykari@live.com.
Hope you have liked all the projects, don’t forget to participate in our monthly challenge.


