Hello Crafty Folks,
A very good morning to you all. Today is my first post for the Rainbow Craftykari blog and I am excited.
I have a Picture Tutorial of a Wooden Tray with Decoupage and Resin. I will take you through the steps of making a beautiful utility tray and, you don't need many supplies to make this kind of a project. Here is a look at what I made:
Here's a video flip through:
Step 1:
I had this wooden tray which is approximately 14 inch in length. You can take any size tray. To begin with, arrange the butterflies on the tray and take a picture of it for reference.
Step 2:
Begin by painting the tray. For this I gave a coat of sky blue and grey chalk paint on the insides and edges of the tray. I dabbed the paint with a sponge dabber so there is a texture on the tray. One can use any paint, chalk paint dries up quickly specially in this summer season.
Step 3:
After the paints dries, further enhance the design by using a pattern stencil. With the help of a woodgrain pattern stencil and brown chalk paint, I added another element of design to the inner sides of the tray.
Step 4:
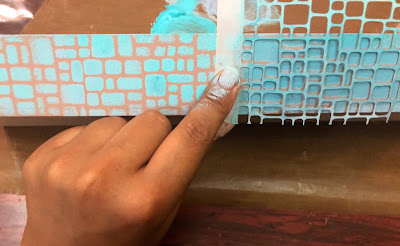
Next, paint the outside of the tray. I gave a coat of brown chalk paint on the outside of the tray and after it dried, with the help of a stone pattern stencil and sky blue and grey chalk paint, I added pattern to the outsides of the tray.
I reversed the colours which were inside the tray on the outside of the tray to maintain monotony in colour.
Step 5:
Remember the butterflies we arranged and clicked a picture, time to arrange and adhere them now, you can use any glue as long as the butterfly adheres flat on the base of the tray, apply a coat of varnish or glue which dries transparent on the base of the tray to protect the butterflies.
Step 6:
Coat the inside of the tray with resin, making it user friendly.For this, use Resin that is Clear and Hardner in 1:1 ration. Pour them in separate containers in equal amounts and the mix the Hardner into the Clear liquid with the help of a stick, please handle these with gloves on and use disposable cups.
With that done, our tray is now ready. Here are some more pictures:
Supplies Used:
Happy Creating!
Megha
A very good morning to you all. Today is my first post for the Rainbow Craftykari blog and I am excited.
I have a Picture Tutorial of a Wooden Tray with Decoupage and Resin. I will take you through the steps of making a beautiful utility tray and, you don't need many supplies to make this kind of a project. Here is a look at what I made:
Here's a video flip through:
Step 1:
I had this wooden tray which is approximately 14 inch in length. You can take any size tray. To begin with, arrange the butterflies on the tray and take a picture of it for reference.
Step 2:
Begin by painting the tray. For this I gave a coat of sky blue and grey chalk paint on the insides and edges of the tray. I dabbed the paint with a sponge dabber so there is a texture on the tray. One can use any paint, chalk paint dries up quickly specially in this summer season.
Step 3:
After the paints dries, further enhance the design by using a pattern stencil. With the help of a woodgrain pattern stencil and brown chalk paint, I added another element of design to the inner sides of the tray.
Next, paint the outside of the tray. I gave a coat of brown chalk paint on the outside of the tray and after it dried, with the help of a stone pattern stencil and sky blue and grey chalk paint, I added pattern to the outsides of the tray.
I reversed the colours which were inside the tray on the outside of the tray to maintain monotony in colour.
Step 5:
Remember the butterflies we arranged and clicked a picture, time to arrange and adhere them now, you can use any glue as long as the butterfly adheres flat on the base of the tray, apply a coat of varnish or glue which dries transparent on the base of the tray to protect the butterflies.
Step 6:
Coat the inside of the tray with resin, making it user friendly.For this, use Resin that is Clear and Hardner in 1:1 ration. Pour them in separate containers in equal amounts and the mix the Hardner into the Clear liquid with the help of a stick, please handle these with gloves on and use disposable cups.
Step 7:
Keep the tray on a flat surface and pour the contents of the cup on to the tray, with the help of a stick you can move the liquid to the corners and blow the bubbles with the help of a heat gun from a distance.
Leave for a day or over night to let it set and dry.
With that done, our tray is now ready. Here are some more pictures:
Supplies Used:
- Wooden Tray
- Chalk paints (sky blue, grey, brown)
- Stencils
- Butterfly Die-cuts
- Decoupage Glue
- Clear and Hardner (Resin)
- Plastic Cups & Wooden Stick
- Heat Gun, Sponge Dabbers, Palettes
Most of the above-listed materials are available on the Rainbow Craftykari Store and can also be pre-ordered by sending an e-mail at rainbowcraftykari@gmail.com.
Do visit the Rainbow Craftykari store HERE
Visit our BLOG for more inspiration, tutorials and check out our ongoing challenge.
Happy Creating!
Megha


