Showing posts with label Mixed Media. Show all posts

Friday 27 January 2017

Altered Old Clock by GDT Pavitra


Hello my dear friends,

I am back with another inspirational post for you guys and really happy being back with you at this platform.


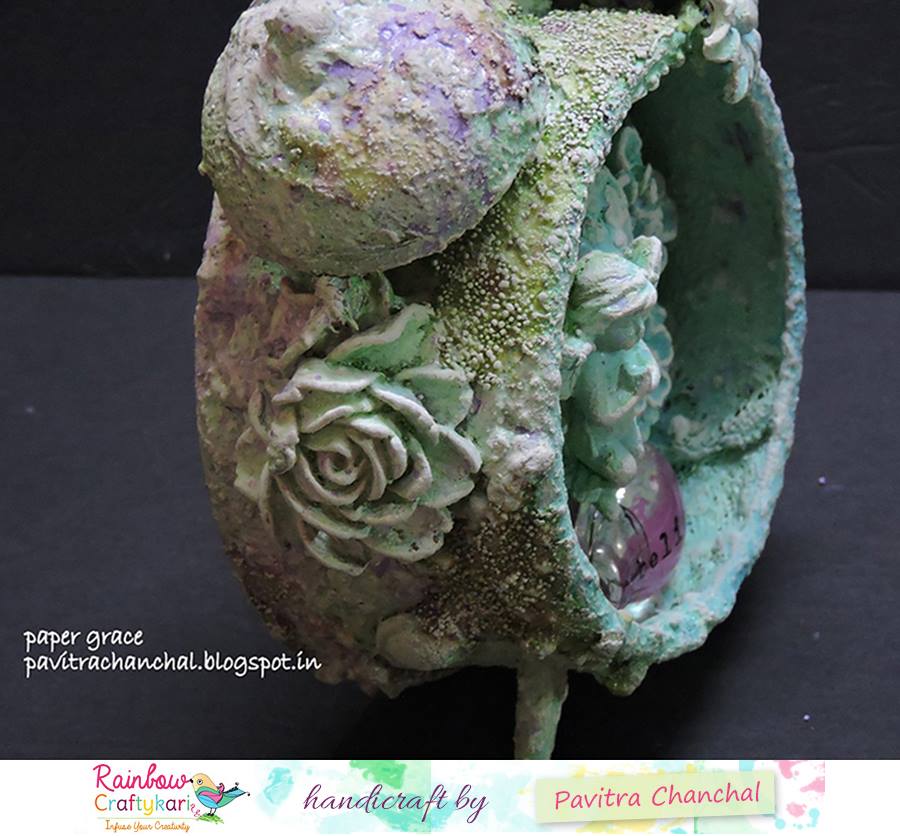
Today project is about an altered old clock, which was not functional and now reformed as home decor piece.

Have a look!!!


I love to work with different mediums and play with textures and that’s what reflects in my project.

For this project i started with an old alarm clock and covered the entire piece with white sand paste, once dried thoroughly I placed all my embellishments with heavy body gel and left it to dry. Next I further build up the textures with gauge and art stones. Did you notice the heart piece in the center it’s a part of my little one’s broken toy. It was lying in my stash from some time and finally got its place.

Gave few coasts of white gesso to entire piece and sprayed with shades of green, blue and purple from lindy’s spray gang. For highlighting the texture I dry brushed with white gesso.

Painted the back of the bulb embellishment with prima alchemy paint and placed it with heavy body gel.


Hope you enjoyed going through my creation.Below you can find out the list of all supplies

Materials used-
Old clock
Finnabair texture paste- White sand paste
Metal Embellishments
Finnabair heavy white gesso
Prima art stone
Lindy’s spray – drop dead diva
Finnabair art alchemy paint – pink blush
Finnabair heavy body gel

Regards,
Pavitra
facebook.com/paperfinesse

Thursday 5 January 2017

Wall Hanging Tutorial By Guest DT Vinita Jain

Hello crafty friends, 

Wishing you all a Happy New Year and this year let it fill with lots of happiness and joy to your life.

A lovely Good Morning to you all,
Today in our Teaching and Learning Program we have our Guest DT Vinita with her beautiful wall hanging with awesome Inspirational Quotations.

Over to you Vinita,

I hope all of you have a wonderful weekend and welcoming the New Year 2017!! Are you ready to drive back into card making, Mixed Media project and what would be better to start featuring with some Inspirational Quotations for the whole year to decorate your room!

How to do:

Here are all 3 panels shown with details.
Firstly, I created my cardboard panel for each quote. One is for the base and one is in window form. I wanted it as a pocket letter style, as you can interchange the quotes or you can add your personal photographs in it easily.


I adhered all the window panels on the base using Fevicol. Leave the center top and inside edges of the window panel, don't glue that parts because we have to put the quote panel inside.
Applied Dylusion paint at the edges with my finger to the window panel and mixed it with white acrylic paint. 


Now peel off the upper layer of Decoupage napkin and adhered it on the paper. Be careful while applying decoupage glue to appear any bubbles at the surface. I have applied the different decoupage napkins on all 3 panels.


Using some stencils and embossing paste I created the BG on all panels, distressed the edges using vintage photo ink to create more depth. Then I applied some Distress crackle clear paint with a brush and let it be dry naturally.


Look at the shine and crackle effects in some close-up picture.


Then I took a natural twig and added a thick wire and wrapped it with double coloured yarn like we did for knitting. 


Take two equal sizes long strip of cardboard. Wrap the brown colored yarn on equal distance and make a punched hole at the top of the strip and tighten the wire along the hole and twing. Now die cut some flowers and leaf flourishes out of felt.


Die cut a sparrow out of blue colored felt and stitched it, decorate it with diamond gems and attached the floral wire to create the legs. Adhered the die cut foam nest and the sparrow on the twig.


Adhered all the flowers, handmade flowers and leaf flourishes on the twig. Decorate it with some buttons and attach a tiny bows.


Then I applied Inka gold in different colors on a MDF cutout and decorated the panel with different flowers, metal floral charm and applied some Inka gold colors on it too.


On the 2nd panel too, I did some stamping, textures and added a MDF brick cutouts to create the BG and decorated with some handmade flowers, fillers.


And the last panel is highlighted with loads of textural elements. I added a MDF flourish and embossed it with silver glitter. Attached a resin piece filled with some micro beads and embellished it with flowers, cabochons and some fillers.


Added some beads and pearls at the end. Hope you enjoyed the tutorial.

Supplies Used;

White cardboard 800gsm
Felt sheets- light & dark green, red, yellow, blue
Foam sheets- light & dark green, white
Yarns- brown, pink & purple
Natural twigs
Decoupage napkins
Stamp- lattice from Itsy Bisty
Stencils- TCW; Art is and mini bricks, flourishes
Dies- Spellbinders- Shapeabilites- flowers bundle, bird sanctuary, Die-namies- bird nest, Heartfelt
Dylusions paint- fresh lime,  tinton falls
Inka Gold- platinum, old gold, haematite
White acrylic colour from Fabrica
Black Archival ink
Distress inks- black soot, vintage photo, pumice stone, wilted violet
Distress stain- Antique limen
Distress crackle paint- clear rock candy
WOW Embossing powder- metallic platinum sparkle
White gel pen
Studio G glitter glue, purple glitter from Oak arts
MDF cutouts- bricks, flourishes, floral circle
Resins- Eno greetings
Other supplies- beads, wires, mulberry flowers, micro beads, cabochons, metal charms, sparkle dots, buttons, diamond stones.


Above listed Materials are available at Rainbow Craftykari Store or you can pre-order.


Thank you for stopping by.

Regards,
Vinita Jain

Thursday 29 December 2016

Reverse Canvas MM Tutorial By Guest DT Roshini

Hello crafty friends,

A lovely Good Morning to you all,

Today in our Teaching and Learning Program we have a beautiful Reverse canvas mixed media by our Guest DT Roshini. 

Over to you Roshini,

Hello, crafty Peeps...Glad to be here to share a project with you as a guest designer.
My dear friends, Sit back and just relax as this is a picture heavy post and I have
a step by step tutorial to share with you ... 


1- Give a coat of gesso to the 6x6 size canvas on the reverse side.


2- Add texture to the frame on all four sides with white sand texture paste using stencil.


3- Paint the canvas with silver spoon metallic paint from Prima marketing.


4- Add cheese cloth and Doily to the canvas.


5- Selected the paper from Prima paper pad - Salvage district and apply a thin coat of white gesso.


6- Add texture to the paper using white crackle paste.


7- Stick the paper in the center of the canvas as shown below in the image.


8- I have used an empty match box, coated it with gesso and added same paper on the match box on all the sides and in center.


9- Place it as shown below to the right side of the top corner.


10- And now start placing the embellishments and flowers.


11- I have used white flowers, charms, and lace for arrangement.

And finally some microbeads, glass glitter and gold sequins, and dry brush with mica powder gold.
Here is the final look of the Reverse Canvas.


And few close ups shots here...


Supplies Used:-
Heavy white Gesso – Prima marketing
White Sand Texture paste
Glass glitter - platinum
micro beads
charms And resins embellishments

Papericious white lace
Prima marketing paper pad
Doilies – small
Prima marketing mica powder – Gold and pale silver
 

Above listed Materials are available at Rainbow Craftykari Store or you can pre-order to them by sending an email at rainbowcraftykari@live.com.

Thank you for stopping by, I hope you liked IT.

Regards
Roshini

Thursday 22 December 2016

MM Jewellery / Make Up / Keepsake Box By Guest DT Sunila & Aditi

Hello guys! So excited to share our inspiration post as GDT’s with Rainbow Craftykari.

Today we’ve created a mixed media jewellery/make up/keepsake box for you’ll! We’ve given it a vintage look! This is something everyone girl/woman would want!


Since this is a mixed media creation, it has various layers with different products. To begin with we, brushed the box with white gesso and adhered some die cuts with mod lodge! This forms our first layer of texture. Once dry, we used a stencil and added texture with modelling paste. We then covered our box with black gesso. Since we wanted a vintage look, black base was a good idea! We left it to dry.

Next, we decided to add more texture. By now you would’ve realised that mixed media is all about textures! Here we used a stencil with white crackle paste! This added the dimension we were looking for. Once everything was dry and we were happy with our result,  we added colours using Lindy’s Stamp Gang sprays.

For our focal elements, we hand made roses using the Heartfelt Creations Classic rose stamp and die set. We coloured them using the same sprays and shaped them. We arranged our elements and added a few tags and die cuts to match our theme! We used some lace on the rim and we had this gorgeous vintage memory keepsake box read.


Hope you liked our work. Feel free to ask your doubts.

Product list:
MDF Box
Camlin/Fine Art White gesso
Modpodge
Assorted dies - Memory Box- Distressed Wyndham Collage, Prima Vintage Clocks
Mont Marte Modelling Paste
Stencils- Tim Holtz Clockwork, Memory Box Texture Cressida
Finnabair Crackle White Texture Paste
Lindy’s Stamp Gang Sprays- Mission Bells Brown, Crow’s Nest Copper, Treasure Island Aqua, Golden Doubloons, Smoky Sapphire.
Heartfelt Creations- Classic Rose Stamp and Die; Timeless Amour
Assorted Die Cuts and lace from stash.
Above listed Materials are available at Rainbow Craftykari Store or you can pre-order.