Showing posts with label Inspiration. Show all posts
Showing posts with label Inspiration. Show all posts
Monday 28 August 2017
"This is my Dream" by DT Kriti Mishra
Namaste Friends!!
The lines which I have used are from a song....these lines focus on the motivation and hope we get while dreaming.
Thank you for stopping by!!
Labels:
Altered Art,
chipboard,
dream catcher,
dreams,
DT Kriti,
Flowers,
Inspiration,
Mixed Media,
mixed media art,
wall plank
Wednesday 23 August 2017
Elegantly Chic Shadow Box by DT Khushboo
Bonjour Crafters!
This is Khushboo here, back with an Inspiration Post this time. I often do colorful projects and work with color schemes. But for my latest project, I chose a different route. I've created a gorgeous 'Elegantly Chic Shadow Box' in a purely Black-and-Red relationship.
Setting up a shadow box, and further yet, creatively embellishing it is a lot of fun! It brings out the kid in me if nothing else. To arrange every single box/space is very cool! You can spin a different story in every space and yet make it all very cohesive on the whole.
My inspiration for this Shadow Box was Papericious' beautiful paper pack called 'Mi Estilio' - very stylish and extremely elegant. So once I knew what my central theme for the shadow box would be, I started collecting all my related embellishments and creative ideas. The result is as follows:
A Brief for creating this 'Elegantly Chic Shadow Box':
Shadow boxes come in different shapes and sizes, and with randomly sized inside spaces too. Select the one that appeals to you and get started.Cover the entire shadow box with 2 coats of black gesso (since I'm going with a black-and-red theme). Let it dry thoroughly between and after every coat.
Now color the whole box with black acrylic paint and let it dry completely.
Measure the inside box length and width and cut up your pattern paper accordingly.
Ink up the edges of the pattern paper with black and/or red distress inks and start gluing them down however you find them the most complementing.
Don't forget the sides of the shadow box. I've cut strips of pattern paper with random lengths and stuck them. They look dreamy!
Since my theme is 'Elegant and chic', I've embellished my shadow box with all royal-looking stuff like a chair, chandelier, photo frames, etc.
Papericious paper pack also has some beautiful shapes and motifs related to the theme like nail paint bottles, quotes, compact, lipstick, mascara, etc. I've used some of them here - on the front panel.
Finally, I've added glitter stickers like hearts and arrows on the floor of every space so as to not make it gaudy and yet maintain the elan.
Materials used:
- Shadow Box
- Black gesso
- Black acrylic paint
- Papericious Paper Pack
- Black cardstock
- Metal embellishments
- Resin embellishments
- Papericious clock embellishments
- Glitter stickers
- Metal chain
- Paper flowers
- Flower pot
- Fillers
Hope you guys enjoyed my creations and the tutorial. Can't wait to see how you add your own twist to this!
Don't forget to participate in our ongoing challenge Rainbow Friendship. Link your projects here.
Above mentioned products are available at Rainbow Craftykari Store OR you can pre-order the products by sending email at rainbowcraftykari@gmail.com
That's it from me, folks!
Friday 18 August 2017
Altered MDF Box by DT Priyanka Thukral
Hello Everyone, :)
I am at Rainbow Craftykari Blog today to share my very first inspiration post as the DT member for Rainbow Craftykari. I am Elated..!! and I hope to stand up to the expectations laid down on me.
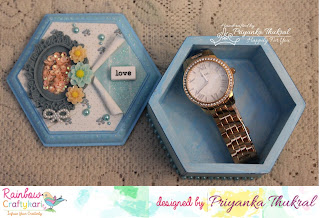
Today I have an Altered MDF wooden box to share as a part of my inspiration project.
Altered MDF projects have been my favorites since forever & no wonder I begin my term with one of these.
Here is the complete picture of my project
For this project, I picked up a hexagonal MDF box (another current favourite of mine.. :P ) I began with painting the base with gesso which works as a primer (tip: Gesso creates a coat on the base of the wooden material that holds the paint otherwise the wood absorbs the colour).
Next, I painted the box with blue acrylic colour. I chose coordinating patterned papers from Eno Greetings paper pack, cut them to the desired size & distressed them on the edges. For the cover, I cut the paper from one end to the centre point & rolled the two sides on the opposite sides.
On the exposed part of the base, I added glitter using stickles in the coordinating colour & a word tile over it. On the other part, I added a resin oval frame & sequins in the middle of it & adorned it with the resin flowers & bows.
On the sides, I again used stickles in the same colour to give an embossed look (I love how they look like tiny droplets resting on the edge) & added rhinestones to lift up the whole look.
and tada..!! the box is done... :)
The box is perfect to gift a watch to someone or keep it on your dresser as a jewellery box, can be used in multipurpose ways.
Check out some more close up pictures
Supplies Used:
- Mdf hexagonal shaped box
- Gesso by Camel
- Blue Acrylic paint by Fevicryl
- Eno Greetings- Pattern Papers
- Word Tile
- Resin frame - Oval
- Resin flowers
- Bow
- Stickles(aqua colour)
- Rhinestones
- Distress Ink
- Glossy Accents
Above-mentioned products are available at Rainbow Craftykari store or you can also pre-order by sending an email at rainbowcraftykari@gmail.com
Don't forget to participate in our ongoing challenge Rainbow Friendship. Link your projects here.
Hope you liked my project!
Priyanka Thukral
Monday 14 August 2017
Rainbow Mixed Media Canvas by DT Shylaashree
Hello Friends,
I am Shylaa Shree here today to share my first post on my DT assignment with Rainbow Craftykari team. Here is my inspiration for our current challenge theme "Rainbow Friendship"
I have a made a special artwork on a canvas for my son who celebrates his birthday this month. My daughter insisted me to make something for him.
I started with an A4 size canvas and applied a coat of white gesso to prime it. I then created a background using stencils and modelling paste. I then used my homemade colour sprays to add colour. I randomly spritzed them and moved them around. I then picked my photo, matted it and adhered it to the canvas with foam tape. I chose butterflies to embellish the canvas as my kids love them. I then randomly added 3D Stickles and sequins. I then printed out a saying (you could even use a phrase sticker or a stamp) and added it to the canvas with foam tape. I then used paper varnish to give a final protective coat.
Materials used:
- Canvas
- Sakura Modelling Paste
- Acrylic Paints
- 3d Stickles
- Sequins
- Tim Holtz stencils.
Hope you are inspired! I can't wait to see your creative work for our current challenge theme. Link your projects here.
Above mentioned products are available at Rainbow Craftykari Store OR you can pre-order the products by sending email at rainbowcraftykari@gmail.com
Happy Crafting!
Shylaashree
Wednesday 9 August 2017
DIY Gifts for a friend by DT Ishani
Hello Everyone,
Today I am here on the blog with my first post in this new term. My post is an inspiration for our August challenge, which you can find here.
August is the month for celebrating friendship and so I planned to put some love and make something for my best friend.
To tell her how I cherish our sweet friendship, I decided to make a card for her and a pair of quilled earrings.
I chose to do some hand lettering for the quote on friendship, as the sentiment for the card. For the design, I chose to build a wreath, around the quote. A wreath is circular and symbolic of eternity and I wish our friendship also lasts forever." The quilling done here is not very traditional, I thought of experimenting with different coils and was happy with the texture it gave to the flowers. After arranging my quilled elements for the wreath, it was stuck on a black card base.
I made a pair of quilled quirky earrings for her. The shape here is also a circle, symbolising our everlasting friendship. I chose the violet, indigo, blue and minty green 3mm strips to make this pair.
Hope you were inspired and would join us in our ongoing challenge.
Supplies used:
(a) For the quilled card:-
- Neenah Classic Crest White cardstock
- Black cardstock
- Pentel brush pen (black)
- 3mm Quilling strips (assorted colours)
(b) For the earrings:-
- 3mm Quilling strips (assorted colours)
- Ear hook findings
- Mod podge matte (as sealant)
- 3mm Quilling strips (assorted colours)
- Ear hook findings
- Mod podge matte (as sealant)
All the supplies used are available at Rainbow Craftykari Store or you can pre-order the products by sending email at rainbowcraftykari@gmail.com
Happy Crafting
Ishani
Friday 4 August 2017
Friendship Layout by DT Priya Mishra
Hello Crafty Friends,
I'm Priya Mishra and am very excited to share my first DT inspiration post for Rainbow Craftykari blog. I have created a project as an inspiration for our Rainbow Friendship Challenge.
Here's what I made...
Hello Crafty Friends,
I'm Priya Mishra and am very excited to share my first DT inspiration post for Rainbow Craftykari blog. I have created a project as an inspiration for our Rainbow Friendship Challenge.
Here's what I made...
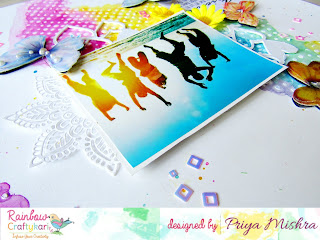
The theme is absolutely wonderful and I wanted to make something CAS this time. This has been my weakness and I struggle to leave white space with pastel shades. So this was a challenge I took up!
The base is a 12"*12" white cardstock. As the theme is Friendship, I took the photo and the sentiment from google and printed them. For my layout, I began by brushing multi medium onto the whole paper. This creates a very good base. Then, I created texture using a stencil (Bubbles all over) and texture paste. Next, I began adding colour. I used Distress Inks and a brush to spread the colours. I have incorporated all the colours of Rainbow. The chippies are from Papericious and are brushed with a thick coat of white gesso. After arranging the photo and sentiment on the base I added some butterflies, flowers and a few sequins. I layered a doily under the photo mat. I finished it by sprinkling a few drops of colours with a brush.Here are a few close ups of the layout
Supplies Used:
- 12"*12" White Cardstock 200gsm
- Rangers Multi Medium Matte
- Stamploration "Bubbles All over" Stencil
- Papericious Chipboard Heart Mesh
- Papericious Sequins Mixed Bag
- Distress Inks (Seedless Preserves, Pink Raspberry, Salty Ocean, Peacock Feather, Mowed lawn, Mustard seed, Cracked Pistachio)
- Doily
- 3D Butterfly Stickers
- Flowers
- Photo and sentiment from Google Images
Almost all the above-mentioned products are available at Rainbow Craftykari Store or you can pre-order by sending email at rainbowcraftykari@gmail.com
Hope my project inspires you. Do participate in the challenge and have fun.Hugs,
Priya Mishra
https://quillingbypriya.blogspot.in/
Labels:
Blooms,
Challenge,
DT Priya Mishra,
Friends,
Friendship Day,
Inspiration,
Layout,
Rainbow,
Rainbow Craftykari
Subscribe to:
Posts (Atom)


