A very warm good morning to you all.
Hope you all had a lovely Holi.
Today in our Teaching and Learning Program we have our Guest DT Richa with some altered items which she made using household items with Mixed Media techniques.
Over to you Richa,
Hello everyone,
This is my first post as GDT member of Rainbow Craftykari and I am really excited to be a part of this Teaching and Learning Program. I would like to thank Maninder Kaur for giving me this awesome opportunity.
Who doesn't love antique showpieces? But purchasing these can make a huge hole in your pocket. Today as a part of GDT I am going to show you how to alter old household items into antique beauties using mixed media techniques. The thing that I love about Mixed Media is that you can never go wrong with it and even if you make a mistake by chance, you can always cover it up with gesso and can start again.
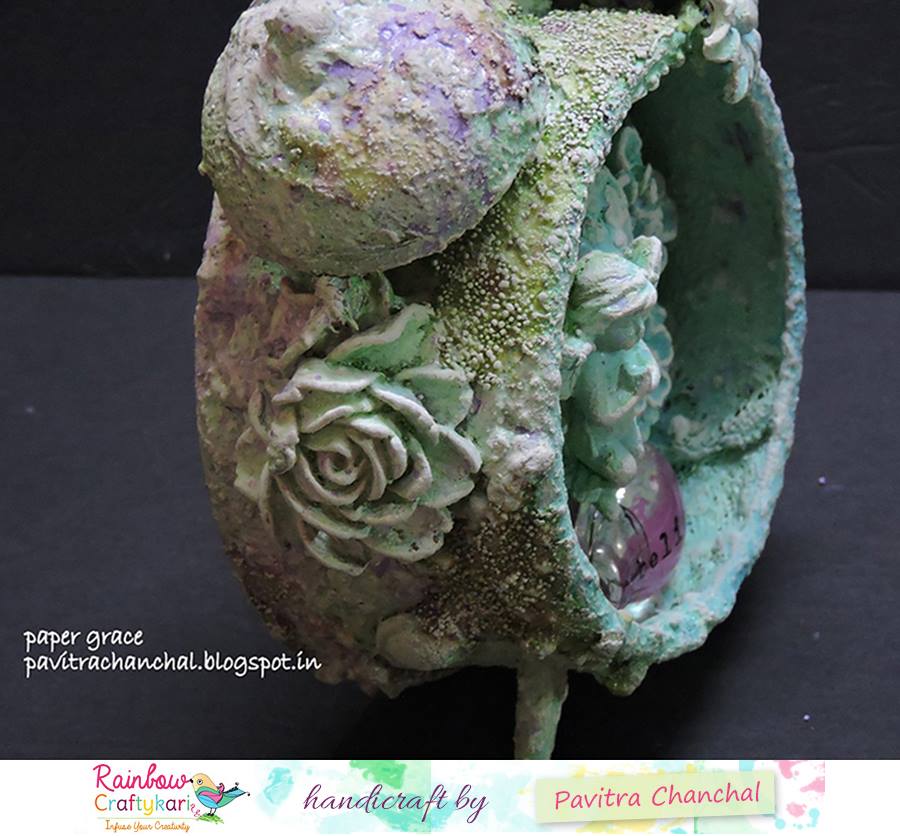
Project 1: Altered Bottle

To make this take an old glass bottle, some tissue paper and mod podge.

Wrinkle the tissue paper and unfold it. Start covering the bottle with mod podge using simple brush or sponge brush and stick the wrinkle tissue paper as you go.

More wrinkles will ensure more texture and texture is what mixed media is all about. For more texture I have added layers of tissue paper. Don't worry if the papers tears while applying mod podge. Just add a patch of paper there and it will become unnoticeable.

When covered the whole bottle with paper, give it a coat of mod podge.

For more texture add some cheesecloth and leave it to dry.

Add some corrugated sheets with glue. Give the whole thing a cover of black gesso or black acrylic paint and let it dry.

To add more texture you can use cotton laces. To make the front panel add a circular corrugated sheet and apply texture paste mixed with beads on the edges. To give it a more antique look add flat based pearls/thermocol balls randomly with glue.

Cover everything with black gesso/acrylic paint.

It still looked incomplete. So I decided to add a central shiny embellishment. To make this one, I took an old bottle cap and covered it with black gesso and metallic paints. Then added some silver sparkle in the central part using glue and allowed it to dry. On the sparkle added green glass stone to bring out some contrast.
Tip: Sparkles are always messy. Before playing with sparkles always cover your hands with talc powder. The sparkle won't stick to your fingers. Less mess created.

Now it's time to have some fun with metallic paints. On this project I have used golden and brick red metallic paints. To apply the paint, use dry brushing technique. In this technique, the paint brush is kept relatively dry but still holds some paint. The key is to dip the very tip of the brush into the paint and wipe or dab a little bit paint off on rag. Make sure the bristles still appear separate instead of clumped together before brushing. And then paint the surface with light handed (not much pressure) fast strokes.
Tip: If you are not comfortable with dry brushing you can always use your fingers. Pick up little pigment in between your fingers and cover the raised areas.
Add the stone embellishment to your central corrugated sheet and apply two coats of varnish to the whole bottle. Your Antique altered bottle is ready.


Project 2: Altered Pen Stand
I just couldn’t stop after altering the bottle and went on altering an old pen stand.

To alter the pen stand, follow the same steps. Cover it with mod podge, layers of tissue paper and black gesso/acrylic paint. Leave it to dry.

To embellish punch out some flowers and emboss the petals with embossing tool.
Tip: Before embossing the petals, spray some water over them and emboss carefully so that you don't tear the paper. Misting helps in retaining the embossed shape.

Glue the flowers, cotton lace, buttons and slider of zip to the pen stand. Here I have added the button in the shape of a butterfly and have also added plastic embellishment spelling 'Dear Friend'. Cover the embellishments with black gesso/acrylic paint.


Materials Used:
Hope you all had a lovely Holi.
Today in our Teaching and Learning Program we have our Guest DT Richa with some altered items which she made using household items with Mixed Media techniques.
Over to you Richa,
Hello everyone,
This is my first post as GDT member of Rainbow Craftykari and I am really excited to be a part of this Teaching and Learning Program. I would like to thank Maninder Kaur for giving me this awesome opportunity.
Who doesn't love antique showpieces? But purchasing these can make a huge hole in your pocket. Today as a part of GDT I am going to show you how to alter old household items into antique beauties using mixed media techniques. The thing that I love about Mixed Media is that you can never go wrong with it and even if you make a mistake by chance, you can always cover it up with gesso and can start again.
Project 1: Altered Bottle

To make this take an old glass bottle, some tissue paper and mod podge.

Wrinkle the tissue paper and unfold it. Start covering the bottle with mod podge using simple brush or sponge brush and stick the wrinkle tissue paper as you go.

More wrinkles will ensure more texture and texture is what mixed media is all about. For more texture I have added layers of tissue paper. Don't worry if the papers tears while applying mod podge. Just add a patch of paper there and it will become unnoticeable.

When covered the whole bottle with paper, give it a coat of mod podge.

For more texture add some cheesecloth and leave it to dry.

Add some corrugated sheets with glue. Give the whole thing a cover of black gesso or black acrylic paint and let it dry.

To add more texture you can use cotton laces. To make the front panel add a circular corrugated sheet and apply texture paste mixed with beads on the edges. To give it a more antique look add flat based pearls/thermocol balls randomly with glue.

Cover everything with black gesso/acrylic paint.

It still looked incomplete. So I decided to add a central shiny embellishment. To make this one, I took an old bottle cap and covered it with black gesso and metallic paints. Then added some silver sparkle in the central part using glue and allowed it to dry. On the sparkle added green glass stone to bring out some contrast.
Tip: Sparkles are always messy. Before playing with sparkles always cover your hands with talc powder. The sparkle won't stick to your fingers. Less mess created.

Now it's time to have some fun with metallic paints. On this project I have used golden and brick red metallic paints. To apply the paint, use dry brushing technique. In this technique, the paint brush is kept relatively dry but still holds some paint. The key is to dip the very tip of the brush into the paint and wipe or dab a little bit paint off on rag. Make sure the bristles still appear separate instead of clumped together before brushing. And then paint the surface with light handed (not much pressure) fast strokes.
Tip: If you are not comfortable with dry brushing you can always use your fingers. Pick up little pigment in between your fingers and cover the raised areas.
Add the stone embellishment to your central corrugated sheet and apply two coats of varnish to the whole bottle. Your Antique altered bottle is ready.


Project 2: Altered Pen Stand
I just couldn’t stop after altering the bottle and went on altering an old pen stand.

To alter the pen stand, follow the same steps. Cover it with mod podge, layers of tissue paper and black gesso/acrylic paint. Leave it to dry.

To embellish punch out some flowers and emboss the petals with embossing tool.
Tip: Before embossing the petals, spray some water over them and emboss carefully so that you don't tear the paper. Misting helps in retaining the embossed shape.

Glue the flowers, cotton lace, buttons and slider of zip to the pen stand. Here I have added the button in the shape of a butterfly and have also added plastic embellishment spelling 'Dear Friend'. Cover the embellishments with black gesso/acrylic paint.

Dry Brush everything with metallic paints and apply two coats of varnish. Here is the final outcome.


Materials Used:
Glass bottle, cap, pen stand,
Buttons and zip slider,
Tissue paper,
Cheesecloth,
Corrugated sheets,
Cotton lace,
Texture paste,
Small pearls,
Flat base pearls/thermocol balls,
Glass stone,
Glitter powder,
Flower punch,
Embossing tool,
Mini mister,
Mod podge,
Black gesso/acrylic paint,
Metallic paints,
Brushes,
Glue gun/white glue.
Above listed Materials are available at Rainbow Craftykari Store or you can pre-order to them by sending an email at rainbowcraftykari@live.com.
Hope you enjoyed the tutorial and got inspired to make some antique alterations and don't forget to participate in our first monthly challenge, Revamp your Scraps' to win some exciting prizes, here is the link to the challenge post.
Regards,
Richa Maurya.