Showing posts with label Mixed Media. Show all posts

Friday 1 September 2017

Family Layout Tutorial & Video Tutorial by Blog Co-ordinator Aditi Mahajan

Hello Everyone,


A very happy September! With the beginning of a new month, we have a wonderful new challenge!


Today I'm here to share an easy to make Layout Tutorial with you all which is also an inspiration for our challenge this month.


Many craft brands come up with coordinated sets/kits. Most often we end up buying the paper pack alone and using it and then in a future date we end up buying the die cut/embellishments and use them individually. However, have you realised how worthy it would be to invest in the entire kit and use it in your projects? Sometimes we are creating an album, a layout, a card, and using all the coordinated elements leads to a great creation.


In my layout today, I will be using one such kit from Kaisercraft- The Golden Grove Collection. All the elements go so well together, that within minutes a quick layout can be created.


Let's begin...


Step1: First begin by choosing a photo and a base paper. 


Step 2: Choose a contrasting pattern paper to mount the photo on. Here I have kept it a 1/4" bigger than the photo on all sides. Stick the photo on the paper. Add some depth to the entire photo mat with waste chipboard/cardboard. Distress the edges of the paper.


Step 3: This Paper Pack has one sheet with flower clusters. So I fussy cut those from the sheet. Usually, every paper pack has one such pattern from which elements can be fussy cut. 


Step 4: Use a stencil and add some texture with modelling paste. 


Step 5: Pick inks of the colours on your base paper. Here I used distress inks. Randomly add some colour on your paper, especially to blend in the texture. Ensure to leave some texture white as that adds extra interest. Distress the edges of the base paper.


Step 6: Add more interest with stamping. Choose one colour that dominates the background colours (in this case green) and black. Stamp randomly around the focal image using two background stamps.


Step 7: Layer and play with the fussy cut elements, the collectables (die cut elements coordinated with the sheet) and the wooden collectables. Stick some with glue and some with foam tape. Run the blade of the scissors on the edges, to give the flowers and leaves some dimension. Pick a title from the collectables. 


Step 8: Complete the layout with some splatter in white and green.


Since this is a layout, and it's difficult to merely read instructions, I created a video tutorial for you all :-)! Click here


Supply List:

  • Kaisercraft Golden Grove Collection- Paper Pack, Collectables and Wooden Flourish pack
  • Kaisercraft Doily 12 x 12 Stencil
  • Mont Marte Modelling Paste
  • Distress Inks- Vintage Photo, Mustard Seeds, Peeled Paint, Crushed Olive, Forest Moss
  • Archival Ink- Jet Black and Library Green
  • Kaisercraft Stamp- Lattice
  • Finnabair STamp- Messy Script
  • Glue
  • Foam Tape
  • Photo courtesy Pinterest
  • Lindy's Spray- Drope Dead GOrgeous Green and Sidewalk Chalk


Hope you're inspired! Looking forward to your creations and participation in the challenge! 

Happy crafting!

Aditi

Wednesday 30 August 2017

Art Journal Tutorial by DT Shylaashree

Hi Friends,


I am Shylaa here to share my step by step tutorial to create an art journal.


Step 1: I started by applying a coat of gesso using foam roller brush. It left a grainy texture after drying.


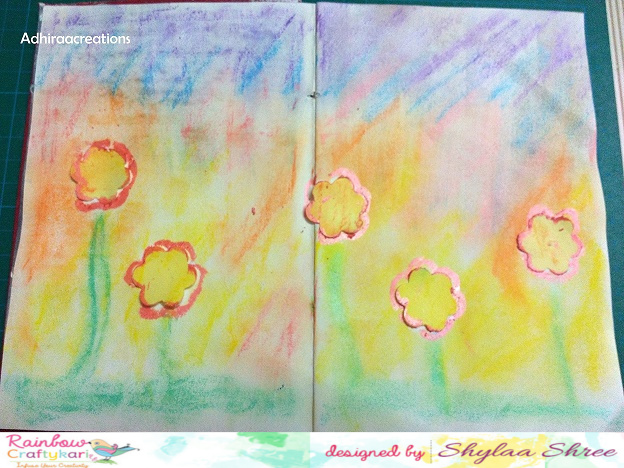
Step 2: I punched the flower shapes out of post it paper, to use as masks. After placing the flower masks on my page, then I used my gelatos to scribble randomly around them.


Step 3: Now I used my fingers to blend the Gelatos over the flower around my page. I used pink gelatos around the edges of the flower mask to give a bright look. Then lifted the flower mask


Step 4: I stamped the floral stamp inside the blank flower outline.


 Step 5: To create textures, I stenciled with gesso using Heidi Swapp spray stencil and allowed it to dry.


Step 6: Used a Black marker to draw the outline around the circle and on the border. Brushed with black water colors over the edges.Stamped with Hot off the press Simply Susan stamp randomly wherever I felt stamping it.


Step 7: Added some sequins and butterfly die cuts. Applied 3d stickles over the die cut.


Materials used:


  • Art journal notebook
  • Faber-Castell Metallic Gelatos Color & Clear Stamp 
  • Sakura Gesso 
  • Black marker
  • Heidi Swapp Spray Stencil
  • Monte Marte Foam roller 
  • Golden sequins
  • Jeff flower punch 
  • Butterfly die cuts
  • Hot off the Press - Simply Susan stamp 

I hope you enjoyed this tutorial. Hope this post has inspired you. 

You can preorder the materials from Rainbow Craftykari store by writing a mail at rainbowcraftykari@gmail.com


Participate in our current ongoing challenge with theme Rainbow Friendship and win exciting prizes.


Happy Crafting!
Shylaashree

Monday 28 August 2017

"This is my Dream" by DT Kriti Mishra

Namaste Friends!!

I am Kriti and I am back with a new project and this is an inspiration post. A layout with some bright colours titled "This is my dream". A dream leads to hope, this is a dream of a wish to come true and all we have is hope.

The lines which I have used are from a song....these lines focus on the motivation and hope we get while dreaming.

Here's the project:


 Some close-ups:


Here's a brief about this project:

To start with, I have taken a wooden plank (Size is 10" x 8") and affixed a few chipboard rectangular pieces on the right-hand side to make a wall and gauge on the left-hand side. Then covered the entire surface with gesso.

Next, I have used a bubble stencil to make the background more interesting using modelling paste and covered the entire surface with gesso again. Next, I have added this beautiful Dreamcatcher chipboard and few beads and again covered the surface with gesso.

After that, I used spray colours i.e., yellow, orange and red(Spray some water too to let them run). I then used gold, copper and black colour to highlight the textures. I then used few stamps, text, brick and music notations to make it more interesting.

Lastly, I embellished it with some coloured gauge, flowers, and a beautiful song lyrics.


Supply List
  • A wooden plank
  • Rectangular chipboard pieces(small)
  • Gauge
  • Dram catcher Chipboard (Papericious)
  • Beads
  • Gesso (Papericious)
  • Bubble Stencil
  • Text, bricks and music notation stamps
  • Black Archival ink
  • Heating tool
  • Spray/Acrylic colours (Red, Yellow, Orange, gold, copper, black)
  • Water mister
  • Handmade mulberry flowers
  • Paper smooches Leaf die
  • Big shot
Above mentioned products are available at Rainbow Craftykari Store or you can pre-order the products by sending e-mail at rainbowcraftykari@gmail.com

Thank you for stopping by!!
Hope you got inspired by my work!


Kriti Mishra

Monday 21 August 2017

Altered Wall Art Tutorial By DT Priya Mishra

Hello Crafty Friends,

Priya here today with a detailed pictorial tutorial for a Mixed media Wall art. Mixed media is always fun and I enjoy a lot creating different textures and I'm showing how to get different textures on your project here today with simple little things from your stash.

Take a look at the final outcome:


Let's start the tutorial:

Step:1 I altered a square shaped MDF board, which actually was a cake base. You can take any size of a board. Here's the base:


Step 2: I gave a thick coat of white heavy gesso on the base. Once it was dry I gave another coat.


Step 3: Next, I created some texture.Here you can see, on the lower part of the board, I glued some crumpled tissue paper and also attached lace.


Step 4: At this point, I created some texture with the help of a stencil on the left side. As you can see my son also helped me in this.


For quick drying, I used the heat tool.


Step 5: Then, on the right side of the lace on upper part, I applied some texture paste and tried some random texture using my quilling comb.


A dotted tool for some more texture here and there.


Step 6: After drying, I started adding embellishments randomly. I added flowers, chipboards, resin and metal embellishments and glued them all with a glue gun.


Step 7: Then I added a few Big and small pearls, Art stones and sprinkled seed beads.


Step 8: Then I started adding colours. Here I used acrylic colours. I mixed Pink and yellow colours to get this colour and at the lower side I added black pearl acrylic colour.


This is how it looked when finished. This photo was taken at night after I finished, so the picture isn't very clear.


Here are a few close ups of the project.


Supplies Used:

  • MDF Board/ Chipboard
  • Art Basic Heavy gesso
  • Rangers Texture Paste
  • Tim Holtz Stencil
  • Rangers Heat Tool
  • Hot Glue gun
  • White glue
  • Tissue Paper
  • Lace
  • Papericious Chipboard
  • Chipboards
  • Resin frame
  • Metal Charm
  • Flowers
  • Pearls
  • Seed Beads
  • Acrylic Paints

Hope you enjoyed the tutorial. All the above mentioned products are available at Rainbow Craftykari Store or you can preorder them by sending an email to rainbowcraftykari@gmail.com.

Don't forget to participate in our ongoing challenge Rainbow Friendship. Link your projects here.


Hugs,