Floral Vintage Box Inspiration by GDT Khushboo Gandhi
Heyloo guys! I'm so excited to be here! This is my first ever post for Rainbow Craftykari Blog and I'm extremely thankful to Maninder for this amazing opportunity.
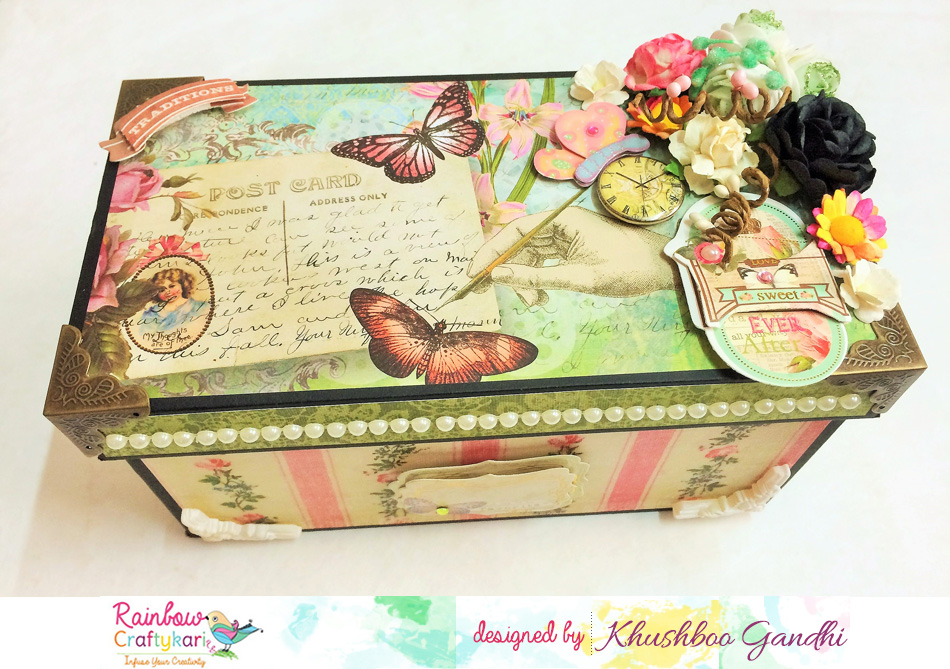
For my Inspiration post this time around, I have a plain chipboard box that I altered and transformed into a completely elegant and floral keepsake box. We can find tons of posts on 'how to construct boxes and albums' all over the web, but it's equally important to focus on 'how to embellish' something. And so, for my post, I'll be highlighting certain features of 'how to decorate a box with a cohesive theme' + certain distress ink techniques to get a vintagey and bright look (for both the outside and the inside of the box).
I had so much fun embellishing this box. It's so amazing that crafting is such a versatile art - we can create whatever we want, and decorate it the way we want to.
Brief Steps for 'How To Embellish A Box/Project':
1. First of all, decide what theme you'd like to go with - floral, vintage, fun, eccentric, classy, monochrome, etc. It could be any one, or a mix of a couple of themes together. For this box, I've chosen a Floral theme with a Vintage backdrop.
2. The trick (to be able to work well during your embellishing stage) is to gather all your supplies that resonate with your theme - floral/vintage pattern papers, flowers, box corners, metal embellishments, pearls, inks, fillers, etc.
3. Decide what pattern papers go well with each other, try and determine which design would go better for the top and the sides, the inside of the box and the outside. Contrasting your design papers and colour combinations is one of the strongest points in embellishing your project.
4. I went with an intricately designed paper for the top (since it's the first thing anyone notices) and I used simple designed pattern papers for everything else.
5. I cut all the papers 1/4th inch less than the size of my box and went ahead and stuck everything in it's right place (leaving 1/8th space all over). The effect that you get when the background cardstock peeps through that 1/8th inch is absolutely enchanting!
6. I then added my metal box corners to the lid, some pearl trims, and loads of flowers on one end of the lid. I also added a clock embellie with some stickers, especially the one that said 'Traditions'.
7. For the front of the box, I added a 3d sticker on which you can write your name or a message. I also added some resin corners.
8. For the inside of the box, I contrasted it and kept it really simple (since the outside is so full of life and heavily decorated).
Some Distress Ink Techniques to get you going on that beautiful Vintage look:
1. If you notice, all of my pattern papers on the outside of the box have an aged, brownish, vintagey look. To achieve that, I simply used an ink applicator with Tim Holtz' Distress Ink (Tea Dye) on my papers, moving it in different directions (circular, random, straight).
2. Since papers age/become yellowy/brownish in random places over the years, the idea is to replicate that look with random strokes of inks - so that our paper looks as naturally 'vintaged' as possible.
3. For the inside of the box, I used Picked Raspberry for the bottom and Peacock Feathers for the sides (keeping the contrasting colours in mind). I tried to create a vignette using these colours that I applied on all 4 corners of the paper in a circular motion.
Supplies used:
Tim Holtz Distress Inks
Kirby Teesdale Studio Paper Pack
Pearl Trims
Resin embellishments
Flowers
Metal box corners
Papericious clock sticker
3d stickers
Glue
You can find all the above mentioned supplies at the Rainbow Craftykari Store or you can pre-order them by sending an email at rainbowcraftykari@live.com
I
hope I was able to inspire and motivate you enough to go try your hands
on embellishing a project today. Don't forget to share your pictures!
Warm Regards
Khushboo Gandhi


Beautifully decorated box Khushboo
ReplyDeleteThank you :)
DeleteVery beautifully explained the art of embelleshing...Love the box...Really gorgeous...
ReplyDeleteLove
Richa
Thank you so much for your encouraging words, Richa :).
DeleteVery pretty box and beautifully embellished :)
ReplyDeleteThank you so much :)
DeleteGorgeous creation Khushboo :)!
ReplyDeleteThank you :)
DeleteWOW thats beautiful :)
ReplyDeleteThank you so much :)
Delete