Showing posts with label Rainbow Craftykari New Team. Show all posts

Tuesday 1 August 2017

RCS Challenge #4 - Rainbow Friendship

Hello Everyone.


Welcome to the first post of our new term!


Today we are announcing our August Challenge. The theme for our challenge is " Rainbow Friendship". 


Get inspired by the quote- "Friendship is a rainbow between two hearts sharing seven colours: Secrets, Truth, Sadness, Faith, Happiness, Respect and Love."


Create any project- card, tag, layout, altered art, home decor, paper crafts, anything art/craft related inspired by the theme Friendship and using at least three colors of the Rainbow. Last day to Submit your Entries are 30th August 2017


Please go through General Guidelines and Rules HERE. Any entry which won't be following the guidelines, will be disqualified and will be removed by the participation entries.


Rainbow Craftykari will be giving Following Prize for this month -

  • First Winner will be selected by the DT's and He/She stands a chance to win a Gift Voucher worth Rs 400/- from Rainbow Craftykari Store.

  • Second Winner will be Selected by the Blog Coordinator and He/She stands a chance to win a Papericious 6"x6" Paper Pack

  • Top 3 entries will win Rainbow Craftykari badges to put on their blog.


*
Above given guidelines are mandatory to qualify in the challenge. If any participant fails to follow the guidelines, they will be disqualified from the challenge.

Here is the Inspiration by Our Blog Co-ordinator and DT Members:

ATC Cards by Blog Co-ordinator Aditi Mahajan. For more Details Visit HERE:


Friendship Layout by DT Priya Mishra. For more details visit HERE


We look forward to your creations and participation. Submit them by uploading on the link below.


Monday 31 July 2017

Uncovering RCS DT Team Day 2

Hello everyone,


We are back with the second part of our DT reveal. Without any adieu let's begin.

First up we have,


Priyanka Thukral


I am Priyanka Thukral, 26 years old, Marketer by profession & a Crafter/Artist by Passion ( a Marketer by the day & crafter by night ;) ). Since my very childhood colours and crafts have always fascinated me. I was one of those who believed in giving a handmade card to people instead of rushing to archies or other stores to buy one. I started with gifting very unique gifts to my friends something that they could connect to instantly & something that would put a smile on their face. Then, I started Happily For You with a simple aim to  make a difference in someone's life & spreading happiness in a way that has a far more impact & what better than something personalized, something they see a reflection of their own in a very unique and creative way. 


Here's the link to her blog- http://www.happilyforu.blogspot.in/

And here are some of her works:


Next we have,


Khushboo Gandhi


My name is Khushboo Gandhi. I am from Mumbai, India. I absolutely love travelling and food! I've been into crafting since more than a year now and I find myself completely in love with every aspect of it; be it decoupage, mixed media, card-making, scrapbooking, etc. I've always been interested in creative hobbies like painting, photography, writing; and crafting is my new found love. I love experimenting with new techniques, new products, different mediums and creating something unique and fun. I work under the brand ‘Snowflakes and Lilies’ and I love the fact that I can bring about a deep sense of versatility in my creations and that makes me feel really happy about the kind of work that I do.


Here's the link to her blog- http://snowflakesandlilies.blogspot.com/

And here are some of her works:


Next,


Priya Mishra


Hello, My name is Priyadarshini Mishra from Odisha, staying in Mumbai. My journey into crafting started in 2012 when I took a break from my job after the birth of my son. It all started with Quilling and now I enjoy mixed media, altered art and different paper crafts. I love learning new techniques  .I am thankful to Maninder for putting her faith in me and bringing me on board. I look forward to join the talented team at Rainbow Craftykari.


Here's the link to her blog- https://quillingbypriya.blogspot.in/

And here are some of her works:


And finally we have,


Anila DK

A Home maker and a full-time crafter from Mumbai,  India and a mother to a 10year old little crafter-in-the-making.I am passionate about learning new skills / techniques and am in a constant process of developing myself. Card making and other paper crafting is my most favorite.


Here's the link to her blog: http://novelideas-gifts.blogspot.com/

And here are some of her works:


So that completes our reveal! Looking forward to a great new term!


Saturday 29 July 2017

Goodbyes and Uncovering RCS DT Team Day 1

Hello Everyone,


Our old term has come to an end which means it's the beginning of a new one. Goodbyes are always hard, especially to a talented team of crafters. However, change is the only thing constant in the world.


Thank you to all our Design Team and Guest Design Team Members who created some amazing projects and provided readers with some great tutorials. You will all be missed.


Welcome to our new team!


Today we will reveal four members of our new team and tomorrow we will be back with the rest.

Without further delay let's introduce our DT Members-


First up


Ishani


Hello everyone, I am Ishani! Since childhood, I have loved getting my hands smeared with glue and colours. But, the studies as a student and then establishing myself at work, didn't leave me much time to pursue a hobby. Around two years ago, I learnt Quilling which helped me cope with daily stressors.  Subsequently, I started making cards by incorporating quilled elements and gifting them to friends. With the internet full of ideas and inspiration, I ventured into using stamps and colouring with different supplies to make cards. I love to learn and experiment new techniques, my recent obsession being handlettering. From being just a hobby, card making has become a passion for me. The way I was inspired by other's work, I hope my work inspires a few too.


Here's a link to her blog- https://quillish.blogspot.in/
And below are a few of her works


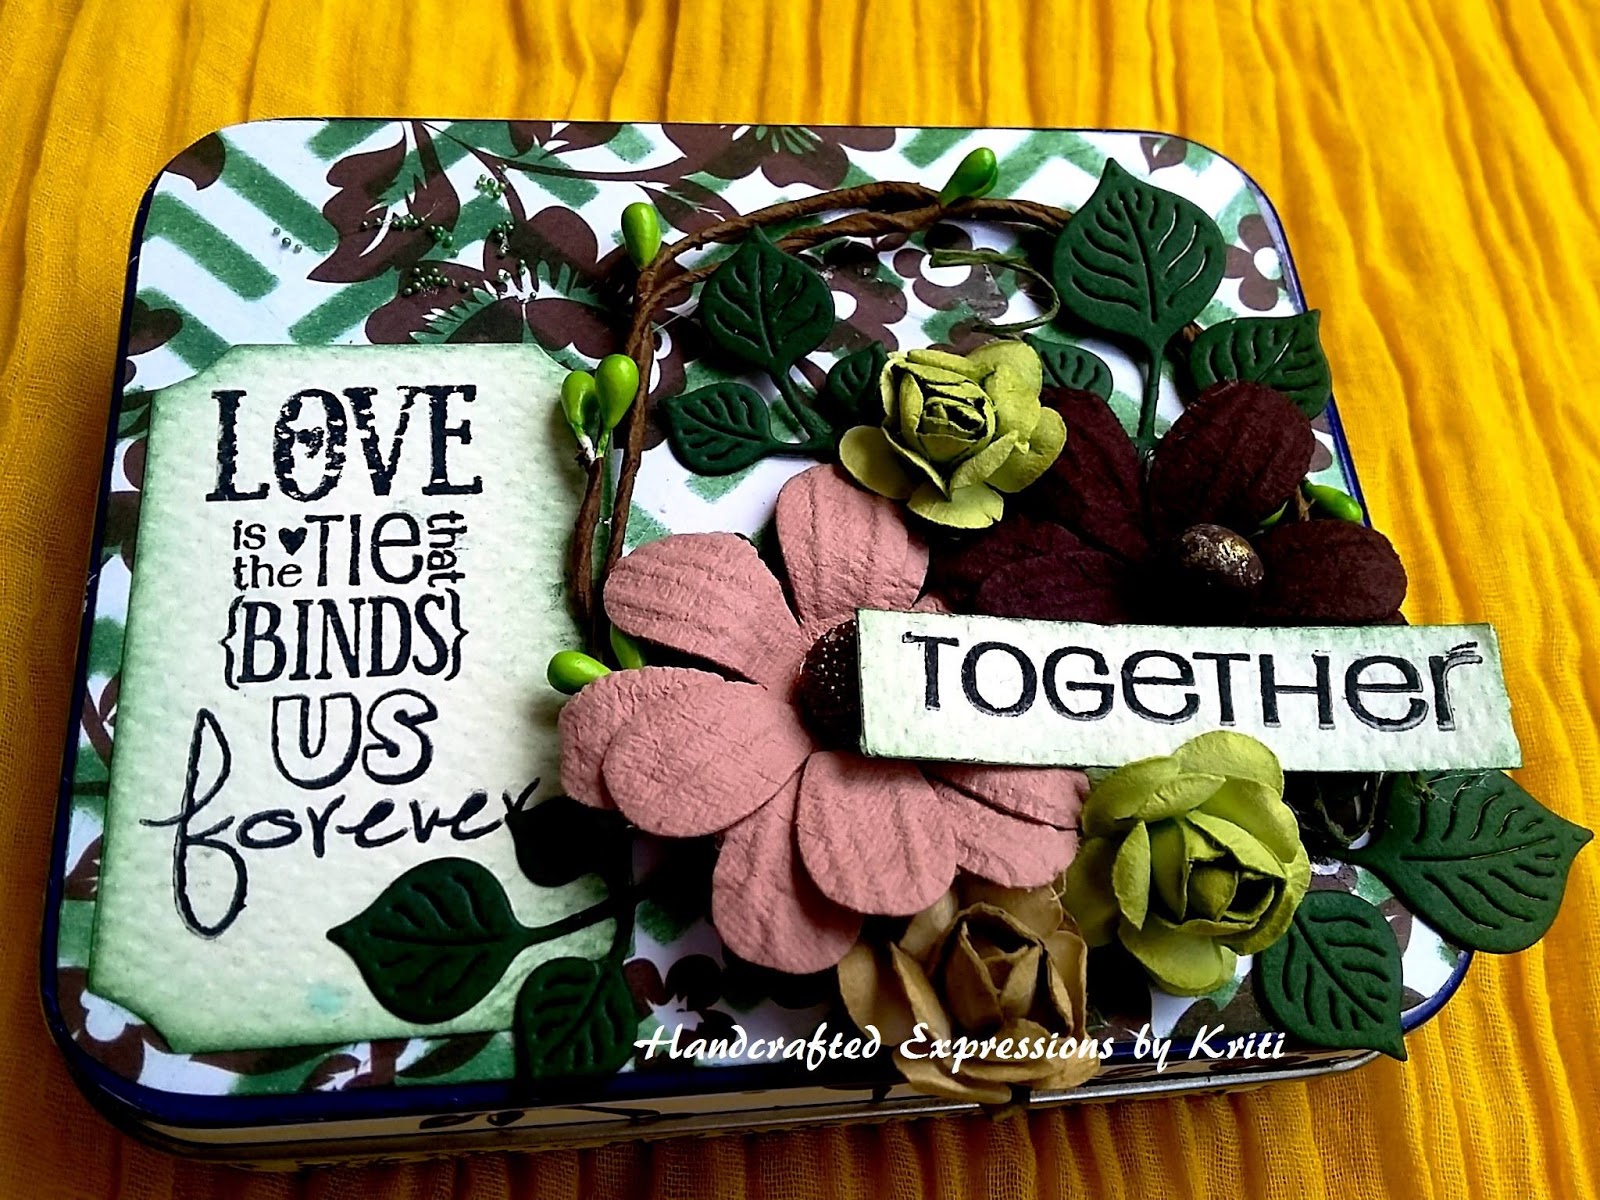
Next, let's welcome back


Kriti Mishra


I am Kriti Mishra from Hyderabad, India. I have done Masters in Information Technology, and was an Astt. Prof. at a reputed engineering college. I left my job after my daughter, Akshada, was born, she is 4.5 years old and now I am a full-time mother. She allows me to do some creative work and I can see a good artist in her also. Right from my childhood, I am into crafting, and I always loved making handmade cards. I am more into Scrapbooking and making mini albums(but now exploring Mixed - media and Flower making) and love to use different kinds of pattern papers and embellishments to enhance my creativity and to share some knowledge with other people around. Previously, I used to make simple handmade cards, just to gift them to my loved ones and friends, but when I joined social media, there I saw a huge world of crafting.

And here are some of her works


Next, we have,

Shylaa Shree


I am Shylaashree from India, very happy to be on the Rainbow Craftykari Design team. I live with a beautiful family in a small industrial town in Tamilnadu.Crafting has always been part of my life, however, having a busy family it's confined to late at night when I steal a few hours to myself. Quilling is how it all began in the blog land in the name of Adhiraacreations and it was a turning point in my craft life from where I started into cardmaking, scrapbooking, alter items, 3D projects, fashion & paper jewellery & etc., I don't think I have a particular style, as it has evolved with time.Thank you Maninder for the opportunity. Look forward to the wonderful journey with Rainbow Craftykari team.


Here's a link to her blog- 
http://adhiraacreations.blogspot.in

And here are some of her works


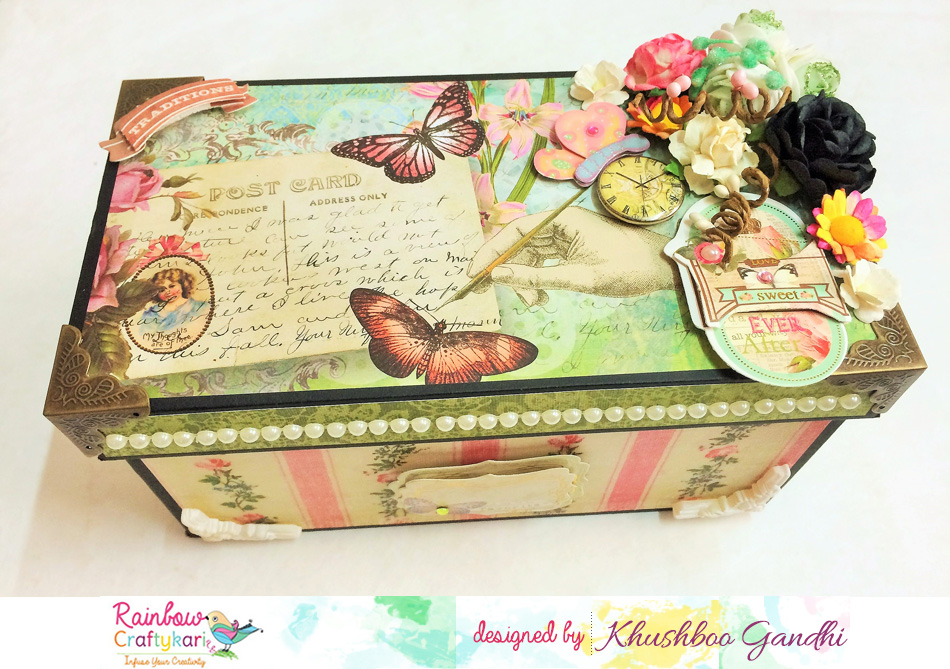
And our last reveal for today, welcoming back,

Mounika Koneru


Hi, I am Mounika from Bangalore, India. I am into handmade things since my childhood. I got into making hand-made gifts for my family and friends. After I got married, I was introduced to paper crafting in Bangalore. I then began my journey in scrapbooks, mixed media, cards and so on. I love to have colours in my projects. 


Here's a link to her blog- http://craftdrama19.blogspot.in/?m=1

And here are some of her works


Stay Tuned for our Day 2 DT reveal!!

Thursday 30 March 2017

Vintage Mini Album by DT Nikkita

Hello Everyone,

Hope you all are doing good.

This is Nikkita Today. Crafters, what do you do to preserve your memories, like we often click photographs, get them framed or make an album. How about making your on scrapbook album to give a handmade touch to your beautiful memories. Today I'm going to inspire you with a Vintage Mini album, so that all you can try easily and gift to your loved ones or preserve memories of your life.
Here we go


Instructions:

Step 1 - Take 2 pieces of chipboard measuring 6 by 6 inches for the base and for the spine take 2.5 by 6 inches. Cover it like book using cardstock and tacky tape.


Step 2 - For the closure take two ribbons and stick them in the middle and cover the whole chipboard using cardstock.


Step 3 - For the pages I used hidden hinge binding system and I have left a gap of 1/2'' between every hinge.

Made 6 pages total,

Page size measures 5.75 by 5.75''

Made 6 pockets measuring 5.5 by 5.5''.


Step 4 - Cut pattern paper as per your choice and distress it with distress ink vintage photo to give a complete look.

I use tacky tape/tacky glue for sticking my pattern paper.


Step 5 - To Decorate Cover, i simply used a Leather paper which is locally available in my near stationery store, I adhered MDF Cut Out, Die cuts, Mulberry Flowers and Resin Charm to give an Vintage look. 


Step 6: Decorate the inside pages as per your choice.  


Tip: When you'll adhere MDF cutout, let it sit for few time to get it adhere with base strongly. I've used Aleene's Tacky Glue


Here are the Close ups 


 Hope you guys liked it.


Materials used-

Emphera collection from Papericious,

Resin embellishments,

Die cut embellishments,

Mulberry flowers,

Metal corners,

Stamp sentiments,

Die cuts,

Satin Ribbon,

Border punch out from Ek success,

Brown Leather paper.


All materials are available at the Rainbow Craftykari Store and you can also get them on pre order.


Regards,

Nikkita
https://www.facebook.com/bloomingcraftskolkata/


Wednesday 29 March 2017

Floral Vintage Box Inspiration by GDT Khushboo Gandhi

Heyloo guys! I'm so excited to be here! This is my first ever post for Rainbow Craftykari Blog and I'm extremely thankful to Maninder for this amazing opportunity.


For my Inspiration post this time around, I have a plain chipboard box that I altered and transformed into a completely elegant and floral keepsake box. We can find tons of posts on 'how to construct boxes and albums' all over the web, but it's equally important to focus on 'how to embellish' something. And so, for my post, I'll be highlighting certain features of 'how to decorate a box with a cohesive theme' + certain distress ink techniques to get a vintagey and bright look (for both the outside and the inside of the box). 


I had so much fun embellishing this box. It's so amazing that crafting is such a versatile art - we can create whatever we want, and decorate it the way we want to.


Brief Steps for 'How To Embellish A Box/Project':

1. First of all, decide what theme you'd like to go with - floral, vintage, fun, eccentric, classy, monochrome, etc. It could be any one, or a mix of a couple of themes together. For this box, I've chosen a Floral theme with a Vintage backdrop.


2. The trick (to be able to work well during your embellishing stage) is to gather all your supplies that resonate with your theme - floral/vintage pattern papers, flowers, box corners, metal embellishments, pearls, inks, fillers, etc.


3. Decide what pattern papers go well with each other, try and determine which design would go better for the top and the sides, the inside of the box and the outside. Contrasting your design papers and colour combinations is one of the strongest points in embellishing your project.


4. I went with an intricately designed paper for the top (since it's the first thing anyone notices) and I used simple designed pattern papers for everything else. 


5. I cut all the papers 1/4th inch less than the size of my box and went ahead and stuck everything in it's right place (leaving 1/8th space all over). The effect that you get when the background cardstock peeps through that 1/8th inch is absolutely enchanting!


6. I then added my metal box corners to the lid, some pearl trims, and loads of flowers on one end of the lid. I also added a clock embellie with some stickers, especially the one that said 'Traditions'.


7. For the front of the box, I added a 3d sticker on which you can write your name or a message. I also added some resin corners.


8. For the inside of the box, I contrasted it and kept it really simple (since the outside is so full of life and heavily decorated). 


Some Distress Ink Techniques to get you going on that beautiful Vintage look:

1. If you notice, all of my pattern papers on the outside of the box have an aged, brownish, vintagey look. To achieve that, I simply used an ink applicator with Tim Holtz' Distress Ink (Tea Dye) on my papers, moving it in different directions (circular, random, straight).

2. Since papers age/become yellowy/brownish in random places over the years, the idea is to replicate that look with random strokes of inks - so that our paper looks as naturally 'vintaged' as possible.

3. For the inside of the box, I used Picked Raspberry for the bottom and Peacock Feathers for the sides (keeping the contrasting colours in mind). I tried to create a vignette using these colours that I applied on all 4 corners of the paper in a circular motion.


Supplies used:

Tim Holtz Distress Inks

Kirby Teesdale Studio Paper Pack

Pearl Trims

Resin embellishments

Flowers

Metal box corners

Papericious clock sticker

3d stickers

Glue


You can find all the above mentioned supplies at the Rainbow Craftykari Store or you can pre-order them by sending an email at rainbowcraftykari@live.com

I hope I was able to inspire and motivate you enough to go try your hands on embellishing a project today. Don't forget to share your pictures!

Warm Regards
Khushboo Gandhi