Showing posts with label Box Card. Show all posts
Showing posts with label Box Card. Show all posts
Wednesday, 6 September 2017
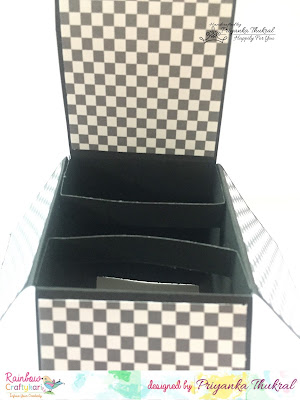
Pop-Up Box Card Tutorial by DT Priyanka
Hello Everyone,
Step 4:
Step5:
Step6:
Materials Used: 1. Black Card stock 2. Clearly Besotted Stamp set 3. Versa ink onyx3. Patterned Papers ( from the stash) 4. Tim Holtz Distress inks
Priyanka ThukralWednesday, 12 July 2017
Box Card Tutorial By DT Nikkita Jain
Hello crafty peeps,
Nikkita Here, I am back again with another tutorial and it's a shadow box card.
So here is the project with step by step instructions and pictures.
- First, take a cardstock of 300 gsm and cut into respective sizes (11"x 6.5" and 6.5" x 8").
- Score the 11" x 6.5" piece at 5" and 6"
- Score the 6.5" x 8" piece at 1/2" and 1.25". Flip and score the same way on all four sides and sniff off the corners as shown in the picture
Create the shadow box using tacky tape or any strong adhesive and keep it aside.
- To make the base strong add layers of cardstock on both sides measuring 6.25* 4.75 on both sides
- Add ribbon as shown for the box closure
- Stick to the shadow box.
- Decorate the box as per your choice , I have made the box as a baby shower gift for a mom to be and used papericious mom to be collection, I have fussy cut the elements and made embellishments, to give a 3D look to the embellishments I have added double sided foam tape at back of the elements. Complete the box as shown in the picture and the pretty gift box is ready.
- Note - always take the pattern paper little smaller than the base for example if the box cover is 5*6.5 inches then pattern paper should be 4.75 * 6.25.
Some close capture:
Hope you enjoyed this tutorial!
Materials Used:
Cardstock 300GSM
Papericious Mom to Be Paper Pack
Tacky Tape
Tim Holtz Scissors
Double Sided Foam Tape
Mulberry Flowers
Die cuts from my stash
Above mentioned materials are available at Rainbow Craftykari Store or You can Pre-Order by sending mail at rainbowcraftykari@gmail.com
Warm Regards
Nikkita Sethi
Labels:
Box Card,
DT Nikkita,
DT Post,
Rainbow Craftykari,
Tutorial
Monday, 9 January 2017
Valentine Box Card Tutorial By Guest DT Pavitra
Bonjour Crafters,
A very lovely Welcome and a warm Good Morning in this cold winter.
Today in our Teaching and Learning Program, we have Guest DT Pavitra with her stunning Valentine box card, so friends get ready to learn this and surprise your loved one this Valentine.
Over to you Pavitra,
A very lovely Welcome and a warm Good Morning in this cold winter.
Today in our Teaching and Learning Program, we have Guest DT Pavitra with her stunning Valentine box card, so friends get ready to learn this and surprise your loved one this Valentine.
Over to you Pavitra,
Hello my dear friends!
I'm Pavitra and today I will be
sharing a box card with you all. Valentine is approaching in the coming month
and I choose the theme of love for my project...
So let’s get startd
For the base of the box I used white
cardstock (12 by 12 inch) and scored it at 4 and 8 inch both horizontally and
vertically.

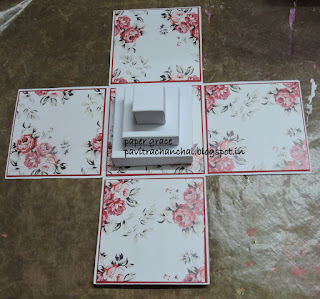
Cut out the squares (4 x 4inch) from
all the four sides as shown in below picture.
Thank you so much. Hope you enjoy the tutorial.
Sigma cardstock from Papericious
Papericious pattern paper
Spellbinder flower play die
Archival ink – carnation red, saffron, cobalt
Distress clear rock candy glitter.
Distress ink – walnut stain.

In order to make it more sturdy I layered red cardstock (3 ¾
by 3 ¾ inch) on the base white cardstock (4 inch by 4 inch) with the help of
tacky glue.
Next I pasted the pattern paper (3 ½
by 3 ½ inch) on all the sides front and back both.
For the top of the box I score 6 ¼ by
6 ¼ white card stock at 1 inch – 4 ¼ inch – 1 inch both vertically and
horizontally as shown in below picture.
After that I cut the sides and pasted
the ends with glue as shown in below picture.
In the centre of the box I thought of
imitating a cake so for that I made three squares of size –
3 X 3 inch
2 x 2 inch
1 x 1 inch
And stack on top of each other, and
once dried properly centred it on the base of card as shown in below picture.
For the closer of the box I used a
metallic lock and also placed metallic corners on all the four sides with
brads. On the top of the box I added a frame, bottles and a clock.
On the back side of the box I added a
metal embellishment and a sentiment.
Here’s the box after all the metal
embellishments are placed.
Nothing can emotes, love better than
flowers and that’s why to finish my project I created handmade flowers. I first
die-cut the Papericious sigma cardstock with spellbinder die and then colored the
petals with carnation red archival color from inside to outside with the help
of a dauber as shown in below picture. For one medium flower I used 2 small, 2
medium and 3 large petals.
I embossed the petals from outside to
inside, cupping the petals towards center as shown in below picture.
After
that I inserted pollen in the center of the petal and cupped the petals in the
form of a bud as shown in below picture. For the bud I used two small petals.
Next I inverted the third layer of
petal on a foam pad and shaped it with clay tool as shown in below picture and
pasted it on the bud with the help of tacky glue.
Added the remaining layers of the petals in the same
way to finish my flower. For the filler flowers I used archival ink cobalt and
archival ink saffron, both the flowers are also embossed in the same way from
outside to inside, cupping the petals towards center. For some shine and
sparkle I applied distress clear rock candy glitter on the flowers
For the leaves I used distress ink peeled
paint and pine needle. For the top of the cake I used papericious heart chippie
cut-out and heat embossed it with gold embossing powder.
Finally
I layered my flowers and leaves with silicon glue and here is the finished
project.
Some more close up,
Thank you so much. Hope you enjoy the tutorial.
Keep crafting and take care. Below is
the list of supplies used:-
White
cardstock
Red
cardstockSigma cardstock from Papericious
Papericious pattern paper
Spellbinder flower play die
Archival ink – carnation red, saffron, cobalt
Distress clear rock candy glitter.
Distress ink – walnut stain.
Papericious Heart Chippie 6"x6"
Above listed Materials are available at Rainbow Craftykari Store or you can pre-order.
Regards,
Pavitra
Labels:
Box Card,
Crafting,
Explosion Box,
Glitters,
Handcrafted Box,
Handmade Flowers,
Love,
Papercrafting,
Pavitra,
Rainbow Craftykari,
Teaching and Learning program,
Tutorial,
Valentine
Subscribe to:
Comments (Atom)


