Showing posts with label Love. Show all posts

Monday, 4 September 2017

Love- Photo Frame by DT Mounika

Hello everyone,

I am Mounika and I am so happy to be on Rainbow Craftykari Blog with my Inspiration Post.


Everyone loves to treasure memories in a special way, and if those memories are with our kids they are all the more special! To treasure such special memories with my son who will turn 3 this August, I  made this frame.


To begin with, using Papericious black gesso I primed the frame. I then traced down the shape of the frame on a piece of pattern papers and cut it. I have used the Aazealian paper stack from Papericious's latest collection. I then stuck down the pattern paper and cut down the extras. To add some texture I used a bubble stencil with texture paste. Once it was dry I took small pattern papers and roughly arranged them. Once I was happy with the arrangement, I glued everything down. For the embellishments, I used a chipboard heart coloured using blue and yellow chalk paint. On the yellow hearts, I added glitter.


The main focal flower was made using Heartfelt Creations Arianna Blooms stamp and then shaped, the "love" sentiment embellishment was coloured using Prima Art Alchemy waxes. I used the same on the frame as well to highlight the texture at places. 


Here are some close ups:


Materials used:

  • MDF frame
  • Papericious- Black Gesso
  • Papericious- Aazealian Paper Pack
  • Chipboard elements
  • Prima Art Alchemy Waxes
  • Fine Glitter
  • Mulberry flowers
  • Fillers
  • White glue
  • Chalk paints
  • Bubble stencil
  • Texture paste
  • Brushes
  • Microbeads
  • MDF embellishments


All the products used available at the Rainbow Craftykari store or you can  pre-order them by sending an e-mail at rainbowcraftykari@gmail.com

Don't forget to participate in our ongoing challenge. Link your projects here.

Hope you're inspired to create!


Happy crafting
Mounika

Friday, 20 January 2017

Shabby Chic Layout By Guest DT Sunila and Aditi

Bonjour Crafters

We’re back with an inspirational post and our third project for Rainbow Craftykari! What a delight :)

Today we’re here to inspire you with a shabby chic layout and with Valentine’s day nearing, we though love would be a fabulous theme to work with!

What is shabby chic? Shabby chic (/ˈʃæb.iˈʃiːk/) is a form of interior design where furniture and furnishings are either chosen for their appearance of age and signs of wear and tear or where new items are distressed to achieve the appearance of an antique. When incorporated in art and craft its as simple as creating something that appears worn off, old, faded and distressed. Pastel colours (pinks, blues, white) are the go to colours in this style.

Here is the Layout we have created for this one


For this layout we chose one 12x12 sheet with a pastel pink and floral elements as our base. We picked various sizes of pattern papers for our layering. If you notice this layout is a three picture layout- one big and two small. We assembled our papers and photos and made rough marks once happy with the arrangement. We then made cut marks on the top right and bottom left of the page, tore it and folded it like draping it. We distressed all our edges with distress inks. In the peep through places, we added another piece of paper underneath. We mounted our base piece onto white cardstock. We distressed the edges of all our paper pieces and photos for the vintage look. We then chose our chipboard pieces, painted them gold and added them onto our layout, some above and some peeking from beneath a picture. We added some texture using modelling paste and a stencil around our arrangement. Once content we adhered everything down in place. We then adhered a few flowers going with our layout.

Its Pastel, Its Subtle and Its Romantic


Products used:
Papericious Paper Stacks- Infinity and Ephemera
Papericious Chippies- The Wedding Theme, and Hearts
Photos off the internet
Flowers
Mont Marte Modelling Paste
Finnabair Dots and Lines Stencils
Distress Ink- Vintage Photo and blending tool
Gold acrylic paint
Fevicol
Two sided tape
Scissors

Above listed Materials are available at Rainbow Craftykari Store or you can pre-order.
Regards,
Sunila & Aditi

Monday, 9 January 2017

Valentine Box Card Tutorial By Guest DT Pavitra

Bonjour Crafters,
A very lovely Welcome and a warm Good Morning in this cold winter.

Today in our Teaching and Learning Program, we have Guest DT Pavitra with her stunning Valentine box card, so friends get ready to learn this and surprise your loved one this Valentine.


Over to you Pavitra,

Hello my dear friends!

I'm Pavitra and today I will be sharing a box card with you all. Valentine is approaching in the coming month and I choose the theme of love for my project...

So let’s get startd

For the base of the box I used white cardstock (12 by 12 inch) and scored it at 4 and 8 inch both horizontally and vertically.


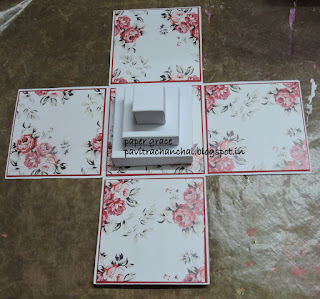
Cut out the squares (4 x 4inch) from all the four sides as shown in below picture.


In order to make it more sturdy I layered red cardstock (3 ¾ by 3 ¾ inch) on the base white cardstock (4 inch by 4 inch) with the help of tacky glue.


Next I pasted the pattern paper (3 ½ by 3 ½ inch) on all the sides front and back both.

For the top of the box I score 6 ¼ by 6 ¼ white card stock at 1 inch – 4 ¼ inch – 1 inch both vertically and horizontally as shown in below picture.


After that I cut the sides and pasted the ends with glue as shown in below picture.


In the centre of the box I thought of imitating a cake so for that I made three squares of size –

3 X 3 inch

2 x 2 inch

1 x 1 inch

And stack on top of each other, and once dried properly centred it on the base of card as shown in below picture.


For the closer of the box I used a metallic lock and also placed metallic corners on all the four sides with brads. On the top of the box I added a frame, bottles and a clock.


On the back side of the box I added a metal embellishment and a sentiment.


Here’s the box after all the metal embellishments are placed.


Nothing can emotes, love better than flowers and that’s why to finish my project I created handmade flowers. I first die-cut the Papericious sigma cardstock with spellbinder die and then colored the petals with carnation red archival color from inside to outside with the help of a dauber as shown in below picture. For one medium flower I used 2 small, 2 medium and 3 large petals.


I embossed the petals from outside to inside, cupping the petals towards center as shown in below picture.


After that I inserted pollen in the center of the petal and cupped the petals in the form of a bud as shown in below picture. For the bud I used two small petals.

Next I inverted the third layer of petal on a foam pad and shaped it with clay tool as shown in below picture and pasted it on the bud with the help of tacky glue.


Added  the remaining layers of the petals in the same way to finish my flower. For the filler flowers I used archival ink cobalt and archival ink saffron, both the flowers are also embossed in the same way from outside to inside, cupping the petals towards center. For some shine and sparkle I applied distress clear rock candy glitter on the flowers

For the leaves I used distress ink peeled paint and pine needle. For the top of the cake I used papericious heart chippie cut-out and heat embossed it with gold embossing powder.


Finally I layered my flowers and leaves with silicon glue and here is the finished project.


Some more close up,


Thank you so much. Hope you enjoy the tutorial.

Keep crafting and take care. Below is the list of supplies used:-

White cardstock
Red cardstock
Sigma cardstock from Papericious
Papericious pattern paper
Spellbinder flower play die
Archival ink – carnation red, saffron, cobalt
Distress clear rock candy glitter.
Distress ink – walnut stain.
Papericious Heart Chippie 6"x6"

Above listed Materials are available at Rainbow Craftykari Store or you can pre-order.


Regards,
Pavitra