Showing posts with label Eno Greetings Paper pack. Show all posts

Tuesday, 14 November 2017

Photofolio Tutorial by DT Mounika

Hello Everyone,


Mounika Here, I'm here to share a tutorial on my latest creation a Photofolio. Photofolio is a great way store many photos together .


So let's start....


1.To make the cover of the album, cut three pieces of 7"*7" & two pieces of 1"*7" black chipboard.


2. Cut a coloured cardstock measuring 25"*9 1/4". Arrange the black chipboard pieces as shown in the picture below on the cardstock. Adjust and stick them. Cut the corner and fold the flaps inside, crease and fold the album.


3. For the inner flaps on the left side, take two 6.5'*6.5" black cardstock & two pieces of 6 3/4 "*6 3/4 " and on the 6 3/4" pieces score at 1/8"one larger and one shorter end & fold the scored 1\8th side and apply glue. Stick 6.5"cardstock on top of the scored and folded side of 6 3\4" cardstock to form a pocket insert.


4. For the hinge of the album, take  2.5"*6 3/4" strip and on 2' side score at 3\4 and 1 1\4  in the middle and fold. Add the pocket flaps to this hinge using glue.


5. To make the insert on the right side of the album, take a cardstock sized 5.5"*12", score at 5 1/4" & 6 1/4" and fold on scored lines. Apply glue on the hinge formed in the middle of the cardstock and stick directly to hinge on album.


6. For the side pocket on right flap of album, cut cardstock measuring 5"*12", on the 12" side score at 1.5" & 6" respectively and fold. Cut a small notch on 1.5" strip, apply glue and stick at the edge of the flap.


7. To make a diagonal insert on left flap of the album, cut 5"*6" cardstock and cut diagonally , score 1/8" on both sides and fold and glue. Note: Before glueing,  stick desired pattern paper on background.


8. For the middle flap of the album cut two piece of 5"*6.5", score at 6" on the longer side on one piece & fold. On another piece score1/4" on three sides, fold and glue.


9. Before starting with pattern paper  choose how you want to close your album you can use ribbons to tie or a magnetic closure .


10. For inserts in the pocket envelopes cut two pieces of black cardstock measuring 6"*6" & one piece of each 5"*5",6"*5.5",6"*4".


11. Finally, decorate the folio with your chosen pattern papers, die cuts, sentiments and embellishments.


12. For the cover of the album, I choose two pattern papers one of size 7"*7" & another of 6.5"*6.5". I layered one on top of the other. I then coloured my Chipboard sentiment with blue chalk paint and distressed with picked raspberry distress ink. I added some glitter. Finally, I added some flowers  to complete the look.


Materials used

  • Black cardstock
  • Black chipboard
  • Eno greetings pattern papers
  • Mdf chipboard embellishments
  • Mulberry flowers
  • Coloured cardstock
  • White glue
  • Rainbowcraftykari neodymium magnets
  • Diecuts and embellishments

All the above-mentioned products are available at the rainbowcraftykari store or you can pre-order them by sending an e-mail at rainbowcraftykari@gmail.com


Hope you all like my project

Mounika

Friday, 18 August 2017

Altered MDF Box by DT Priyanka Thukral

Hello Everyone, :)


I am at Rainbow Craftykari Blog today to share my very first inspiration post as the DT member for Rainbow Craftykari. I am Elated..!! and I hope to stand up to the expectations laid down on me.


Today I have an Altered MDF wooden box to share as a part of my inspiration project.
Altered MDF projects have been my favorites since forever & no wonder I begin my term with one of these.


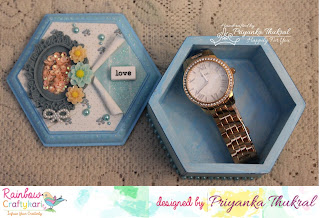
Here is the complete picture of my project


For this project, I picked up a hexagonal MDF box (another current favourite of mine.. :P ) I began with painting the base with gesso which works as a primer (tip: Gesso creates a coat on the base of the wooden material that holds the paint otherwise the wood absorbs the colour).


Next, I painted the box with blue acrylic colour. I chose coordinating patterned papers from Eno Greetings paper pack, cut them to the desired size & distressed them on the edges. For the cover, I cut the paper from one end to the centre point & rolled the two sides on the opposite sides.

On the exposed part of the base, I added glitter using stickles in the coordinating colour & a word tile over it. On the other part, I added a resin oval frame & sequins in the middle of it & adorned it with the resin flowers & bows.
On the sides, I again used stickles in the same colour to give an embossed look (I love how they look like tiny droplets resting on the edge) & added rhinestones to lift up the whole look.

and tada..!! the box is done... :)

The box is perfect to gift a watch to someone or keep it on your dresser as a jewellery box, can be used in multipurpose ways.

Check out some more close up pictures


Supplies Used: 

  • Mdf hexagonal shaped box
  • Gesso by Camel
  • Blue Acrylic paint by Fevicryl
  • Eno Greetings- Pattern Papers
  • Word Tile
  • Resin frame - Oval
  • Resin flowers
  • Bow
  • Stickles(aqua colour)
  • Rhinestones
  • Distress Ink
  • Glossy Accents

Above-mentioned products are available at Rainbow Craftykari store or you can also pre-order by sending an email at rainbowcraftykari@gmail.com

Don't forget to participate in our ongoing challenge Rainbow Friendship. Link your projects here.

Hope you liked my project!


Priyanka Thukral

Monday, 25 July 2016

Guest DT Shikha - Explosion Box Tutorial

Heya Crafters, Happy Monday to Everyone! I'm glad to introduce to one of the truly brilliant artist in a craft community. We always adore her work by sneak peeks of her Characters, which left smile on our face. She is Shikha Mahajan from SM Memory Makers

Over to you Shikha

Hello, crafty friends! Shikha here from Hubli and I am thrilled to be a guest designer this month for Rainbow Craftykari Store. I'm Passionate about art and craft, diy's, upcycling products, doodling, sketching since childhood. I took it as profession and its been 5 years now. I also organize events related to art in my city. Owner of SM Memory Makers, which is all about handmade gifts like cards, scrapbook, scrapboxes, frames and more. Also into merchandising of handmade products. I have my 2 main characters named Amor and Quieo sketched by me which I use as brand ambassadors of SM Memory Makers.

How to make a 2 layers Explosion Box

This is a tutorial which shows how to make a 2 layer explosion box. Explosion box can be custom made to suit different occasions.


Glimpse of the Explosion box:


Since Friendship day is around the corner, I made this Explosion box for the same occasion.

Steps to make  a 2 layers Explosion Box ;

Step 1
Start with a square sheet of cardstock of any desire color which measures 12 by 12 inch. I close black because it makes any color look bright onto it.


Step 2
Score 4 inches and 8 inches horizontally and vertically.


Step 3
Cut out the squares at corners as shown.


This is how it  looks like.

Step 4
Repeat Steps 1, 2 & 3 and make one more such piece for the second layer with 11.5 inches square cardstock. The layers can be of same size as well but I want it to be a little smaller than the first layer.


Step 5
Apply adhesive (I have used fevicol, you can use any adhesive you have) on the center square of the first layer and glue it to the next piece on top.


The base is ready.

Step 6
To make the lid take a black cardstock of 6 1/4 by 6 1/4 inches size, score 1 inch from all the edges and crease them.


Step 7
Make cuts along the creases on all the 4 edges of 1 inch.

Step 8
Apply adhesive on the flap and fold inwards.


Repeat same for all the four corners to complete the lid.

Step 9
Choose pattern papers and stick them. You can choose any pattern papers you like. I'm choosing 3 different floral pattern papers from Paper designer paper pack which goes along with the occasion.


This is how it looks like once we stick these papers to the base.

Step 10
Embellishments to be added.


1 - I chose Teddy bear die cuts from a pattern paper set I brought from a local store and wrote friendship message on them using a marker.
Stamped few sentiments to make more embellishments. (Clear stamp from Heidi swap).

2 - Quote die cut are from collection of die cuts brought from a local store again, a heart pearl, ribbon, a button, 3 pink mulberry flowers, bling to decorate the lid.

3 - For center of the card:
I stamped a sentiment "love our friendship" on pattern die cut for center of the card, added a ribbon to the tag and a little butterfly which goes along with the pattern paper and few pearls brought from local store.
I added few bling and distressed the corner of all the embellishments with Ranger's Mowed Lawn acid free distress ink pad using blending tool. 
I used double sided tape to all the embellishments to give a 3D look.

The complete Explosion Box


This is my take on 2 layers Explosion Box for Friendship Day

Thank you so much for taking out the time to read this tutorial. If you have any question please feel free to leave the comments here.

Regards
Shikha Mahajan
Materaisl used -
Black cardstock - 650 GSM
Fevicol
A pair of scissors
Pattern papers - paper designer from Enogreeting
Heidi swap clear stamp set
Rubber stamp - love our friendship
Friends die cuts
Teddy bear die cuts
Pearls, Ribbons, Bling, Buttons
Mulberry flowers

Products are available at Rainbow Craftykari Store and You can mail them your list of products at rainbowcraftykari@live.com to get your favorite products at best prices!!